
如何在 MacOS 或 Linux 上設置 Amazon AWS CLI(命令行界面)?
已發表: 2019-05-11
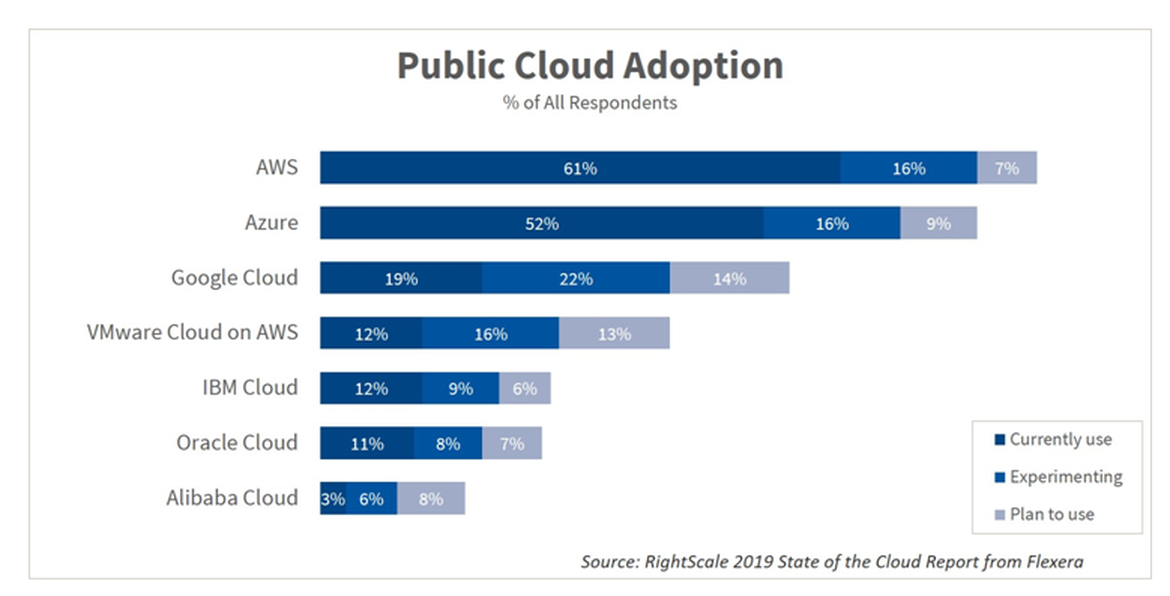
毫無疑問, Amazon AWS是最大的公共雲提供商。 我個人開始為 Crunchify 的少數客戶使用 Amazon AWS,我必須說 AWS 非常靈活。
我使用我的Macbook Pro進行所有的開發活動。 如果您決定為您的項目使用 Amazon AWS 雲,那麼您首先需要安裝 Amazon CLI(命令行界面)來開始自動化您的基本 Amazon AWS 操作。
在本教程中,我們將介紹在 macOS 上安裝Amazon CLI的步驟。
如果您有以下任何問題,那麼您來對地方了:
- 在 mac 上安裝亞馬遜 AWS cli
- AWS CLI 入門 – AWS 命令行界面
- 在 macOS 上安裝、更新和卸載 AWS CLI 版本 1 或 2
- AWS 命令行界面 – 亞馬遜 AWS
- 如何在 Macbook Pro 上安裝 AWS CLI?
- macOS 安裝 Amazon AWS 命令行界面 (CLI) 工具
讓我們開始吧:
我們可以通過兩種方式在 MacOS 上設置 Amazon AWS CLI。
- 選項 1:使用
curl命令 - 選項 2:使用簡單的 Python
pip命令
選項 1:使用 curl 命令
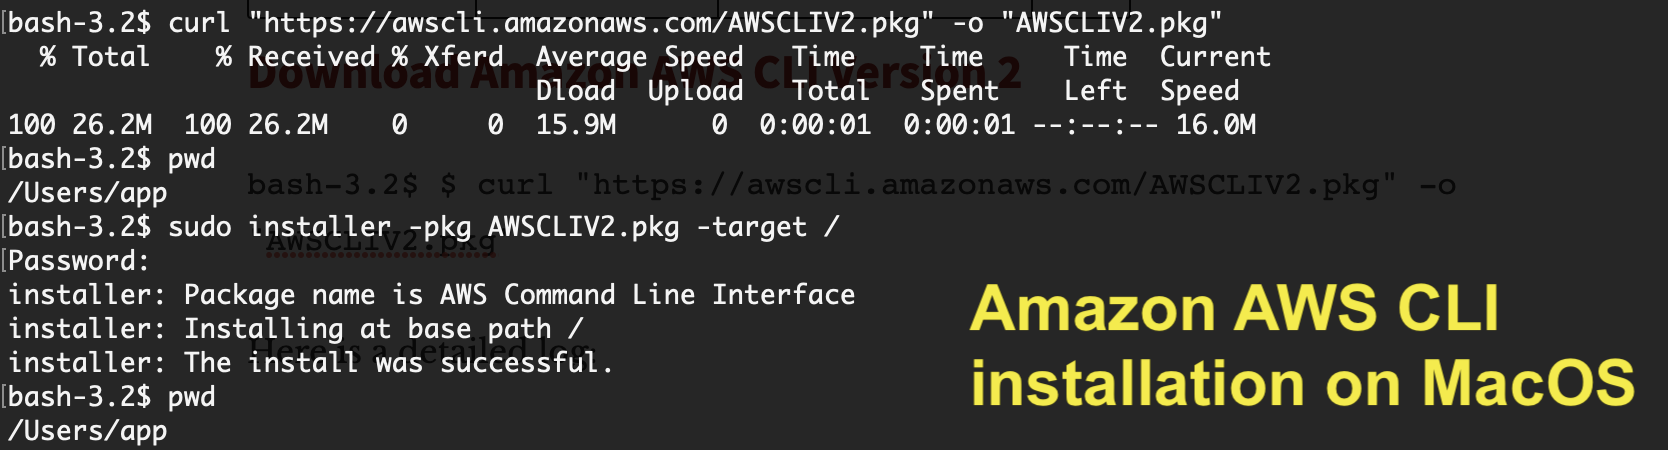
下載 Amazon AWS CLI 版本 2
|
1 |
bash - 3.2 $ $ curl "https://awscli.amazonaws.com/AWSCLIV2.pkg" - o "AWSCLIV2.pkg" |
這是詳細的日誌:
|
1 2 3 4 5 6 |
bash - 3.2 $ $ curl "https://awscli.amazonaws.com/AWSCLIV2.pkg" - o "AWSCLIV2.pkg" bash : $ : command not found bash - 3.2 $ curl "https://awscli.amazonaws.com/AWSCLIV2.pkg" - o "AWSCLIV2.pkg" % Total % Received % Xferd Average Speed Time Time Time Current Dload Upload Total Spent Left Speed 100 26.2M 100 26.2M 0 0 15.9M 0 0 : 00 : 01 0 : 00 : 01 -- : -- : -- 16.0M |
這是將其安裝在文件夾/下的命令
|
1 2 3 4 5 6 7 |
bash - 3.2 $ sudo installer - pkg AWSCLIV2 . pkg - target / Password : installer : Package name is AWS Command Line Interface installer : Installing at base path / installer : The install was successful . |
驗證亞馬遜 AWS 版本:
|
1 2 3 |
bash - 3.2 $ aws -- version aws - cli / 2.4.16 Python / 3.8.8 Darwin / 21.4.0 exe / x86_64 prompt / off |
這是在 MacOS 上安裝 Amazon AWS CLI 的最簡單方法。 如果您在安裝它時遇到任何問題,請告訴我。
選項 2:使用 Python pip 命令
第1步。
檢查您的系統上是否安裝了 python。
|
1 2 |
bash - 3.2 $ python -- version Python 3.7.2 |
如果您沒有看到最新版本的 Python,則只需使用以下命令進行安裝:
|
1 |
bash - 3.2 $ brew install python |
第2步。
下載最新的 Amazon AWS CLI 包。
|
1 2 3 4 |
bash - 3.2 $ curl "https://s3.amazonaws.com/aws-cli/awscli-bundle.zip" - o "awscli-bundle.zip" % Total % Received % Xferd Average Speed Time Time Time Current Dload Upload Total Spent Left Speed 100 11.1M 100 11.1M 0 0 5598k 0 0 : 00 : 02 0 : 00 : 02 -- : -- : -- 5600k |
步驟 3。
解壓縮awscli-bundle.zip 。
|
1 2 3 4 5 6 7 8 9 10 11 12 13 14 15 16 17 18 19 20 21 22 23 24 |
bash - 3.2 $ unzip awscli - bundle . zip Archive : awscli - bundle . zip replace awscli - bundle / install ? [ y ] es , [ n ] o , [ A ] ll , [ N ] one , [ r ] ename : A inflating : awscli - bundle / install inflating : awscli - bundle / packages / botocore - 1.12.145.tar.gz inflating : awscli - bundle / packages / futures - 3.2.0.tar.gz inflating : awscli - bundle / packages / docutils - 0.14.tar.gz inflating : awscli - bundle / packages / virtualenv - 15.1.0.tar.gz inflating : awscli - bundle / packages / urllib3 - 1.22.tar.gz inflating : awscli - bundle / packages / rsa - 3.4.2.tar.gz inflating : awscli - bundle / packages / urllib3 - 1.24.3.tar.gz inflating : awscli - bundle / packages / ordereddict - 1.1.tar.gz inflating : awscli - bundle / packages / simplejson - 3.3.0.tar.gz inflating : awscli - bundle / packages / s3transfer - 0.2.0.tar.gz inflating : awscli - bundle / packages / python - dateutil - 2.6.1.tar.gz inflating : awscli - bundle / packages / jmespath - 0.9.4.tar.gz inflating : awscli - bundle / packages / PyYAML - 3.13.tar.gz inflating : awscli - bundle / packages / argparse - 1.2.1.tar.gz inflating : awscli - bundle / packages / pyasn1 - 0.4.5.tar.gz inflating : awscli - bundle / packages / colorama - 0.3.9.tar.gz inflating : awscli - bundle / packages / python - dateutil - 2.8.0.tar.gz inflating : awscli - bundle / packages / awscli - 1.16.155.tar.gz inflating : awscli - bundle / packages / six - 1.12.0.tar.gz inflating : awscli - bundle / packages / setup / setuptools_scm - 1.15.7.tar.gz |
第四步。
作為sudoer運行安裝程序。
|
1 2 3 4 5 6 7 8 |
bash - 3.2 $ sudo . / awscli - bundle / install - i / usr / local / aws - b / usr / local / bin / aws Password : Running cmd : / usr / bin / python virtualenv . py -- no - download -- python / usr / bin / python / usr / local / aws Running cmd : / usr / local / aws / bin / pip install -- no - cache - dir -- no - index -- find - links file : ///Users/crunchify/Documents/ansible/awscli-bundle/packages/setup setuptools_scm-1.15.7.tar.gz Running cmd : / usr / local / aws / bin / pip install -- no - cache - dir -- no - index -- find - links file : ///Users/crunchify/Documents/ansible/awscli-bundle/packages awscli-1.16.155.tar.gz Symlink already exists : / usr / local / bin / aws Removing symlink . You can now run : / usr / local / bin / aws -- version |
步驟 5。
核實。 如何檢查 Amazon CLI 是否安裝成功?
|
1 2 |
bash - 3.2 $ aws -- version aws - cli / 1.16.155 Python / 2.7.10 Darwin / 18.5.0 botocore / 1.12.145 |
而已。 你都準備好了。 Amazon CLI is successfully installed now 。
設置亞馬遜 AWS 控制台和 AWS CLI:
- 轉到:
https://console.aws.amazon.com/iam/home?#/users://console.aws.amazon.com/iam/home?#/users - 創建用戶
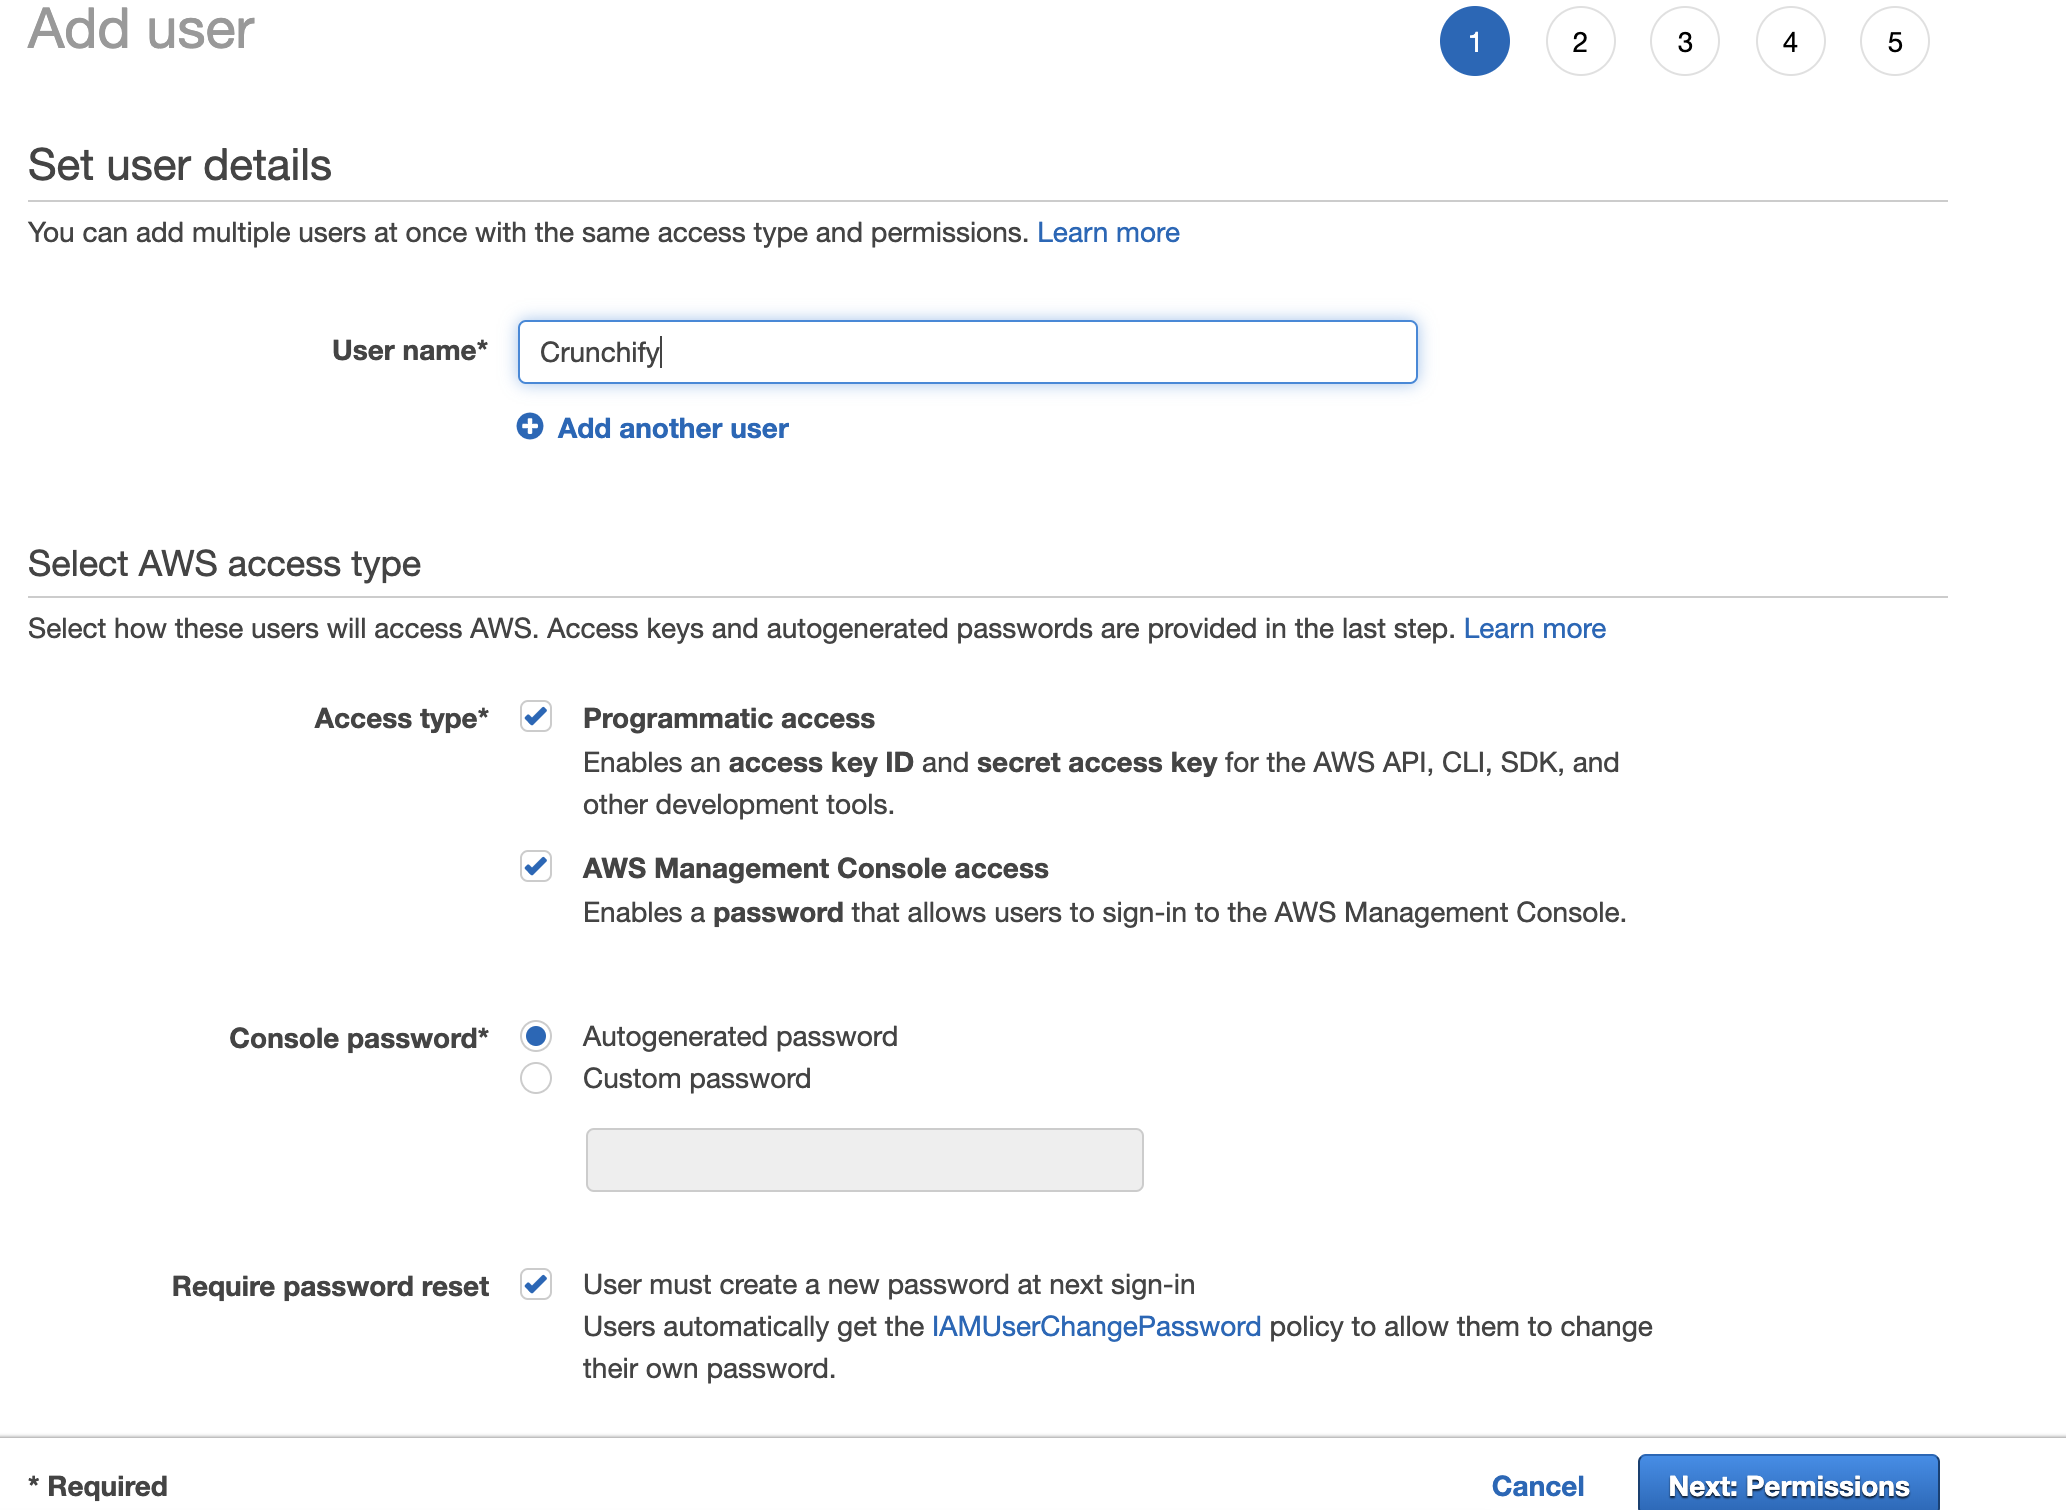
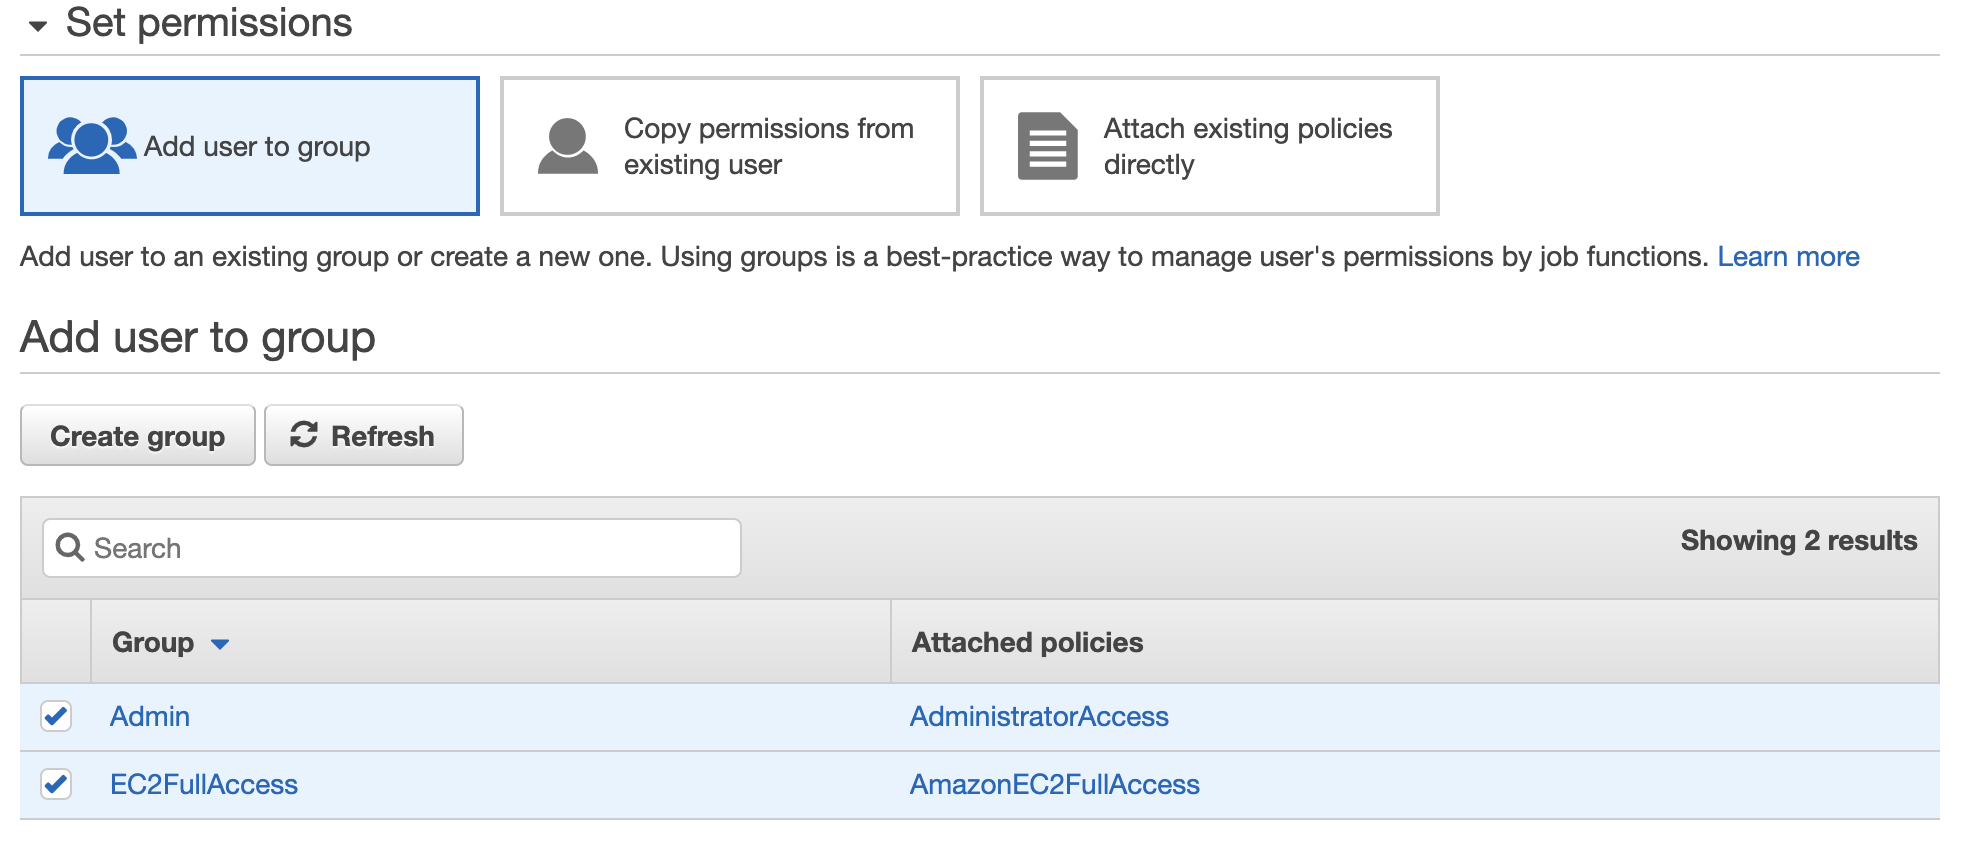
設置權限
下載 Amazon AWS 訪問密鑰 ID、秘密訪問密鑰

只需鍵入aws configure命令。 輸入您的亞馬遜訪問密鑰 ID 和秘密訪問密鑰。
|
1 2 3 4 5 |
bash - 3.2 $ aws configure AWS Access Key ID [ **************** QTOR ] : AWS Secret Access Key [ **************** 4taa ] : Default region name [ us - east - 2 ] : Default output format [ json ] : |
你都準備好了。 您已成功設置 Amazon AWS CLI。
運行您的第一個 Amazon AWS CLI 命令:

正如您在上面看到的,我確實有one Amazon EC2 instance啟動並運行,使用describe-instances命令獲取有關實例的所有詳細信息。
bash-3.2$ aws ec2 describe-instances
|
1 2 3 4 5 6 7 8 9 10 11 12 13 14 15 16 17 18 19 20 21 22 23 24 25 26 27 28 29 30 31 32 33 34 35 36 37 38 39 40 41 42 43 44 45 46 47 48 49 50 51 52 53 54 55 56 57 58 59 60 61 62 63 64 65 66 67 68 69 70 71 72 73 74 75 76 77 78 79 80 81 82 83 84 85 86 87 88 89 90 91 92 93 94 95 96 97 98 99 100 101 102 103 104 105 106 107 108 109 110 111 112 113 114 115 116 117 118 119 120 121 122 123 124 125 126 127 128 129 130 131 132 133 134 135 136 137 138 139 140 141 142 143 144 145 146 147 148 149 150 151 152 153 154 155 156 157 158 159 160 161 162 163 164 165 166 167 |
{ "Reservations" : [ { "Instances" : [ { "Monitoring" : { "State" : "disabled" } , "PublicDnsName" : "" , "StateReason" : { "Message" : "Client.UserInitiatedShutdown: User initiated shutdown" , "Code" : "Client.UserInitiatedShutdown" } , "State" : { "Code" : 48 , "Name" : "terminated" } , "EbsOptimized" : false , "LaunchTime" : "2019-05-09T12:33:20.000Z" , "ProductCodes" : [ ] , "CpuOptions" : { "CoreCount" : 1 , "ThreadsPerCore" : 1 } , "StateTransitionReason" : "User initiated (2019-05-10 15:33:23 GMT)" , "InstanceId" : "i-02f2a6661658d3ef2" , "EnaSupport" : true , "ImageId" : "ami-06088b0de148c2bac" , "PrivateDnsName" : "" , "KeyName" : "crunchify" , "SecurityGroups" : [ ] , "ClientToken" : "" , "InstanceType" : "t2.micro" , "CapacityReservationSpecification" : { "CapacityReservationPreference" : "open" } , "NetworkInterfaces" : [ ] , "Placement" : { "Tenancy" : "default" , "GroupName" : "" , "AvailabilityZone" : "us-east-2a" } , "Hypervisor" : "xen" , "BlockDeviceMappings" : [ ] , "Architecture" : "x86_64" , "RootDeviceType" : "ebs" , "RootDeviceName" : "/dev/sda1" , "VirtualizationType" : "hvm" , "Tags" : [ { "Value" : "worker" , "Key" : "Name" } ] , "HibernationOptions" : { "Configured" : false } , "AmiLaunchIndex" : 0 } , { "Monitoring" : { "State" : "disabled" } , "PublicDnsName" : "ec2-18-188-240-188.us-east-2.compute.amazonaws.com" , "State" : { "Code" : 16 , "Name" : "running" } , "EbsOptimized" : false , "LaunchTime" : "2019-05-09T12:33:20.000Z" , "PublicIpAddress" : "18.188.240.188" , "PrivateIpAddress" : "172.31.1.223" , "ProductCodes" : [ ] , "VpcId" : "vpc-8b4655e3" , "CpuOptions" : { "CoreCount" : 1 , "ThreadsPerCore" : 1 } , "StateTransitionReason" : "" , "InstanceId" : "i-0e19bc4bb04173c6a" , "EnaSupport" : true , "ImageId" : "ami-06088b0de148c2bac" , "PrivateDnsName" : "ip-172-31-1-223.us-east-2.compute.internal" , "KeyName" : "crunchify" , "SecurityGroups" : [ { "GroupName" : "launch-wizard-4" , "GroupId" : "sg-06bd2ee5d14e38797" } ] , "ClientToken" : "" , "SubnetId" : "subnet-c2447faa" , "InstanceType" : "t2.micro" , "CapacityReservationSpecification" : { "CapacityReservationPreference" : "open" } , "NetworkInterfaces" : [ { "Status" : "in-use" , "MacAddress" : "02:e4:a8:93:ad:56" , "SourceDestCheck" : true , "VpcId" : "vpc-8b4655e3" , "Description" : "" , "NetworkInterfaceId" : "eni-0b57a08339236e849" , "PrivateIpAddresses" : [ { "PrivateDnsName" : "ip-172-31-1-223.us-east-2.compute.internal" , "PrivateIpAddress" : "172.31.1.223" , "Primary" : true , "Association" : { "PublicIp" : "18.188.240.188" , "PublicDnsName" : "ec2-18-188-240-188.us-east-2.compute.amazonaws.com" , "IpOwnerId" : "amazon" } } ] , "PrivateDnsName" : "ip-172-31-1-223.us-east-2.compute.internal" , "InterfaceType" : "interface" , "Attachment" : { "Status" : "attached" , "DeviceIndex" : 0 , "DeleteOnTermination" : true , "AttachmentId" : "eni-attach-06cb447cd085d5818" , "AttachTime" : "2019-05-09T12:33:20.000Z" } , "Groups" : [ { "GroupName" : "launch-wizard-4" , "GroupId" : "sg-06bd2ee5d14e38797" } ] , "Ipv6Addresses" : [ ] , "OwnerId" : "600038600370" , "PrivateIpAddress" : "172.31.1.223" , "SubnetId" : "subnet-c2447faa" , "Association" : { "PublicIp" : "18.188.240.188" , "PublicDnsName" : "ec2-18-188-240-188.us-east-2.compute.amazonaws.com" , "IpOwnerId" : "amazon" } } ] , "SourceDestCheck" : true , "Placement" : { "Tenancy" : "default" , "GroupName" : "" , "AvailabilityZone" : "us-east-2a" } , "Hypervisor" : "xen" , "BlockDeviceMappings" : [ { "DeviceName" : "/dev/sda1" , "Ebs" : { "Status" : "attached" , "DeleteOnTermination" : true , "VolumeId" : "vol-077e7eb58ca59daea" , "AttachTime" : "2019-05-09T12:33:20.000Z" } } ] , "Architecture" : "x86_64" , "RootDeviceType" : "ebs" , "RootDeviceName" : "/dev/sda1" , "VirtualizationType" : "hvm" , "Tags" : [ { "Value" : "Crunchify" , "Key" : "Name" } ] , "HibernationOptions" : { "Configured" : false } , "AmiLaunchIndex" : 1 } ] , "ReservationId" : "r-00163c475d0a29a3d" , "Groups" : [ ] , "OwnerId" : "600038600370" } ] } |
就是這樣。 你都準備好了。 您已成功執行以下所有任務:

- 安裝亞馬遜 AWS CLI
- 設置亞馬遜 AWS CLI
- 執行你的第一個命令並得到結果
如果您在運行 AWS AWS CLI 命令時遇到任何問題,請告訴我。