
Comment configurer Amazon AWS CLI (interface de ligne de commande) sur MacOS ou Linux ?
Publié: 2019-05-11
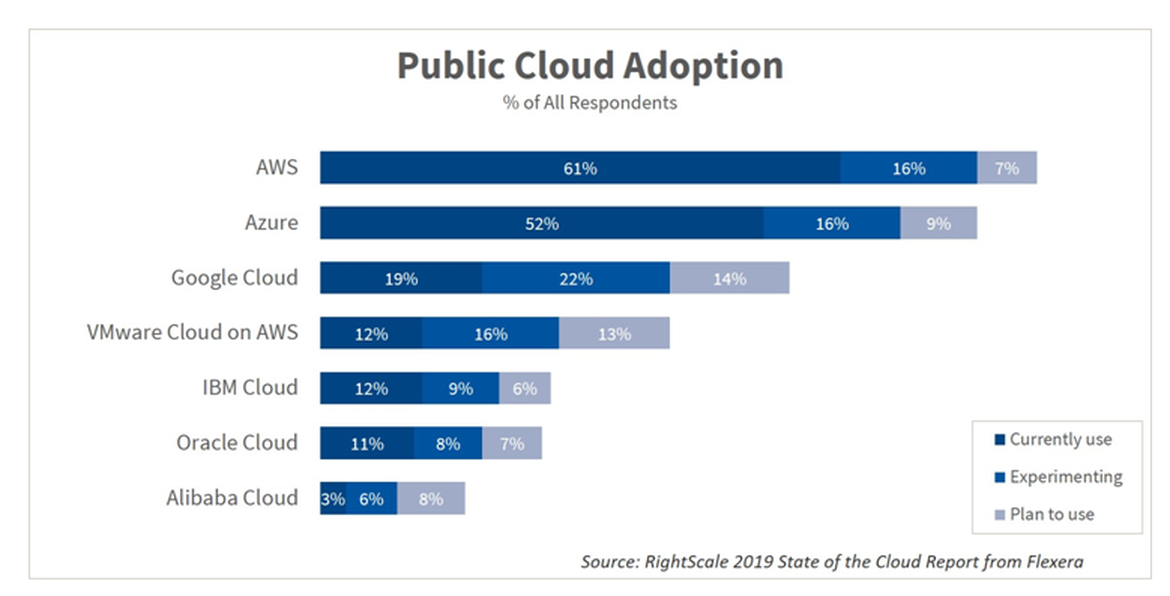
Il ne fait aucun doute Amazon AWS est le plus grand fournisseur de cloud public sur le marché. J'ai personnellement commencé à jouer avec Amazon AWS pour quelques clients de Crunchify et je dois dire qu'AWS est si flexible.
J'utilise mon Macbook Pro pour toutes mes activités de développement. Si vous décidez d'utiliser le cloud Amazon AWS pour votre projet, la première chose dont vous avez besoin est d'installer Amazon CLI (interface de ligne de commande) pour commencer à automatiser vos opérations Amazon AWS de base.
Dans ce didacticiel, nous passerons en revue les étapes d'installation d' Amazon CLI sur macOS.
Si vous avez l'une des questions ci-dessous, vous êtes au bon endroit :
- Installer amazon AWS cli sur mac
- Premiers pas avec l'AWS CLI – Interface de ligne de commande AWS
- Installer, mettre à jour et désinstaller l'AWS CLI version 1 ou 2 sur macOS
- Interface de ligne de commande AWS – Amazon AWS
- Comment installer AWS CLI sur Macbook Pro ?
- macOS installer l'outil d'interface de ligne de commande (CLI) Amazon AWS
Commençons:
Il existe deux façons de configurer Amazon AWS CLI sur MacOS.
- Option-1 : Utilisation de la commande
curl - Option-2 : Utilisation de la simple commande Python
pip
Option-1 : Utilisation de la commande curl
Télécharger la version 2 de l'interface de ligne de commande Amazon AWS
|
1 |
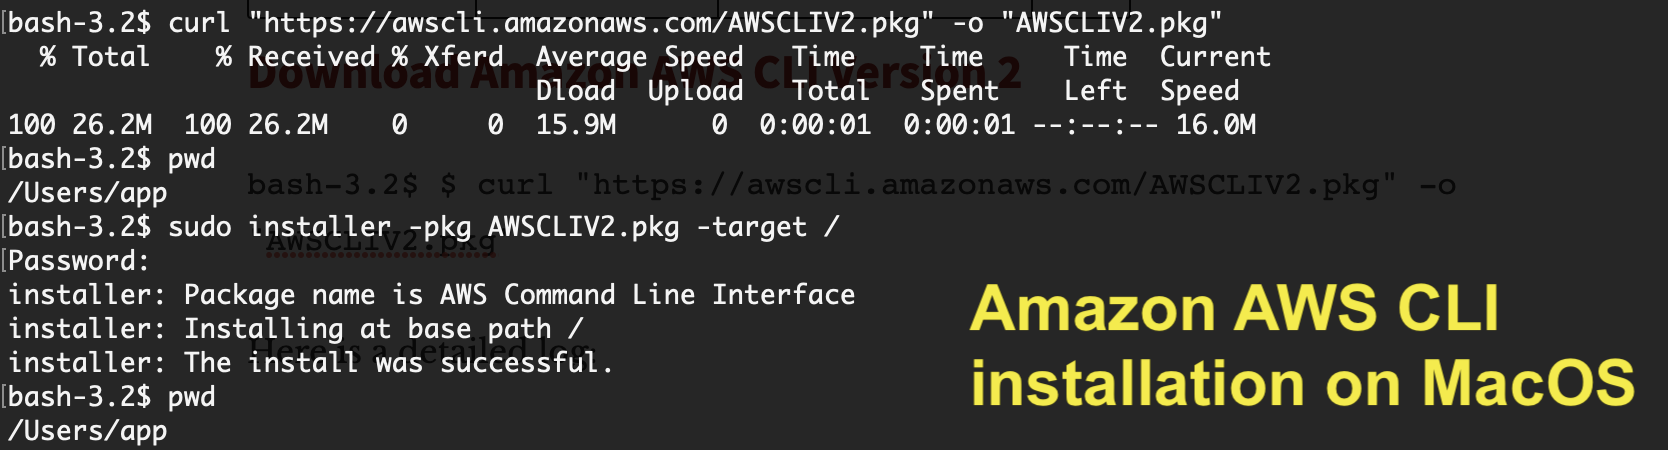
bash - 3.2 $ $ curl "https://awscli.amazonaws.com/AWSCLIV2.pkg" - o "AWSCLIV2.pkg" |
Voici un journal détaillé :
|
1 2 3 4 5 6 |
bash - 3.2 $ $ curl "https://awscli.amazonaws.com/AWSCLIV2.pkg" - o "AWSCLIV2.pkg" bash : $ : command not found bash - 3.2 $ curl "https://awscli.amazonaws.com/AWSCLIV2.pkg" - o "AWSCLIV2.pkg" % Total % Received % Xferd Average Speed Time Time Time Current Dload Upload Total Spent Left Speed 100 26.2M 100 26.2M 0 0 15.9M 0 0 : 00 : 01 0 : 00 : 01 -- : -- : -- 16.0M |
Voici une commande pour l'installer sous le dossier /
|
1 2 3 4 5 6 7 |
bash - 3.2 $ sudo installer - pkg AWSCLIV2 . pkg - target / Password : installer : Package name is AWS Command Line Interface installer : Installing at base path / installer : The install was successful . |
Vérifiez la version d'Amazon AWS :
|
1 2 3 |
bash - 3.2 $ aws -- version aws - cli / 2.4.16 Python / 3.8.8 Darwin / 21.4.0 exe / x86_64 prompt / off |
C'est le moyen le plus simple d'installer Amazon AWS CLI sur MacOS. Faites-moi savoir si vous rencontrez un problème pour l'installer.
Option 2 : Utilisation de la commande Python pip
Étape 1.
Vérifiez que Python est installé sur votre système.
|
1 2 |
bash - 3.2 $ python -- version Python 3.7.2 |
Si vous ne voyez pas la dernière version de Python, installez-la simplement à l'aide de la commande ci-dessous :
|
1 |
bash - 3.2 $ brew install python |
Étape 2.
Téléchargez le dernier bundle Amazon AWS CLI.
|
1 2 3 4 |
bash - 3.2 $ curl "https://s3.amazonaws.com/aws-cli/awscli-bundle.zip" - o "awscli-bundle.zip" % Total % Received % Xferd Average Speed Time Time Time Current Dload Upload Total Spent Left Speed 100 11.1M 100 11.1M 0 0 5598k 0 0 : 00 : 02 0 : 00 : 02 -- : -- : -- 5600k |
Étape 3.
Décompressez awscli-bundle.zip .
|
1 2 3 4 5 6 7 8 9 10 11 12 13 14 15 16 17 18 19 20 21 22 23 24 |
bash - 3.2 $ unzip awscli - bundle . zip Archive : awscli - bundle . zip replace awscli - bundle / install ? [ y ] es , [ n ] o , [ A ] ll , [ N ] one , [ r ] ename : A inflating : awscli - bundle / install inflating : awscli - bundle / packages / botocore - 1.12.145.tar.gz inflating : awscli - bundle / packages / futures - 3.2.0.tar.gz inflating : awscli - bundle / packages / docutils - 0.14.tar.gz inflating : awscli - bundle / packages / virtualenv - 15.1.0.tar.gz inflating : awscli - bundle / packages / urllib3 - 1.22.tar.gz inflating : awscli - bundle / packages / rsa - 3.4.2.tar.gz inflating : awscli - bundle / packages / urllib3 - 1.24.3.tar.gz inflating : awscli - bundle / packages / ordereddict - 1.1.tar.gz inflating : awscli - bundle / packages / simplejson - 3.3.0.tar.gz inflating : awscli - bundle / packages / s3transfer - 0.2.0.tar.gz inflating : awscli - bundle / packages / python - dateutil - 2.6.1.tar.gz inflating : awscli - bundle / packages / jmespath - 0.9.4.tar.gz inflating : awscli - bundle / packages / PyYAML - 3.13.tar.gz inflating : awscli - bundle / packages / argparse - 1.2.1.tar.gz inflating : awscli - bundle / packages / pyasn1 - 0.4.5.tar.gz inflating : awscli - bundle / packages / colorama - 0.3.9.tar.gz inflating : awscli - bundle / packages / python - dateutil - 2.8.0.tar.gz inflating : awscli - bundle / packages / awscli - 1.16.155.tar.gz inflating : awscli - bundle / packages / six - 1.12.0.tar.gz inflating : awscli - bundle / packages / setup / setuptools_scm - 1.15.7.tar.gz |
Étape 4.
Exécutez le programme d'installation en tant que sudoer .
|
1 2 3 4 5 6 7 8 |
bash - 3.2 $ sudo . / awscli - bundle / install - i / usr / local / aws - b / usr / local / bin / aws Password : Running cmd : / usr / bin / python virtualenv . py -- no - download -- python / usr / bin / python / usr / local / aws Running cmd : / usr / local / aws / bin / pip install -- no - cache - dir -- no - index -- find - links file : ///Users/crunchify/Documents/ansible/awscli-bundle/packages/setup setuptools_scm-1.15.7.tar.gz Running cmd : / usr / local / aws / bin / pip install -- no - cache - dir -- no - index -- find - links file : ///Users/crunchify/Documents/ansible/awscli-bundle/packages awscli-1.16.155.tar.gz Symlink already exists : / usr / local / bin / aws Removing symlink . You can now run : / usr / local / bin / aws -- version |
Étape-5.
Vérifier. Comment vérifier si Amazon CLI est installé avec succès ?
|
1 2 |
bash - 3.2 $ aws -- version aws - cli / 1.16.155 Python / 2.7.10 Darwin / 18.5.0 botocore / 1.12.145 |
C'est ça. Vous êtes prêt. Amazon CLI is successfully installed now .
Configurez la console Amazon AWS et l'interface de ligne de commande AWS :
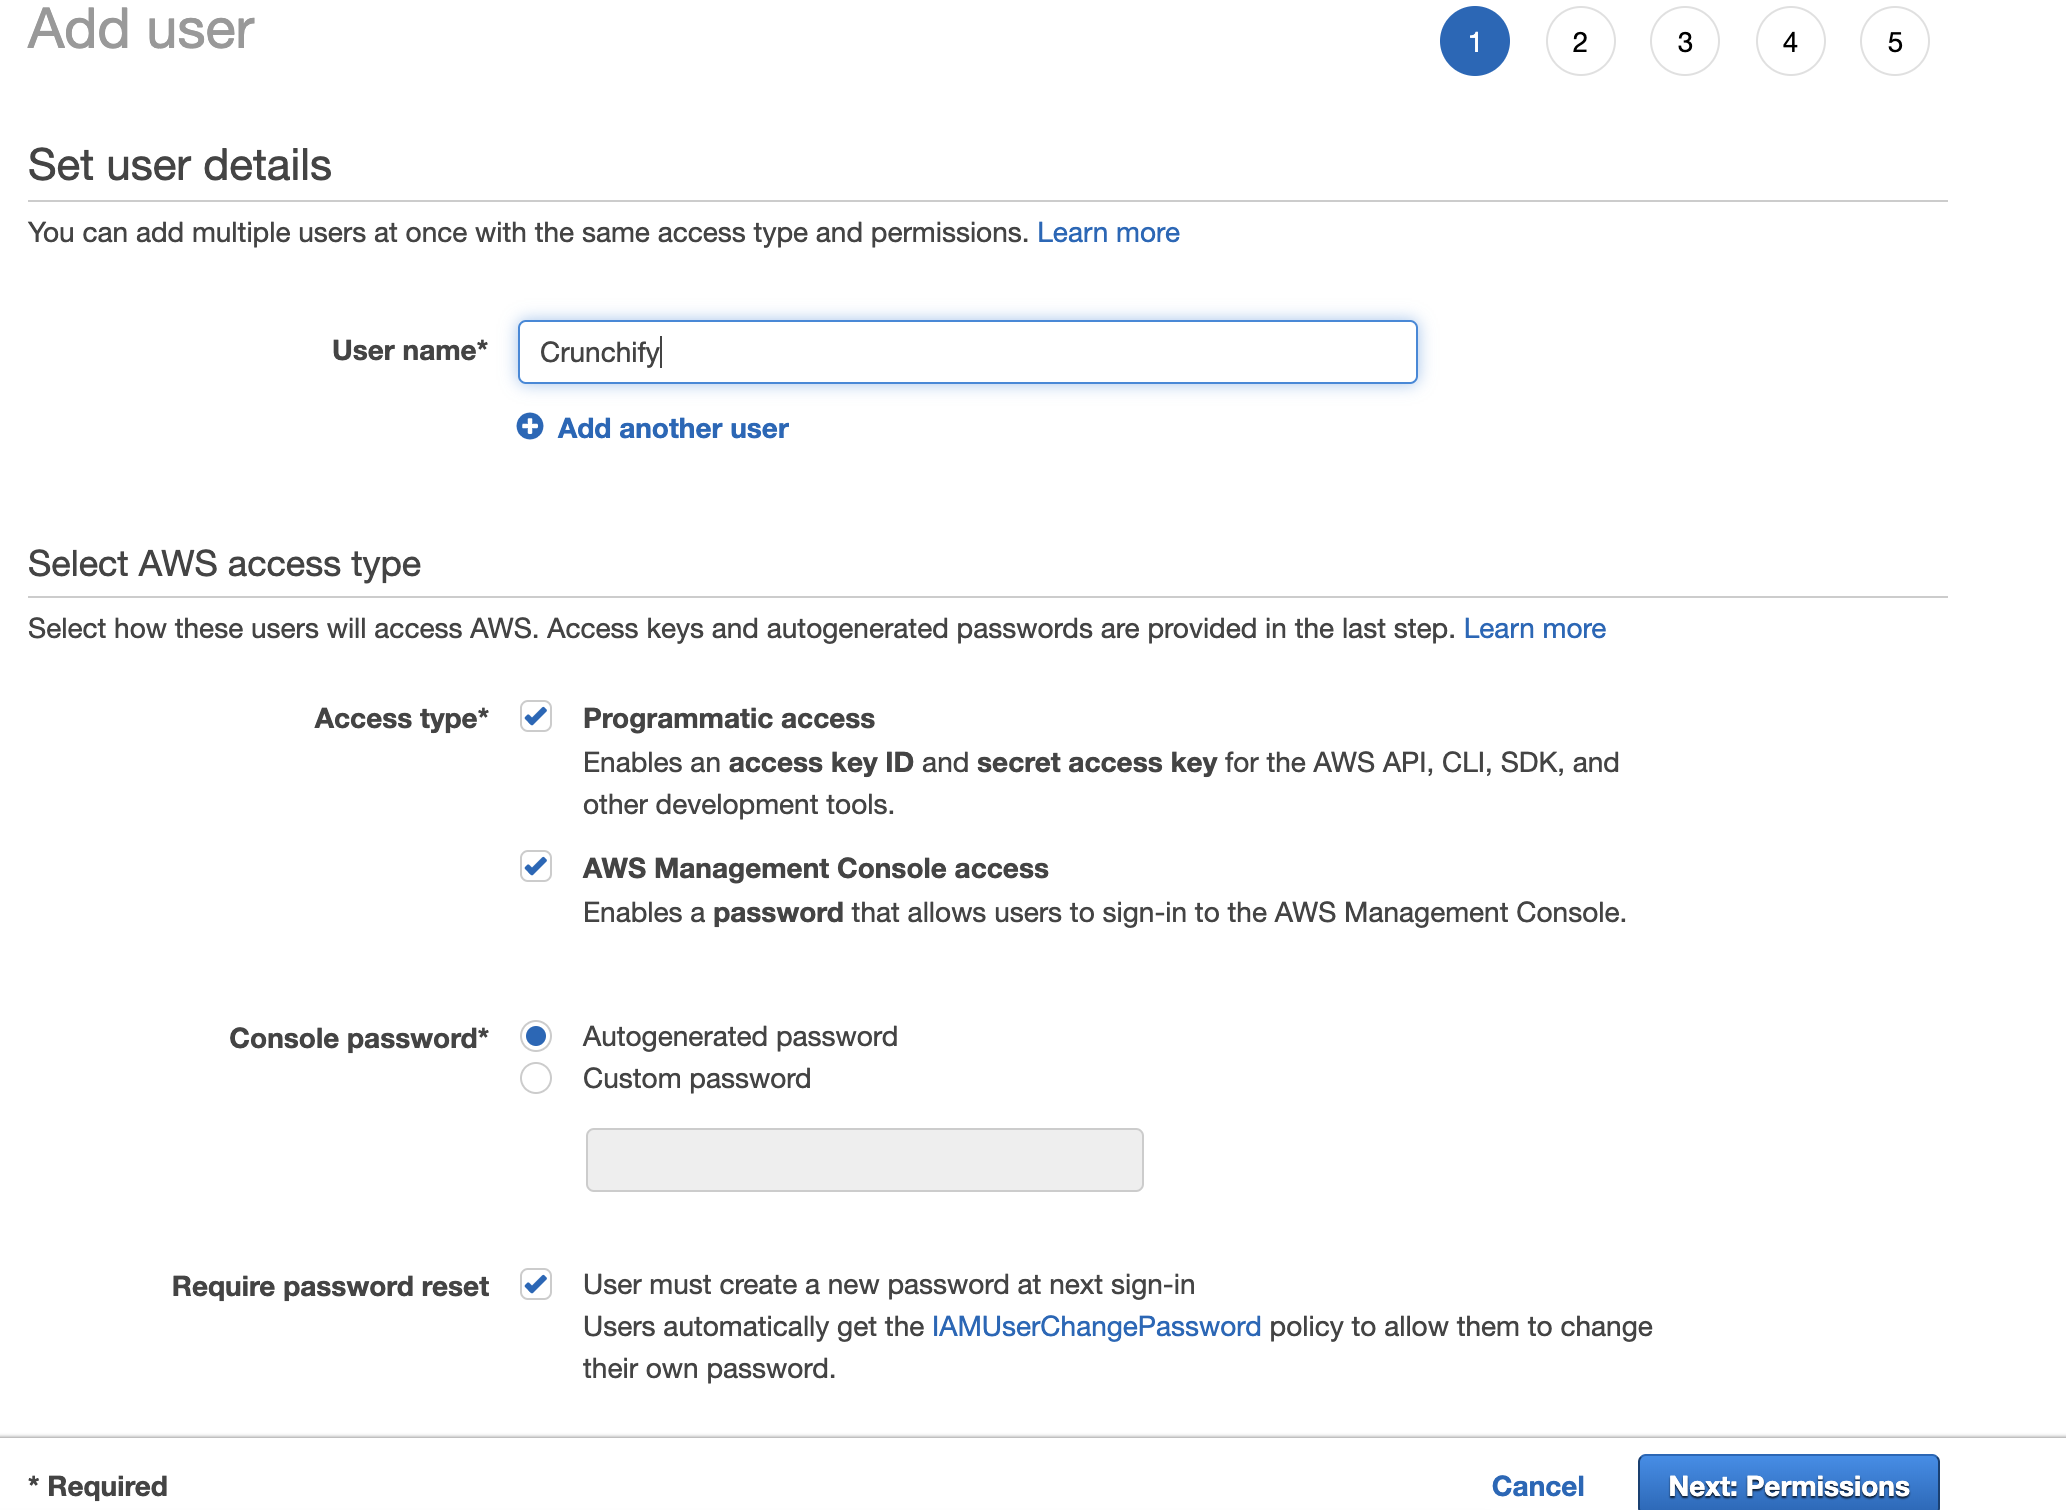
- Accédez à :
https://console.aws.amazon.com/iam/home?#/users - Créer un utilisateur
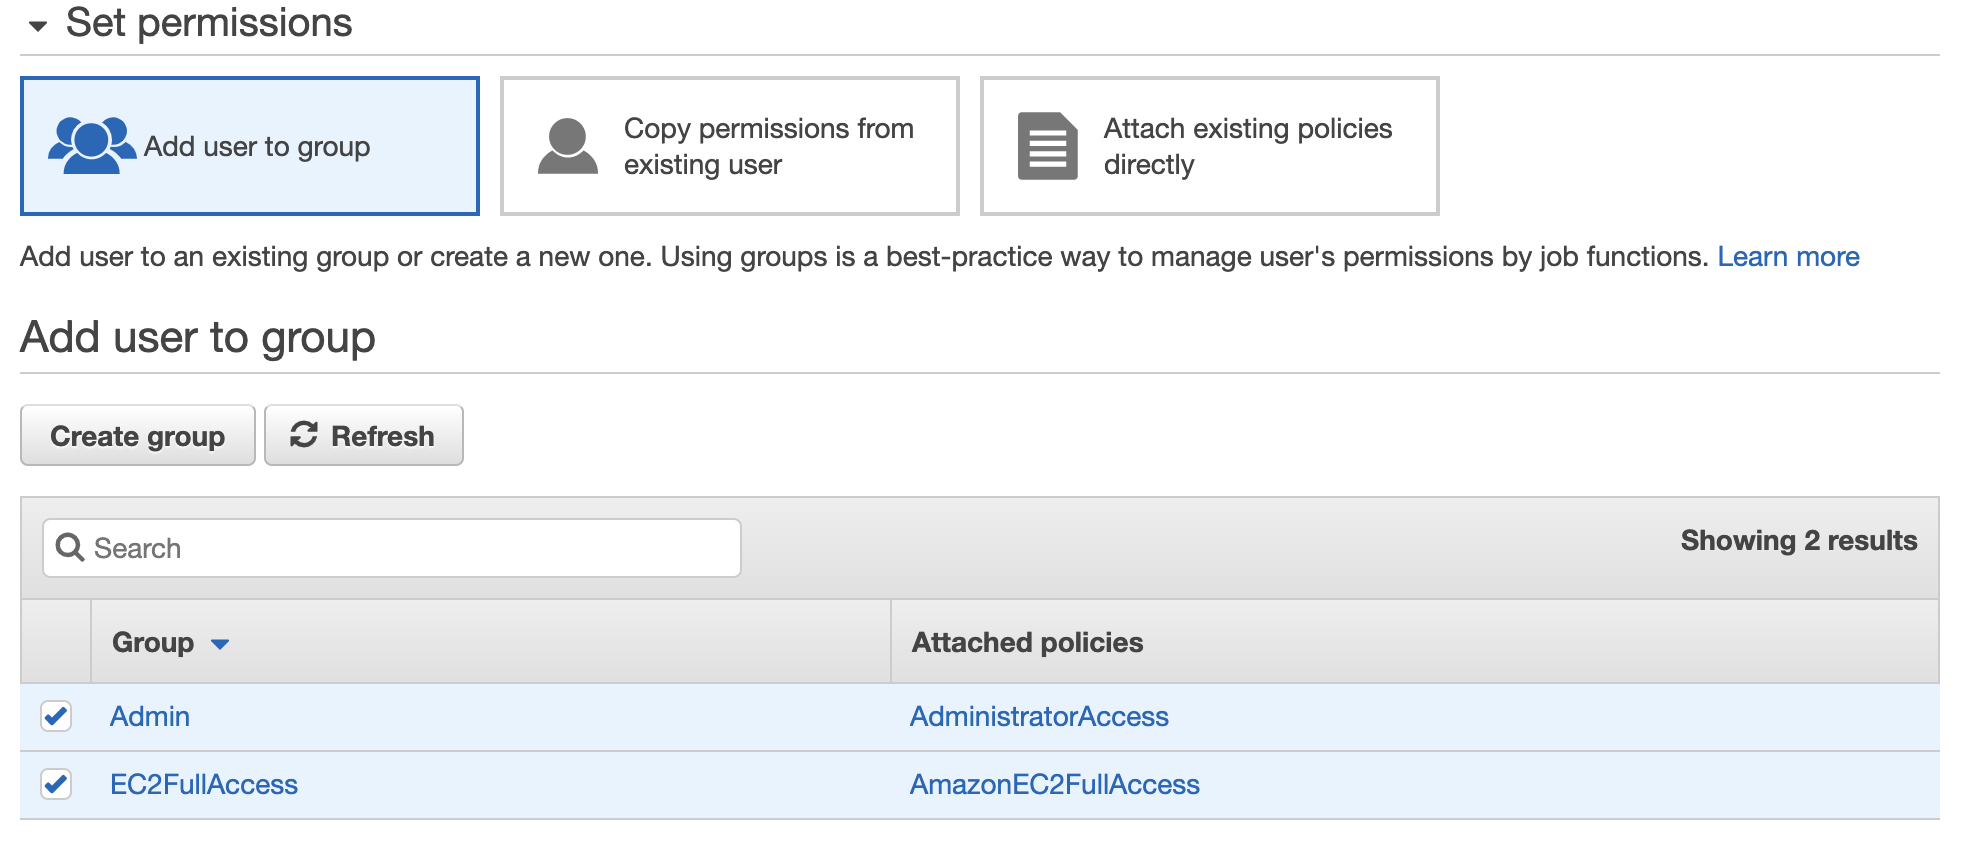
Définir les autorisations
Télécharger l'ID de clé d'accès Amazon AWS, la clé d'accès secrète

Tapez simplement la commande aws configure . Entrez votre ID de clé d'accès Amazon et votre clé d'accès secrète.
|
1 2 3 4 5 |
bash - 3.2 $ aws configure AWS Access Key ID [ **************** QTOR ] : AWS Secret Access Key [ **************** 4taa ] : Default region name [ us - east - 2 ] : Default output format [ json ] : |
Et vous êtes prêt. Vous avez correctement configuré Amazon AWS CLI.
Exécutez votre première commande Amazon AWS CLI :

Comme vous le voyez ci-dessus, j'ai one Amazon EC2 instance en cours d'exécution, utilisez la commande describe-instances pour obtenir tous les détails sur l'instance.
bash-3.2$ aws ec2 describe-instances
|
1 2 3 4 5 6 7 8 9 10 11 12 13 14 15 16 17 18 19 20 21 22 23 24 25 26 27 28 29 30 31 32 33 34 35 36 37 38 39 40 41 42 43 44 45 46 47 48 49 50 51 52 53 54 55 56 57 58 59 60 61 62 63 64 65 66 67 68 69 70 71 72 73 74 75 76 77 78 79 80 81 82 83 84 85 86 87 88 89 90 91 92 93 94 95 96 97 98 99 100 101 102 103 104 105 106 107 108 109 110 111 112 113 114 115 116 117 118 119 120 121 122 123 124 125 126 127 128 129 130 131 132 133 134 135 136 137 138 139 140 141 142 143 144 145 146 147 148 149 150 151 152 153 154 155 156 157 158 159 160 161 162 163 164 165 166 167 |
{ "Reservations" : [ { "Instances" : [ { "Monitoring" : { "State" : "disabled" } , "PublicDnsName" : "" , "StateReason" : { "Message" : "Client.UserInitiatedShutdown: User initiated shutdown" , "Code" : "Client.UserInitiatedShutdown" } , "State" : { "Code" : 48 , "Name" : "terminated" } , "EbsOptimized" : false , "LaunchTime" : "2019-05-09T12:33:20.000Z" , "ProductCodes" : [ ] , "CpuOptions" : { "CoreCount" : 1 , "ThreadsPerCore" : 1 } , "StateTransitionReason" : "User initiated (2019-05-10 15:33:23 GMT)" , "InstanceId" : "i-02f2a6661658d3ef2" , "EnaSupport" : true , "ImageId" : "ami-06088b0de148c2bac" , "PrivateDnsName" : "" , "KeyName" : "crunchify" , "SecurityGroups" : [ ] , "ClientToken" : "" , "InstanceType" : "t2.micro" , "CapacityReservationSpecification" : { "CapacityReservationPreference" : "open" } , "NetworkInterfaces" : [ ] , "Placement" : { "Tenancy" : "default" , "GroupName" : "" , "AvailabilityZone" : "us-east-2a" } , "Hypervisor" : "xen" , "BlockDeviceMappings" : [ ] , "Architecture" : "x86_64" , "RootDeviceType" : "ebs" , "RootDeviceName" : "/dev/sda1" , "VirtualizationType" : "hvm" , "Tags" : [ { "Value" : "worker" , "Key" : "Name" } ] , "HibernationOptions" : { "Configured" : false } , "AmiLaunchIndex" : 0 } , { "Monitoring" : { "State" : "disabled" } , "PublicDnsName" : "ec2-18-188-240-188.us-east-2.compute.amazonaws.com" , "State" : { "Code" : 16 , "Name" : "running" } , "EbsOptimized" : false , "LaunchTime" : "2019-05-09T12:33:20.000Z" , "PublicIpAddress" : "18.188.240.188" , "PrivateIpAddress" : "172.31.1.223" , "ProductCodes" : [ ] , "VpcId" : "vpc-8b4655e3" , "CpuOptions" : { "CoreCount" : 1 , "ThreadsPerCore" : 1 } , "StateTransitionReason" : "" , "InstanceId" : "i-0e19bc4bb04173c6a" , "EnaSupport" : true , "ImageId" : "ami-06088b0de148c2bac" , "PrivateDnsName" : "ip-172-31-1-223.us-east-2.compute.internal" , "KeyName" : "crunchify" , "SecurityGroups" : [ { "GroupName" : "launch-wizard-4" , "GroupId" : "sg-06bd2ee5d14e38797" } ] , "ClientToken" : "" , "SubnetId" : "subnet-c2447faa" , "InstanceType" : "t2.micro" , "CapacityReservationSpecification" : { "CapacityReservationPreference" : "open" } , "NetworkInterfaces" : [ { "Status" : "in-use" , "MacAddress" : "02:e4:a8:93:ad:56" , "SourceDestCheck" : true , "VpcId" : "vpc-8b4655e3" , "Description" : "" , "NetworkInterfaceId" : "eni-0b57a08339236e849" , "PrivateIpAddresses" : [ { "PrivateDnsName" : "ip-172-31-1-223.us-east-2.compute.internal" , "PrivateIpAddress" : "172.31.1.223" , "Primary" : true , "Association" : { "PublicIp" : "18.188.240.188" , "PublicDnsName" : "ec2-18-188-240-188.us-east-2.compute.amazonaws.com" , "IpOwnerId" : "amazon" } } ] , "PrivateDnsName" : "ip-172-31-1-223.us-east-2.compute.internal" , "InterfaceType" : "interface" , "Attachment" : { "Status" : "attached" , "DeviceIndex" : 0 , "DeleteOnTermination" : true , "AttachmentId" : "eni-attach-06cb447cd085d5818" , "AttachTime" : "2019-05-09T12:33:20.000Z" } , "Groups" : [ { "GroupName" : "launch-wizard-4" , "GroupId" : "sg-06bd2ee5d14e38797" } ] , "Ipv6Addresses" : [ ] , "OwnerId" : "600038600370" , "PrivateIpAddress" : "172.31.1.223" , "SubnetId" : "subnet-c2447faa" , "Association" : { "PublicIp" : "18.188.240.188" , "PublicDnsName" : "ec2-18-188-240-188.us-east-2.compute.amazonaws.com" , "IpOwnerId" : "amazon" } } ] , "SourceDestCheck" : true , "Placement" : { "Tenancy" : "default" , "GroupName" : "" , "AvailabilityZone" : "us-east-2a" } , "Hypervisor" : "xen" , "BlockDeviceMappings" : [ { "DeviceName" : "/dev/sda1" , "Ebs" : { "Status" : "attached" , "DeleteOnTermination" : true , "VolumeId" : "vol-077e7eb58ca59daea" , "AttachTime" : "2019-05-09T12:33:20.000Z" } } ] , "Architecture" : "x86_64" , "RootDeviceType" : "ebs" , "RootDeviceName" : "/dev/sda1" , "VirtualizationType" : "hvm" , "Tags" : [ { "Value" : "Crunchify" , "Key" : "Name" } ] , "HibernationOptions" : { "Configured" : false } , "AmiLaunchIndex" : 1 } ] , "ReservationId" : "r-00163c475d0a29a3d" , "Groups" : [ ] , "OwnerId" : "600038600370" } ] } |
Et c'est tout. Vous êtes prêt. Vous avez effectué avec succès toutes les tâches ci-dessous :

- Installer l'interface de ligne de commande Amazon AWS
- Configuration de l'interface de ligne de commande Amazon AWS
- Exécuté votre 1ère commande et obtenu le résultat
Faites-moi savoir si vous rencontrez un problème lors de l'exécution de la commande AWS AWS CLI.