
Come configurare Amazon AWS CLI (Command Line Interface) su MacOS o Linux?
Pubblicato: 2019-05-11
Non c'è dubbio che Amazon AWS sia il più grande provider di cloud pubblico in circolazione. Personalmente ho iniziato a giocare con Amazon AWS per alcuni dei clienti di Crunchify e devo dire che AWS è così flessibile.
Uso il mio Macbook Pro per tutte le mie attività di sviluppo. Se decidi di utilizzare Amazon AWS Cloud per il tuo progetto, la prima cosa di cui hai bisogno è installare Amazon CLI (Command Line Interface) per iniziare ad automatizzare le operazioni di base di Amazon AWS.
In questo tutorial esamineremo i passaggi per installare Amazon CLI su macOS.
Se hai una delle seguenti domande, sei nel posto giusto:
- Installa Amazon AWS cli su mac
- Iniziare con l'AWS CLI – AWS Command Line Interface
- Installa, aggiorna e disinstalla l'AWS CLI versione 1 o 2 su macOS
- Interfaccia a riga di comando di AWS – Amazon AWS
- Come installare AWS CLI su Macbook Pro?
- macOS installa lo strumento CLI (command-line interface) di Amazon AWS
Iniziamo:
Esistono due modi per configurare Amazon AWS CLI su MacOS.
- Opzione-1: utilizzo del comando
curl - Opzione-2: utilizzo del semplice comando
pipPython
Opzione-1: utilizzo del comando curl
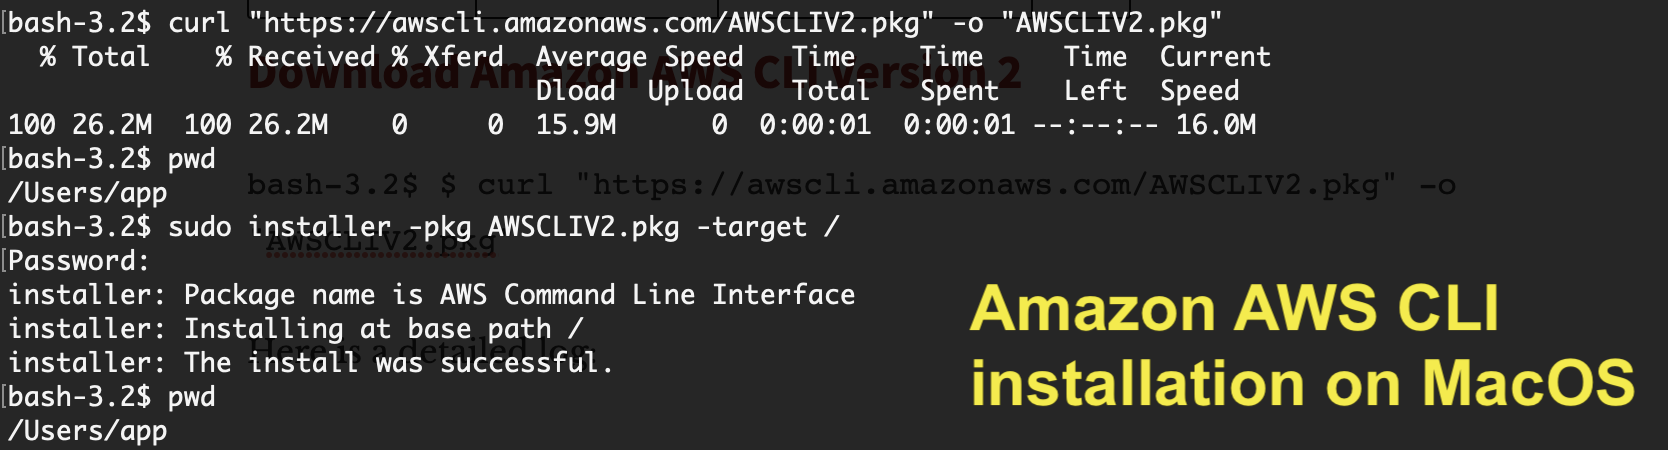
Scarica Amazon AWS CLI versione 2
|
1 |
bash - 3.2 $ $ curl "https://awscli.amazonaws.com/AWSCLIV2.pkg" - o "AWSCLIV2.pkg" |
Ecco un registro dettagliato:
|
1 2 3 4 5 6 |
bash - 3.2 $ $ curl "https://awscli.amazonaws.com/AWSCLIV2.pkg" - o "AWSCLIV2.pkg" bash : $ : command not found bash - 3.2 $ curl "https://awscli.amazonaws.com/AWSCLIV2.pkg" - o "AWSCLIV2.pkg" % Total % Received % Xferd Average Speed Time Time Time Current Dload Upload Total Spent Left Speed 100 26.2M 100 26.2M 0 0 15.9M 0 0 : 00 : 01 0 : 00 : 01 -- : -- : -- 16.0M |
Ecco un comando per installarlo nella cartella /
|
1 2 3 4 5 6 7 |
bash - 3.2 $ sudo installer - pkg AWSCLIV2 . pkg - target / Password : installer : Package name is AWS Command Line Interface installer : Installing at base path / installer : The install was successful . |
Verifica la versione di Amazon AWS:
|
1 2 3 |
bash - 3.2 $ aws -- version aws - cli / 2.4.16 Python / 3.8.8 Darwin / 21.4.0 exe / x86_64 prompt / off |
Questo è il modo più semplice per installare Amazon AWS CLI su MacOS. Fammi sapere se riscontri problemi durante l'installazione.
Opzione-2: utilizzo del comando pip Python
Passo 1.
Verifica di avere python installato sul tuo sistema.
|
1 2 |
bash - 3.2 $ python -- version Python 3.7.2 |
Se non vedi l'ultima versione di Python, installa semplicemente usando il comando seguente:
|
1 |
bash - 3.2 $ brew install python |
Passo 2.
Scarica l'ultimo pacchetto Amazon AWS CLI.
|
1 2 3 4 |
bash - 3.2 $ curl "https://s3.amazonaws.com/aws-cli/awscli-bundle.zip" - o "awscli-bundle.zip" % Total % Received % Xferd Average Speed Time Time Time Current Dload Upload Total Spent Left Speed 100 11.1M 100 11.1M 0 0 5598k 0 0 : 00 : 02 0 : 00 : 02 -- : -- : -- 5600k |
Passaggio 3.
Decomprimi awscli-bundle.zip .
|
1 2 3 4 5 6 7 8 9 10 11 12 13 14 15 16 17 18 19 20 21 22 23 24 |
bash - 3.2 $ unzip awscli - bundle . zip Archive : awscli - bundle . zip replace awscli - bundle / install ? [ y ] es , [ n ] o , [ A ] ll , [ N ] one , [ r ] ename : A inflating : awscli - bundle / install inflating : awscli - bundle / packages / botocore - 1.12.145.tar.gz inflating : awscli - bundle / packages / futures - 3.2.0.tar.gz inflating : awscli - bundle / packages / docutils - 0.14.tar.gz inflating : awscli - bundle / packages / virtualenv - 15.1.0.tar.gz inflating : awscli - bundle / packages / urllib3 - 1.22.tar.gz inflating : awscli - bundle / packages / rsa - 3.4.2.tar.gz inflating : awscli - bundle / packages / urllib3 - 1.24.3.tar.gz inflating : awscli - bundle / packages / ordereddict - 1.1.tar.gz inflating : awscli - bundle / packages / simplejson - 3.3.0.tar.gz inflating : awscli - bundle / packages / s3transfer - 0.2.0.tar.gz inflating : awscli - bundle / packages / python - dateutil - 2.6.1.tar.gz inflating : awscli - bundle / packages / jmespath - 0.9.4.tar.gz inflating : awscli - bundle / packages / PyYAML - 3.13.tar.gz inflating : awscli - bundle / packages / argparse - 1.2.1.tar.gz inflating : awscli - bundle / packages / pyasn1 - 0.4.5.tar.gz inflating : awscli - bundle / packages / colorama - 0.3.9.tar.gz inflating : awscli - bundle / packages / python - dateutil - 2.8.0.tar.gz inflating : awscli - bundle / packages / awscli - 1.16.155.tar.gz inflating : awscli - bundle / packages / six - 1.12.0.tar.gz inflating : awscli - bundle / packages / setup / setuptools_scm - 1.15.7.tar.gz |
Passaggio 4.
Esegui il programma di installazione come sudoer .
|
1 2 3 4 5 6 7 8 |
bash - 3.2 $ sudo . / awscli - bundle / install - i / usr / local / aws - b / usr / local / bin / aws Password : Running cmd : / usr / bin / python virtualenv . py -- no - download -- python / usr / bin / python / usr / local / aws Running cmd : / usr / local / aws / bin / pip install -- no - cache - dir -- no - index -- find - links file : ///Users/crunchify/Documents/ansible/awscli-bundle/packages/setup setuptools_scm-1.15.7.tar.gz Running cmd : / usr / local / aws / bin / pip install -- no - cache - dir -- no - index -- find - links file : ///Users/crunchify/Documents/ansible/awscli-bundle/packages awscli-1.16.155.tar.gz Symlink already exists : / usr / local / bin / aws Removing symlink . You can now run : / usr / local / bin / aws -- version |
Passaggio 5.
Verificare. Come verificare se Amazon CLI è stato installato correttamente?
|
1 2 |
bash - 3.2 $ aws -- version aws - cli / 1.16.155 Python / 2.7.10 Darwin / 18.5.0 botocore / 1.12.145 |
Questo è tutto. Siete a posto. Amazon CLI is successfully installed now .
Configurazione della console Amazon AWS e dell'interfaccia a riga di comando AWS:
- Vai a:
https://console.aws.amazon.com/iam/home?#/users - Creare un utente
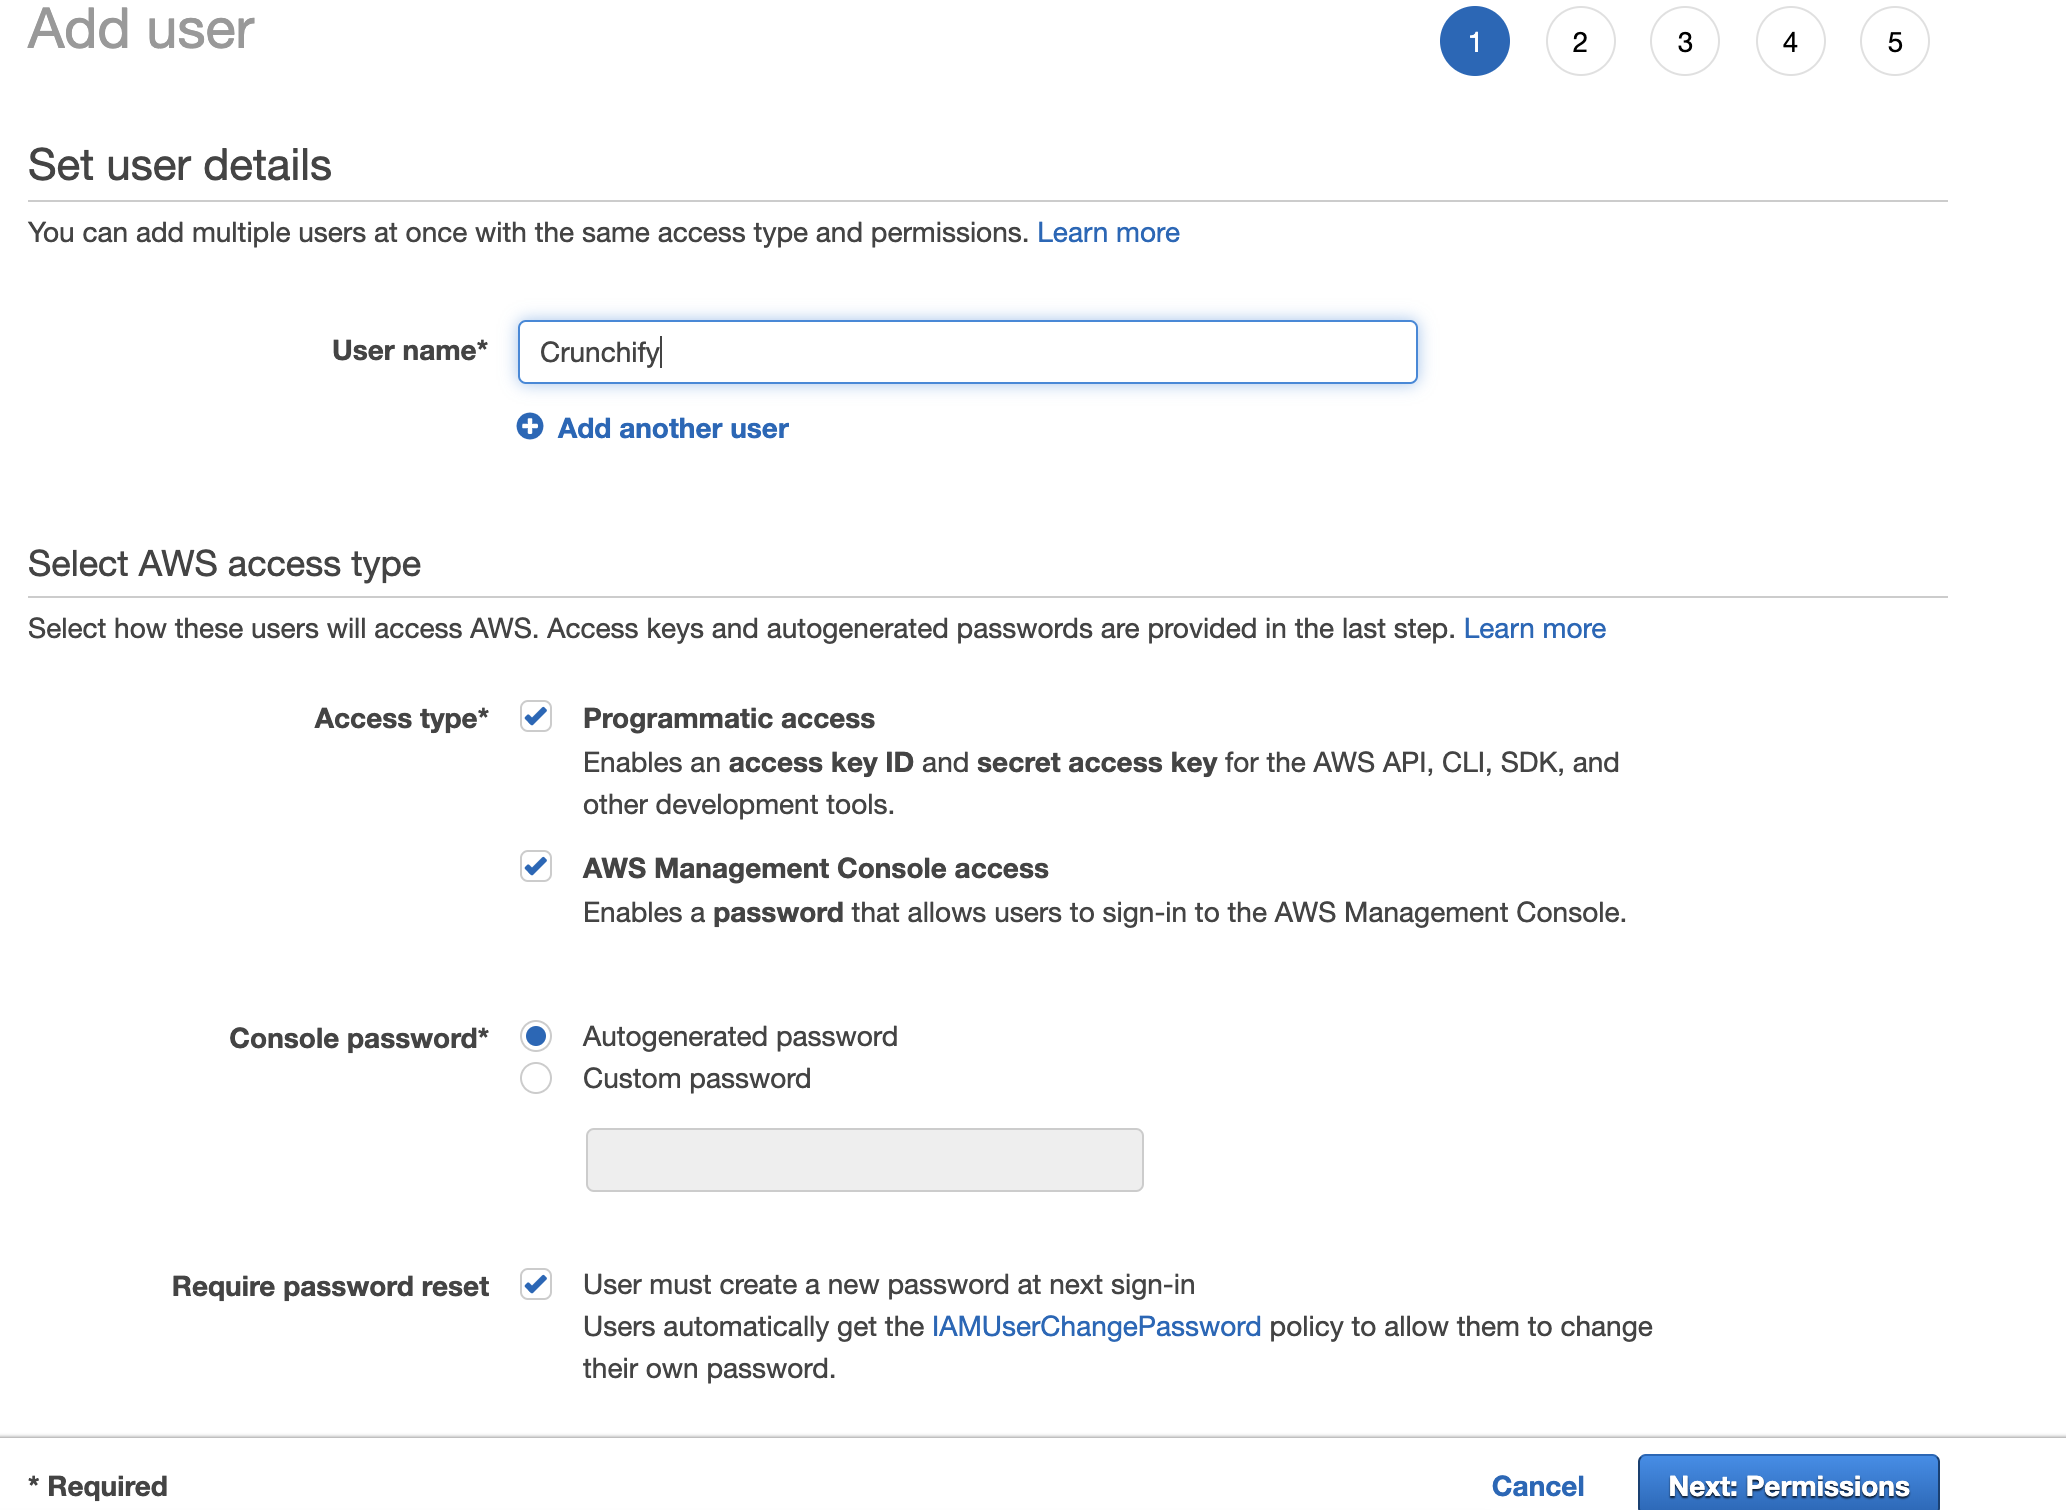
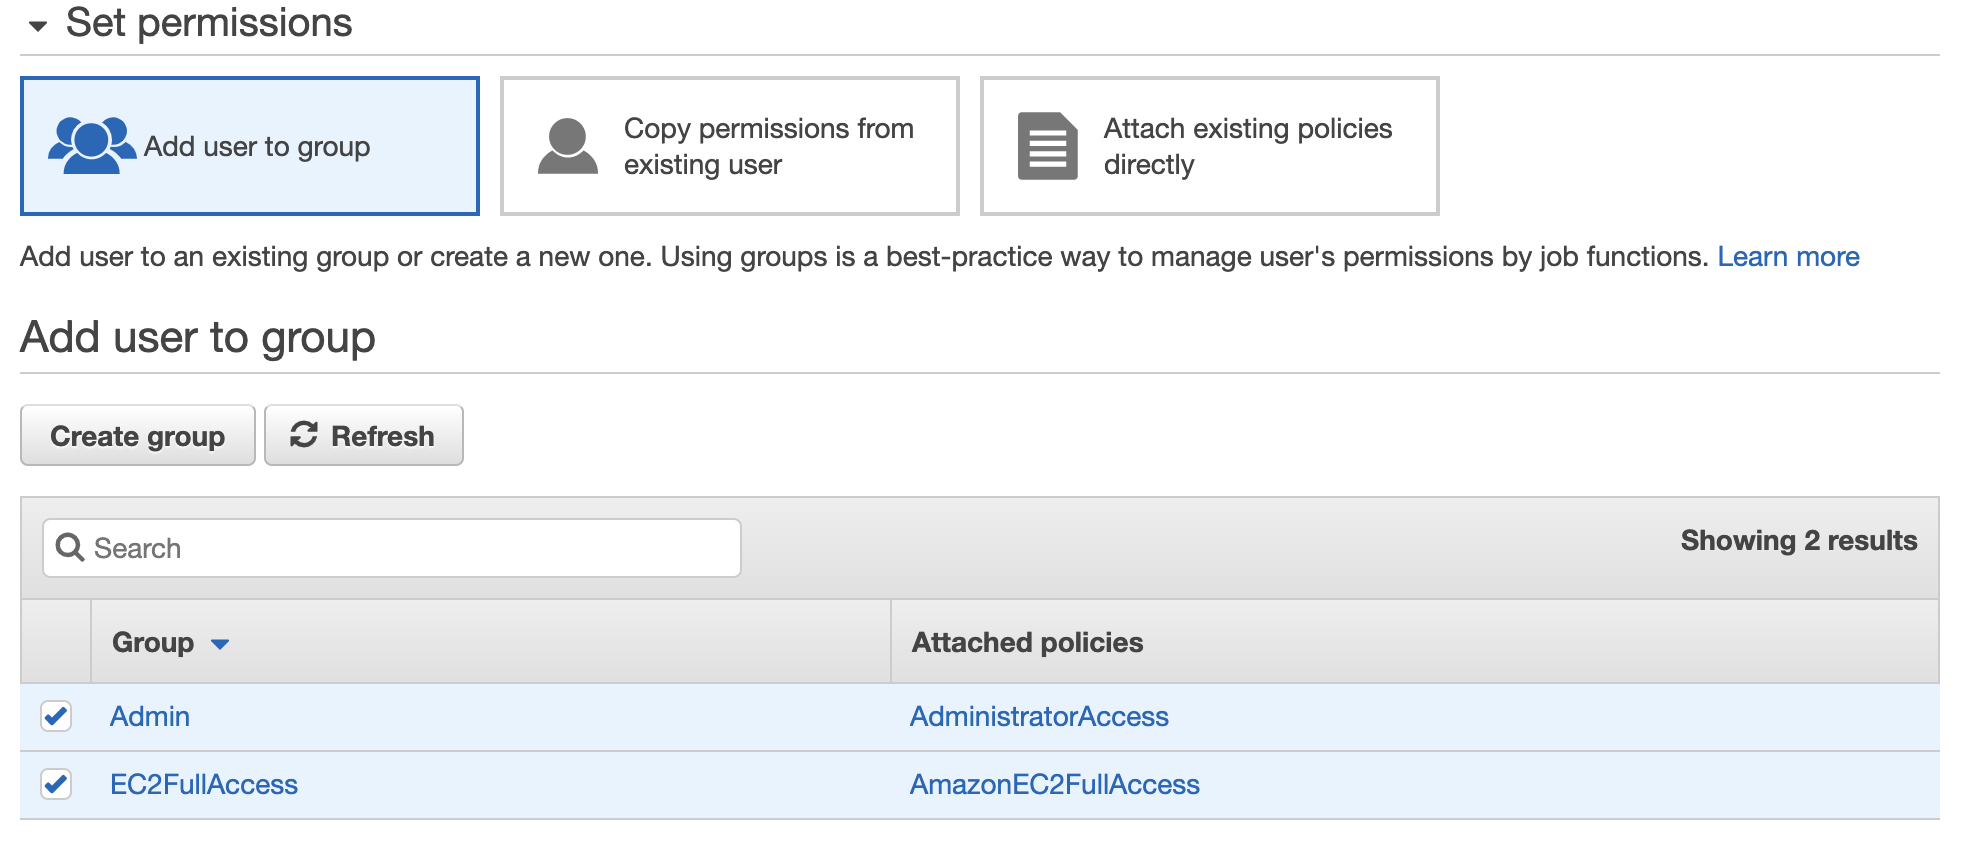
Imposta i permessi
Scarica Amazon AWS Access Key ID, Secret Access Key

Basta digitare aws configure comando. Inserisci l'ID chiave Amazon Access e la chiave di accesso segreta.
|
1 2 3 4 5 |
bash - 3.2 $ aws configure AWS Access Key ID [ **************** QTOR ] : AWS Secret Access Key [ **************** 4taa ] : Default region name [ us - east - 2 ] : Default output format [ json ] : |
E sei a posto. Hai configurato correttamente Amazon AWS CLI.
Esegui il tuo primo comando Amazon AWS CLI:

Come vedi sopra, ho one Amazon EC2 instance attiva e funzionante, usa il comando describe-instances per ottenere tutti i dettagli sull'istanza.
bash-3.2$ aws ec2 describe-instances
|
1 2 3 4 5 6 7 8 9 10 11 12 13 14 15 16 17 18 19 20 21 22 23 24 25 26 27 28 29 30 31 32 33 34 35 36 37 38 39 40 41 42 43 44 45 46 47 48 49 50 51 52 53 54 55 56 57 58 59 60 61 62 63 64 65 66 67 68 69 70 71 72 73 74 75 76 77 78 79 80 81 82 83 84 85 86 87 88 89 90 91 92 93 94 95 96 97 98 99 100 101 102 103 104 105 106 107 108 109 110 111 112 113 114 115 116 117 118 119 120 121 122 123 124 125 126 127 128 129 130 131 132 133 134 135 136 137 138 139 140 141 142 143 144 145 146 147 148 149 150 151 152 153 154 155 156 157 158 159 160 161 162 163 164 165 166 167 |
{ "Reservations" : [ { "Instances" : [ { "Monitoring" : { "State" : "disabled" } , "PublicDnsName" : "" , "StateReason" : { "Message" : "Client.UserInitiatedShutdown: User initiated shutdown" , "Code" : "Client.UserInitiatedShutdown" } , "State" : { "Code" : 48 , "Name" : "terminated" } , "EbsOptimized" : false , "LaunchTime" : "2019-05-09T12:33:20.000Z" , "ProductCodes" : [ ] , "CpuOptions" : { "CoreCount" : 1 , "ThreadsPerCore" : 1 } , "StateTransitionReason" : "User initiated (2019-05-10 15:33:23 GMT)" , "InstanceId" : "i-02f2a6661658d3ef2" , "EnaSupport" : true , "ImageId" : "ami-06088b0de148c2bac" , "PrivateDnsName" : "" , "KeyName" : "crunchify" , "SecurityGroups" : [ ] , "ClientToken" : "" , "InstanceType" : "t2.micro" , "CapacityReservationSpecification" : { "CapacityReservationPreference" : "open" } , "NetworkInterfaces" : [ ] , "Placement" : { "Tenancy" : "default" , "GroupName" : "" , "AvailabilityZone" : "us-east-2a" } , "Hypervisor" : "xen" , "BlockDeviceMappings" : [ ] , "Architecture" : "x86_64" , "RootDeviceType" : "ebs" , "RootDeviceName" : "/dev/sda1" , "VirtualizationType" : "hvm" , "Tags" : [ { "Value" : "worker" , "Key" : "Name" } ] , "HibernationOptions" : { "Configured" : false } , "AmiLaunchIndex" : 0 } , { "Monitoring" : { "State" : "disabled" } , "PublicDnsName" : "ec2-18-188-240-188.us-east-2.compute.amazonaws.com" , "State" : { "Code" : 16 , "Name" : "running" } , "EbsOptimized" : false , "LaunchTime" : "2019-05-09T12:33:20.000Z" , "PublicIpAddress" : "18.188.240.188" , "PrivateIpAddress" : "172.31.1.223" , "ProductCodes" : [ ] , "VpcId" : "vpc-8b4655e3" , "CpuOptions" : { "CoreCount" : 1 , "ThreadsPerCore" : 1 } , "StateTransitionReason" : "" , "InstanceId" : "i-0e19bc4bb04173c6a" , "EnaSupport" : true , "ImageId" : "ami-06088b0de148c2bac" , "PrivateDnsName" : "ip-172-31-1-223.us-east-2.compute.internal" , "KeyName" : "crunchify" , "SecurityGroups" : [ { "GroupName" : "launch-wizard-4" , "GroupId" : "sg-06bd2ee5d14e38797" } ] , "ClientToken" : "" , "SubnetId" : "subnet-c2447faa" , "InstanceType" : "t2.micro" , "CapacityReservationSpecification" : { "CapacityReservationPreference" : "open" } , "NetworkInterfaces" : [ { "Status" : "in-use" , "MacAddress" : "02:e4:a8:93:ad:56" , "SourceDestCheck" : true , "VpcId" : "vpc-8b4655e3" , "Description" : "" , "NetworkInterfaceId" : "eni-0b57a08339236e849" , "PrivateIpAddresses" : [ { "PrivateDnsName" : "ip-172-31-1-223.us-east-2.compute.internal" , "PrivateIpAddress" : "172.31.1.223" , "Primary" : true , "Association" : { "PublicIp" : "18.188.240.188" , "PublicDnsName" : "ec2-18-188-240-188.us-east-2.compute.amazonaws.com" , "IpOwnerId" : "amazon" } } ] , "PrivateDnsName" : "ip-172-31-1-223.us-east-2.compute.internal" , "InterfaceType" : "interface" , "Attachment" : { "Status" : "attached" , "DeviceIndex" : 0 , "DeleteOnTermination" : true , "AttachmentId" : "eni-attach-06cb447cd085d5818" , "AttachTime" : "2019-05-09T12:33:20.000Z" } , "Groups" : [ { "GroupName" : "launch-wizard-4" , "GroupId" : "sg-06bd2ee5d14e38797" } ] , "Ipv6Addresses" : [ ] , "OwnerId" : "600038600370" , "PrivateIpAddress" : "172.31.1.223" , "SubnetId" : "subnet-c2447faa" , "Association" : { "PublicIp" : "18.188.240.188" , "PublicDnsName" : "ec2-18-188-240-188.us-east-2.compute.amazonaws.com" , "IpOwnerId" : "amazon" } } ] , "SourceDestCheck" : true , "Placement" : { "Tenancy" : "default" , "GroupName" : "" , "AvailabilityZone" : "us-east-2a" } , "Hypervisor" : "xen" , "BlockDeviceMappings" : [ { "DeviceName" : "/dev/sda1" , "Ebs" : { "Status" : "attached" , "DeleteOnTermination" : true , "VolumeId" : "vol-077e7eb58ca59daea" , "AttachTime" : "2019-05-09T12:33:20.000Z" } } ] , "Architecture" : "x86_64" , "RootDeviceType" : "ebs" , "RootDeviceName" : "/dev/sda1" , "VirtualizationType" : "hvm" , "Tags" : [ { "Value" : "Crunchify" , "Key" : "Name" } ] , "HibernationOptions" : { "Configured" : false } , "AmiLaunchIndex" : 1 } ] , "ReservationId" : "r-00163c475d0a29a3d" , "Groups" : [ ] , "OwnerId" : "600038600370" } ] } |
E questo è tutto. Siete a posto. Hai eseguito con successo tutte le seguenti attività:

- Installa Amazon AWS CLI
- Configura Amazon AWS CLI
- Esegui il tuo primo comando e ottieni il risultato
Fammi sapere se riscontri problemi con l'esecuzione del comando AWS CLI.