
プラグインなしでWordPressサイトにGoogleカスタム検索エンジン(CSE)を含める方法(2つの異なるアプローチ)
公開: 2016-03-16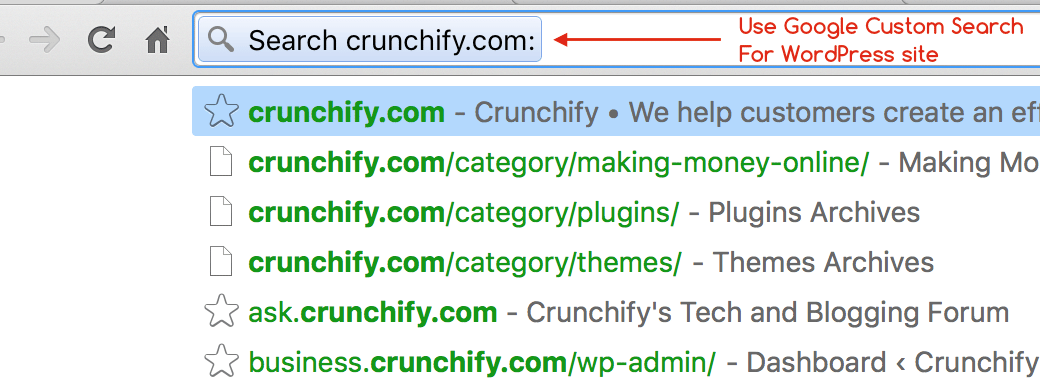
検索機能の重要性とWordPressでGoogleカスタム検索を使用する必要がある理由
GoogleまたはBing? 間違いなし。 Googleは、世界で最高の検索エンジンであり、検索のパイオニアです。 WordPressブログでGoogleカスタム検索を使用すべきでない理由はありません。 それはあなたのブログ読者にも最高の検索体験を与えるでしょう。 このチュートリアルでは、WordPressサイトでカスタム検索を利用できるようにするための簡単な手順を説明します。
Alphabet( https://abc.xyz )傘下でGoogleは独立した検索会社です。 それで、それはすべての消費者にとって何を意味するのでしょうか? さて、報告構造が変更され、間違いなくニューヨーク証券取引所の銘柄名が変更されたことを除いて、私たちにとって何も変わることはないと思います。
なぜCSE(カスタム検索エンジン)が必要なのですか?
サイトでより優れた検索機能を提供することは非常に重要です。 通常、メインページには10未満の投稿が含まれますが、ほとんどの場合、ブログユーザーは検索からのみ最も関連性の高い記事を取得できます。
さらに、デフォルトのWordPress検索よりもはるかに高速な検索結果+ Googleは検索クエリからこの結果リストを認識し、重複するコンテンツリストに追加しないため、サイトのSEOに適しています。
Googleカスタム検索を設定two waysます。
- Google Adsense Consoleから(Crunchifyでは
this approachを使用しています) - Googleカスタム検索パネルから
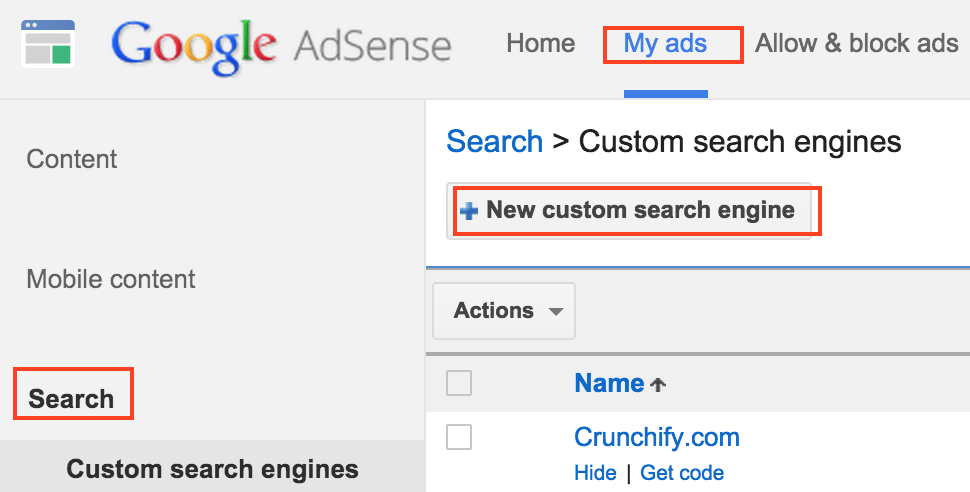
Configuration Approach-1. グーグルアドセンスコンソールから
ステップ1
-
Adsenseに行く - [
My ads]タブをクリックします - [
Search-> [Custom search enginesをクリックします New Custom Search engineをクリックします
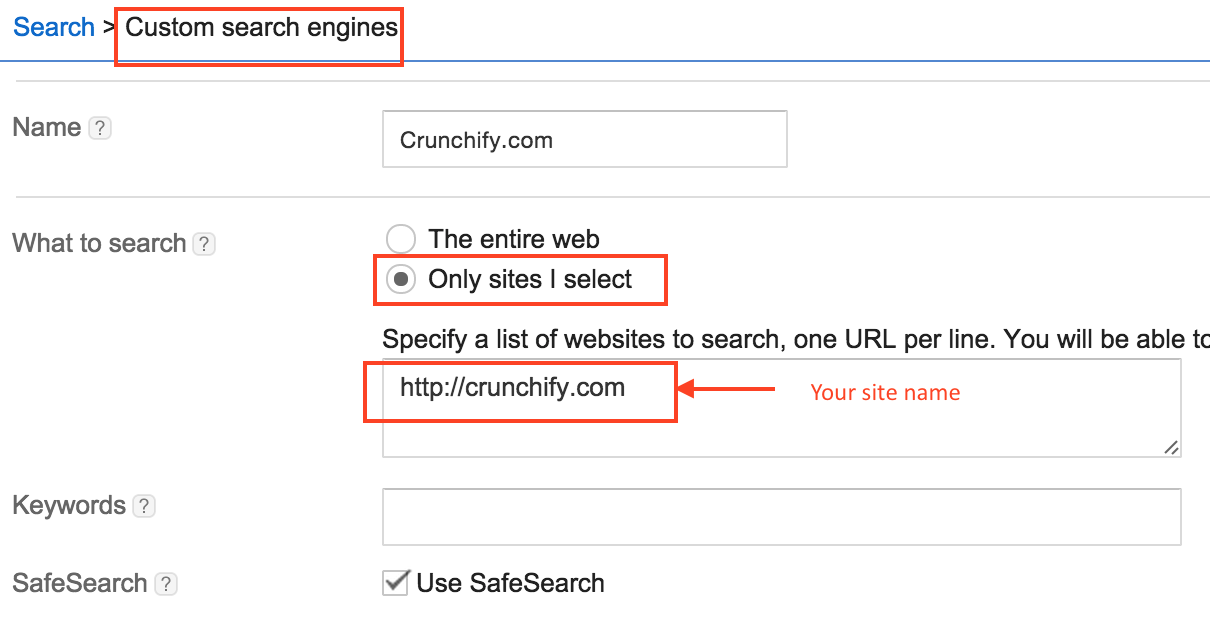
ステップ2
-
Nameを入力してください。 自由形式のテキストです - 選択
Only sites I select - Webサイト名を指定してください
ステップ-3
必要に応じて以下のオプションを変更します
- カスタムチャネル
- 検索ボックスのスタイル
- 広告CSSスタイル
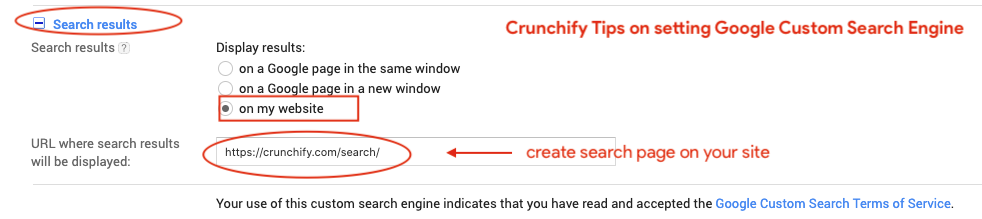
ステップ-4
[検索結果]オプションで、以下の設定が正しいことを確認してください
- 検索結果:
on my website - 検索結果が表示されるURL:ブログの
search page
ステップ-5
[保存]をクリックして、両方のコードを取得します
- 検索
Box Code - 検索
Result Code
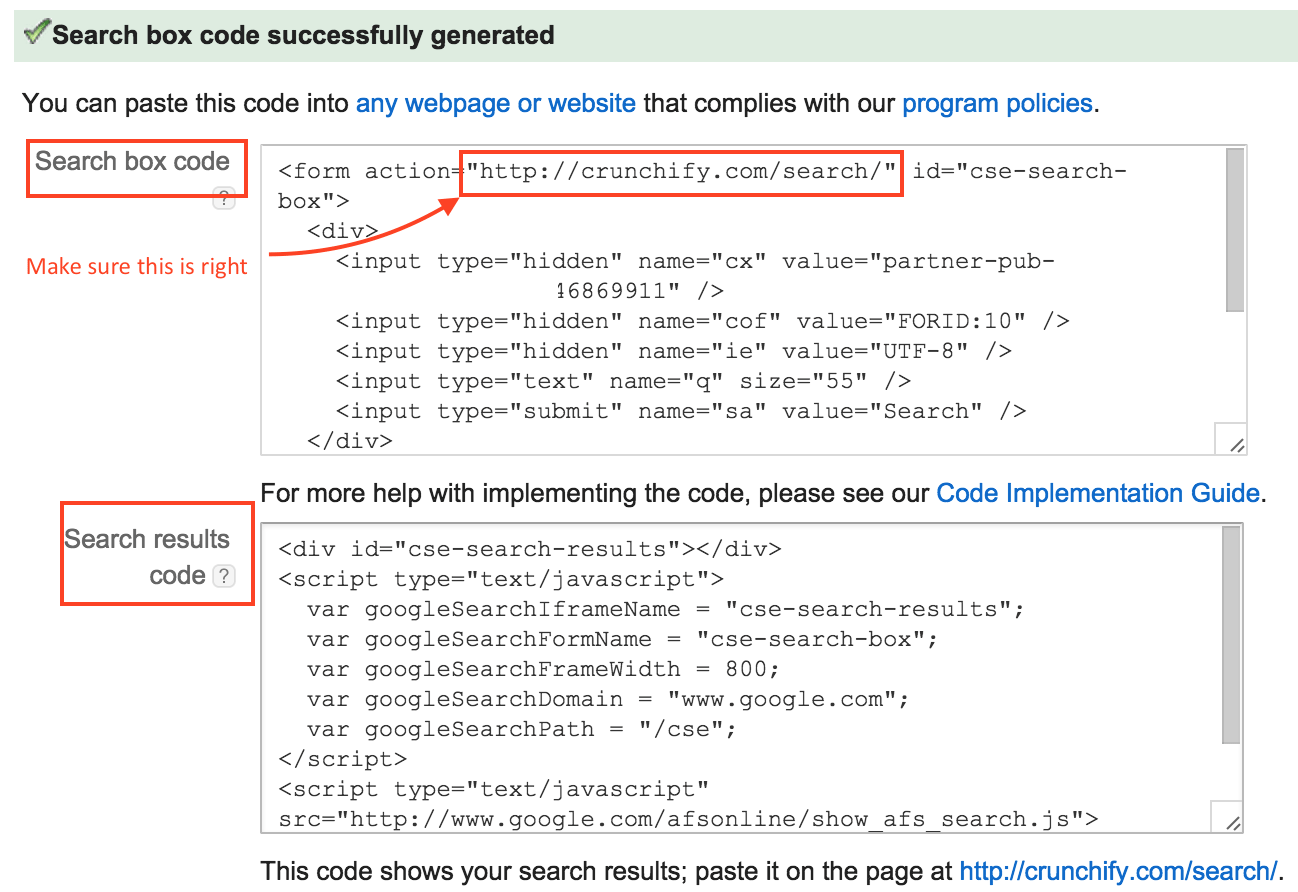
ステップ-6
あなたのサイトに行き、 /searchページを作成してください

ステップ-7
HTMLセクションの下にsearch result codeを貼り付け、[保存]をクリックします。
ステップ-8
[ Appearance ]-> [ Widgets ]セクションに移動し、 search box codeを貼り付けて、[保存]をクリックします。 必要に応じて検索ボックスのCSSを変更します。 これが私がCrunchifyで使用しているカスタムCSSです。
|
1 2 3 4 5 6 7 8 9 10 11 12 13 14 15 16 17 18 19 20 21 22 |
. crunchify - search { width : 76 % ! important ; padding : 9px 6px 7px 6px ! important ; max - width : 275px ; margin : 10px 0px 0px 0px ! important ; } input [ type = "submit" ] { background - color : #dd7127; border : none ; box - shadow : none ; color : #fff; cursor : pointer ; font - family : 'Oswald' , sans - serif ; font - size : 14px ; font - weight : 400 ; letter - spacing : 1px ; padding : 6px 10px ; width : auto ; - webkit - font - smoothing : antialiased ; border - radius : 3px ; } |
そして、あなたはすべて準備ができています。 キーワードを検索してみると、 /searchページにGoogleの検索結果が表示されます。
Configuration Approach-2 。 Googleカスタム検索パネルから
ステップ1
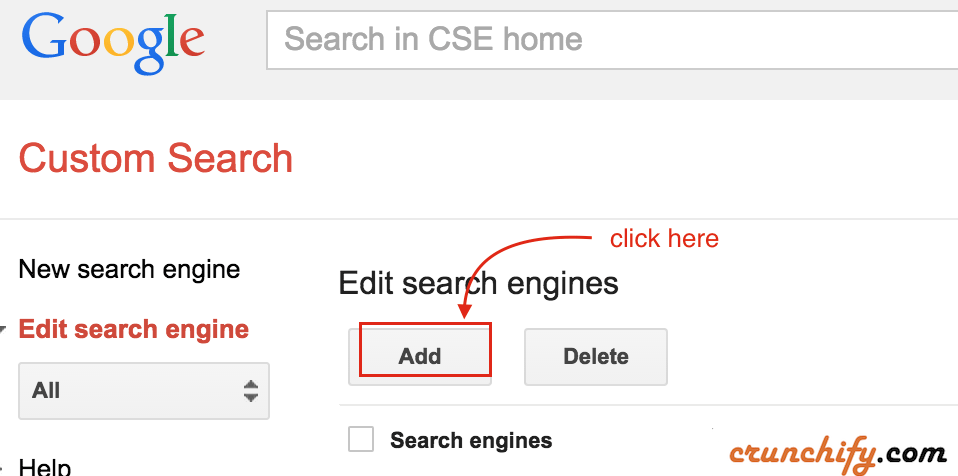
- https://cse.google.com/cse/allにアクセスします
- [検索エンジンの
Add]をクリックします
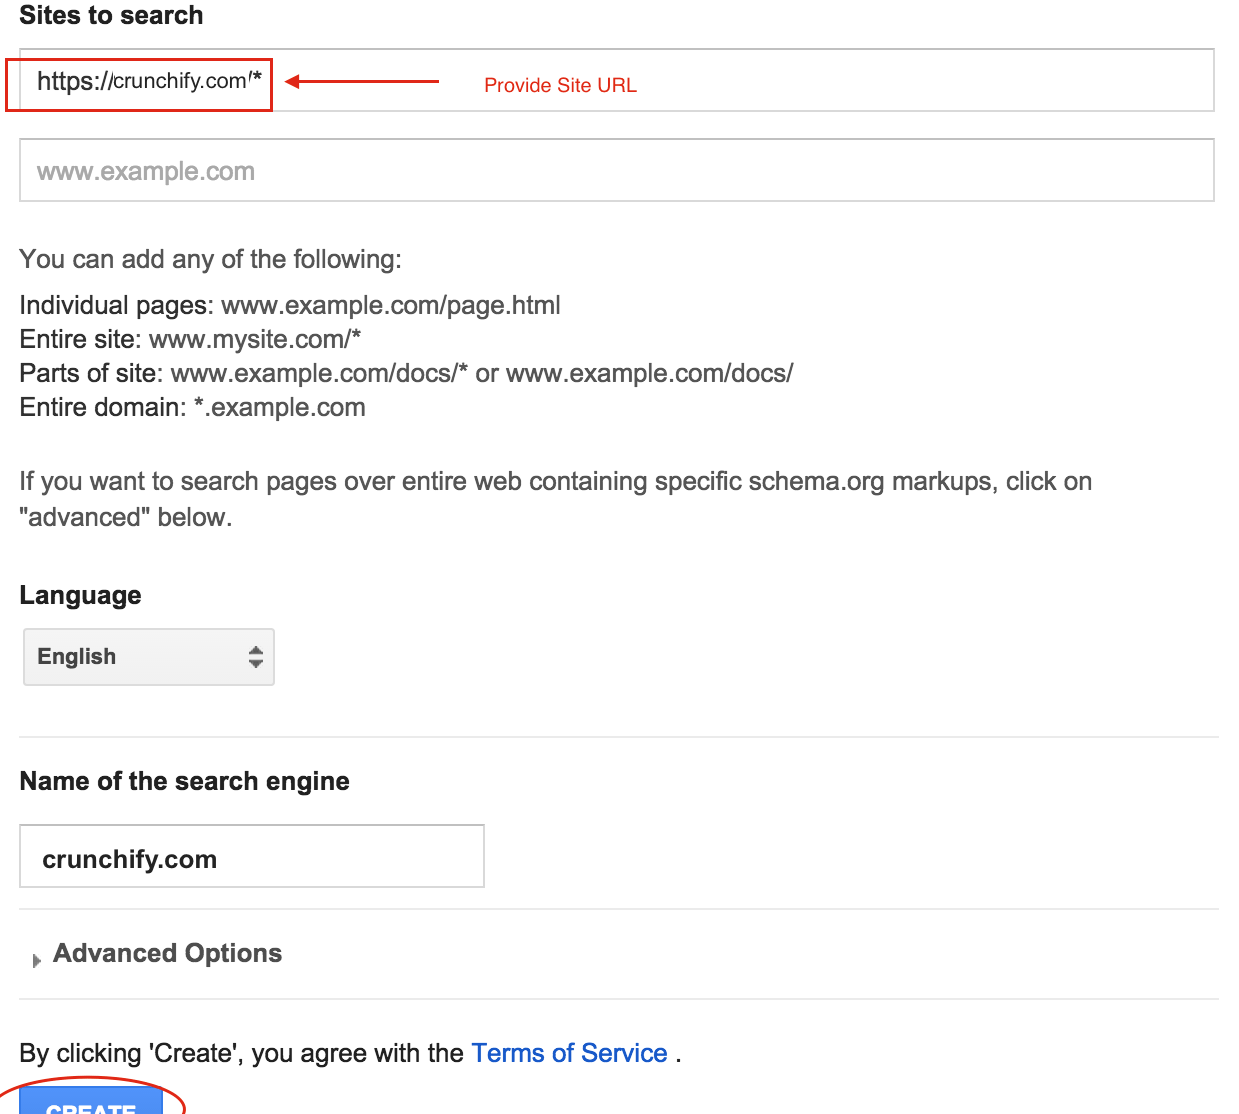
ステップ2
- サイトのURLを入力してください
- [追加]をクリックします
ステップ-3
- 新しく作成した検索エンジンをクリックします
Look and feelセクションに移動Layoutタブに移動しますTwo Pageを選択- [
Save and Get Codeクリックします
ステップ-4
- 検索ボックスのコードを取得する
- サイドバーに入れます
- 検索結果のコードを取得する
- ページを作成http:// <yourblog.com> / search
- このページにコードを入れる
ステップ-5
Google Appsのようなキーワードを検索してみると、このような結果が表示されるはずです。
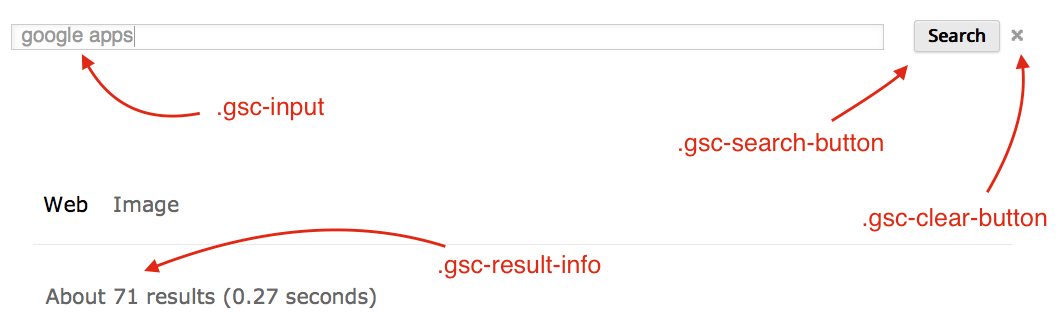
結果パネル:
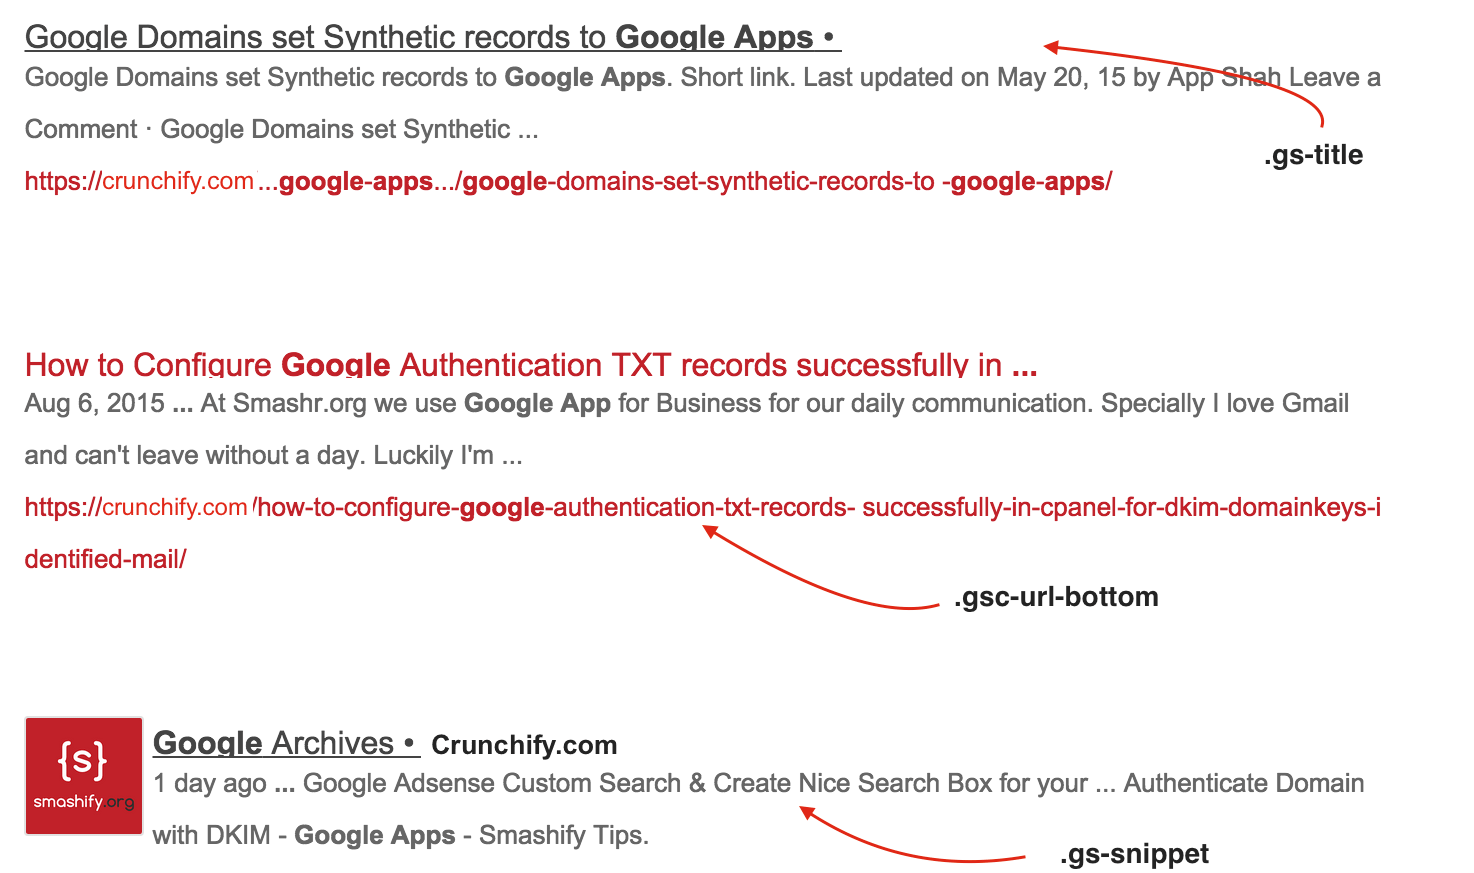
ステップ-6
Crunchifyに戻って、以下のカスタムCSSで結果を変更しました。
|
1 2 3 4 5 6 7 8 9 10 11 12 13 14 15 16 17 18 19 20 21 22 23 24 25 26 27 28 29 30 31 32 33 34 35 36 37 38 39 40 41 42 43 44 45 46 47 48 49 50 51 52 53 54 55 56 57 58 59 60 61 62 63 64 65 66 67 68 69 |
/* Change Search Button Code */ input . gsc - search - button { padding : 10px ! important ; height : 35px ! important ; border - color : #c12129 !important; background - color : #c12129 !important; color : #fff !important; } /* Change Search Button Hover Color */ input . gsc - search - button : hover { border - color : #444 !important; background - color : #444 !important; } /* Change Bottom Margin after each result */ . gsc - control - cse . gsc - table - result { margin - bottom : 10px ! important ; } /* Hide URL from search result */ . gsc - url - top , . gsc - url - bottom { display : none ! important ; } /* Change input field look and feel */ input . gsc - input { padding : 10px ! important ; margin - left : 0px ; background - position : right center ! important ; background - repeat : no - repeat ! important ; } /* Hide number of result count */ . gsc - result - info { display : none ; } . gs - webResult : hover { background - color : #eee; } /* Change mouse hover result background change */ . gsc - cursor - page { font - size : 1.1em ; padding : 3px 7px ; border : 2px solid #eee; background - color : #eee !important; } /* Change search result heading font size change */ . gsc - result . gs - title { height : 2.0em ! important ; font - size : 16px ! important ; } . gs - result . gs - snippet { line - height : 19px ! important ; } /* Remove Clear cross image and CSS adjustment - below 3 CSS prop changes */ div . gsc - clear - button { display : none ! important ; } td . gsc - clear - button { width : 0px ! important ; } td . gsc - input { padding - right : 1px ! important ; } |

次に、両方のクエリを見てみましょう。
Approach-1 :
-
search/?cx=
Approach-2 :
- https://crunchify.com/
search/?q= Google%20Apps(.htaccessルールが設定されているため、これは機能しません)
上記のように、どちらのアプローチにもdifferent query parametersがあります。
次は何?
Googleのサイトリンク検索ボックスのJSON-LD Schema URLを必ず更新してください。
WordPressサイトリンク検索ボックスの検証JSON-LDSchema.orgマークアップURL