
Guia passo a passo para habilitar HTTPS ou SSL de maneira correta no servidor Apache Tomcat – porta 8443
Publicados: 2021-04-03Já faz quase 12 anos que comecei a usar o Apache Tomcat. Acredito que quando fiz meu projeto de 1º ano, foi no Tomcat versão 1.x . Agora já está na versão 8.0 . Principalmente eu estive em contato com o Tomcat Server na minha vida diária de trabalho, simplesmente não consigo viver sem ele.
No Crunchify já publicamos quase 40 artigos sobre Apache Tomcat . Na maior parte do tutorial eu executei o servidor na porta 8080 que é a porta padrão configurada no arquivo server.xml .
Neste tutorial, abordaremos todas as etapas em detalhes sobre how to enable HTTPS/SSL on Apache Tomcat Server .
Vamos começar:
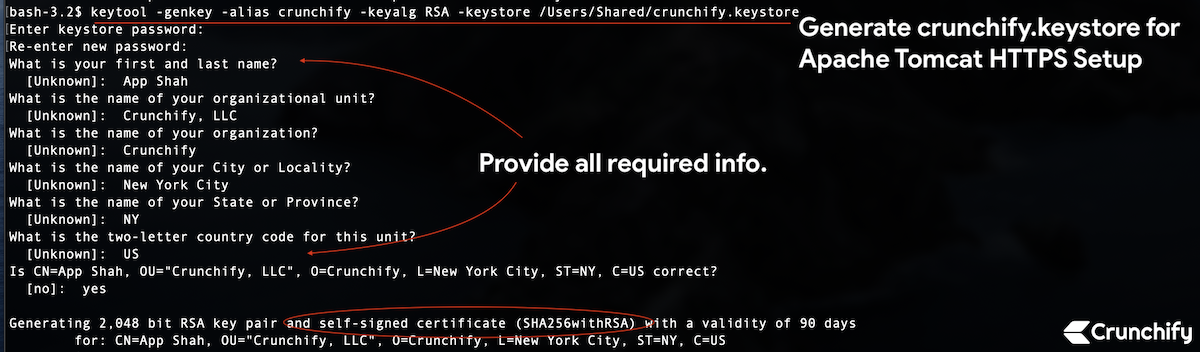
Passo 1. Criar armazenamento de chaves
keytool : geraremos uma chave segura usando o comando keytool - que é uma ferramenta de gerenciamento de chaves e certificados.
Comando:
|
1 2 3 4 |
bash - 3.2 $ pwd / Users / Shared bash - 3.2 $ keytool - genkey - alias crunchify - keyalg RSA - keystore / Users / Shared / crunchify . keystore |
O arquivo será criado na pasta /Users/Shared .
|
1 2 3 4 5 6 7 8 9 10 11 12 13 14 15 16 17 18 19 20 |
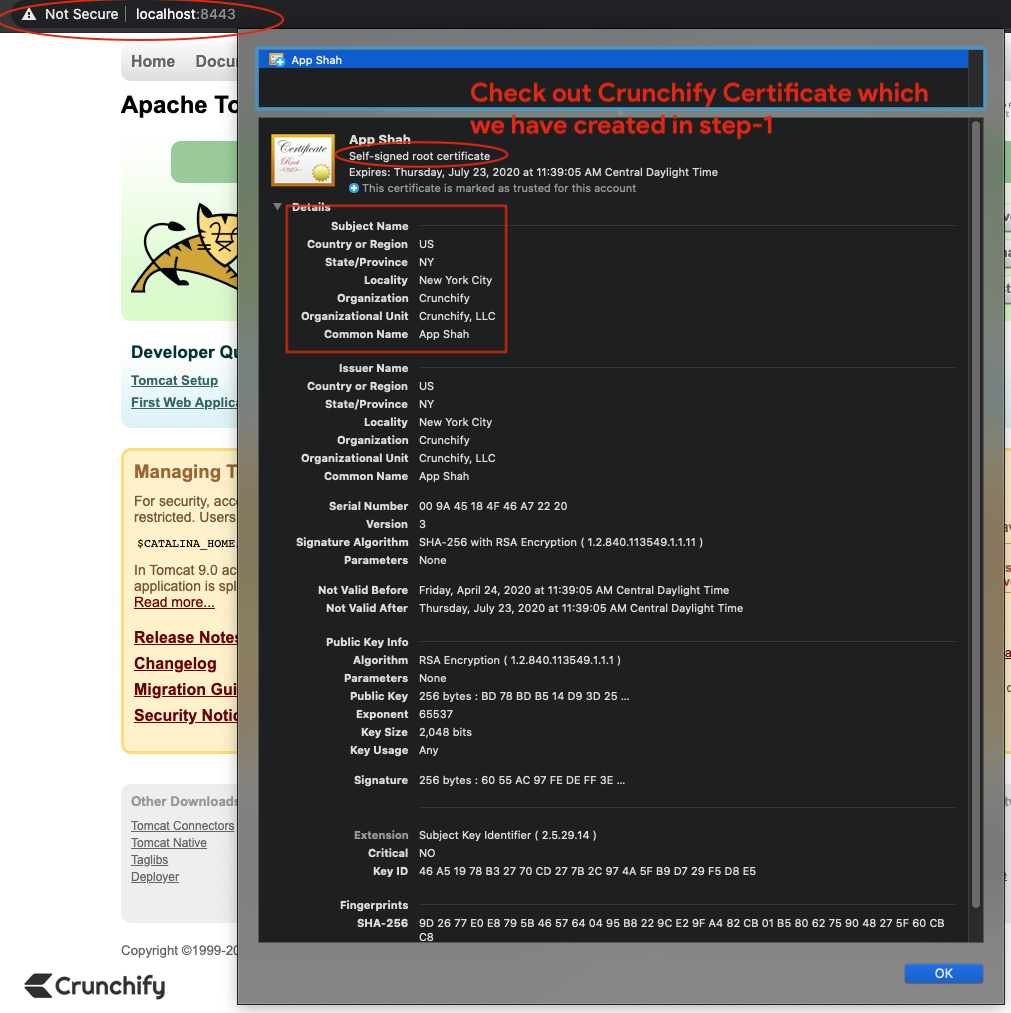
bash - 3.2 $ keytool - genkey - alias crunchify - keyalg RSA - keystore / Users / Shared / crunchify . keystore Enter keystore password : Re - enter new password : What is your first and last name ? [ Unknown ] : App Shah What is the name of your organizational unit ? [ Unknown ] : Crunchify , LLC What is the name of your organization ? [ Unknown ] : Crunchify What is the name of your City or Locality ? [ Unknown ] : New York City What is the name of your State or Province ? [ Unknown ] : NY What is the two - letter country code for this unit ? [ Unknown ] : US Is CN = App Shah , OU = "Crunchify, LLC" , O = Crunchify , L = New York City , ST = NY , C = US correct ? [ no ] : yes Generating 2 , 048 bit RSA key pair and self - signed certificate ( SHA256withRSA ) with a validity of 90 days for : CN = App Shah , OU = "Crunchify, LLC" , O = Crunchify , L = New York City , ST = NY , C = US |
Estou usando o Mac OS X, então substitua seu caminho de acordo se você estiver no Windows. Eu usei a senha 123456 .
Passo 2. Criar solicitação de assinatura de certificado autoassinado
|
1 2 |
bash - 3.2 $ keytool - certreq - keyalg RSA - alias crunchify - file crunchify . csr - keystore crunchify . keystore Enter keystore password : |
Digite a senha: 123456
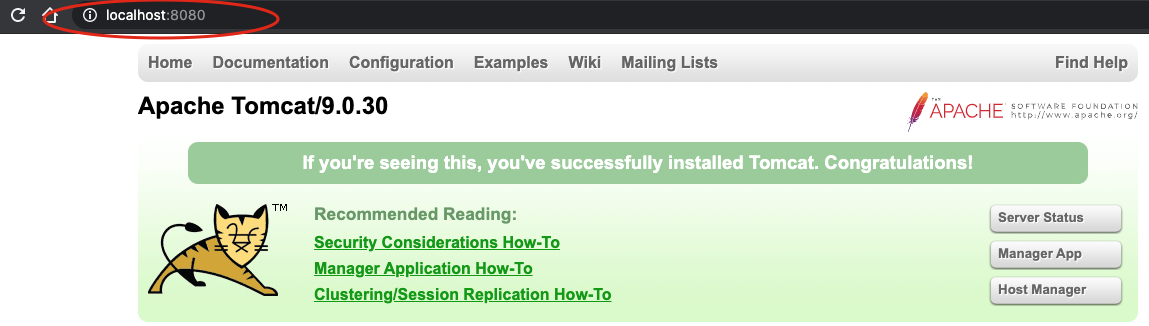
Etapa 3. Vamos verificar primeiro que o tomcat está sendo executado na porta 8080 sobre HTTP.
Start o servidor tomcat usando o comando: < startup.sh >/bin/startup.sh .
Verifique se você está no local correto do caminho do tomcat.
|
1 2 3 4 5 6 7 8 9 10 11 |
bash - 3.2 # pwd / Users / Shared / apache - tomcat - 9.0.30 / bin bash - 3.2 $ . / startup . sh Using CATALINA_BASE : / Users / Shared / apache - tomcat - 9.0.30 Using CATALINA_HOME : / Users / Shared / apache - tomcat - 9.0.30 Using CATALINA_TMPDIR : / Users / Shared / apache - tomcat - 9.0.30 / temp Using JRE_HOME : / Library / Java / JavaVirtualMachines / jdk - 13.0.1.jdk / Contents / Home Using CLASSPATH : / Users / Shared / apache - tomcat - 9.0.30 / bin / bootstrap . jar : / Users / Shared / apache - tomcat - 9.0.30 / bin / tomcat - juli . jar Tomcat started . |
Hit URL: http://localhost:8080 para certificar-se de que o servidor está funcionando.
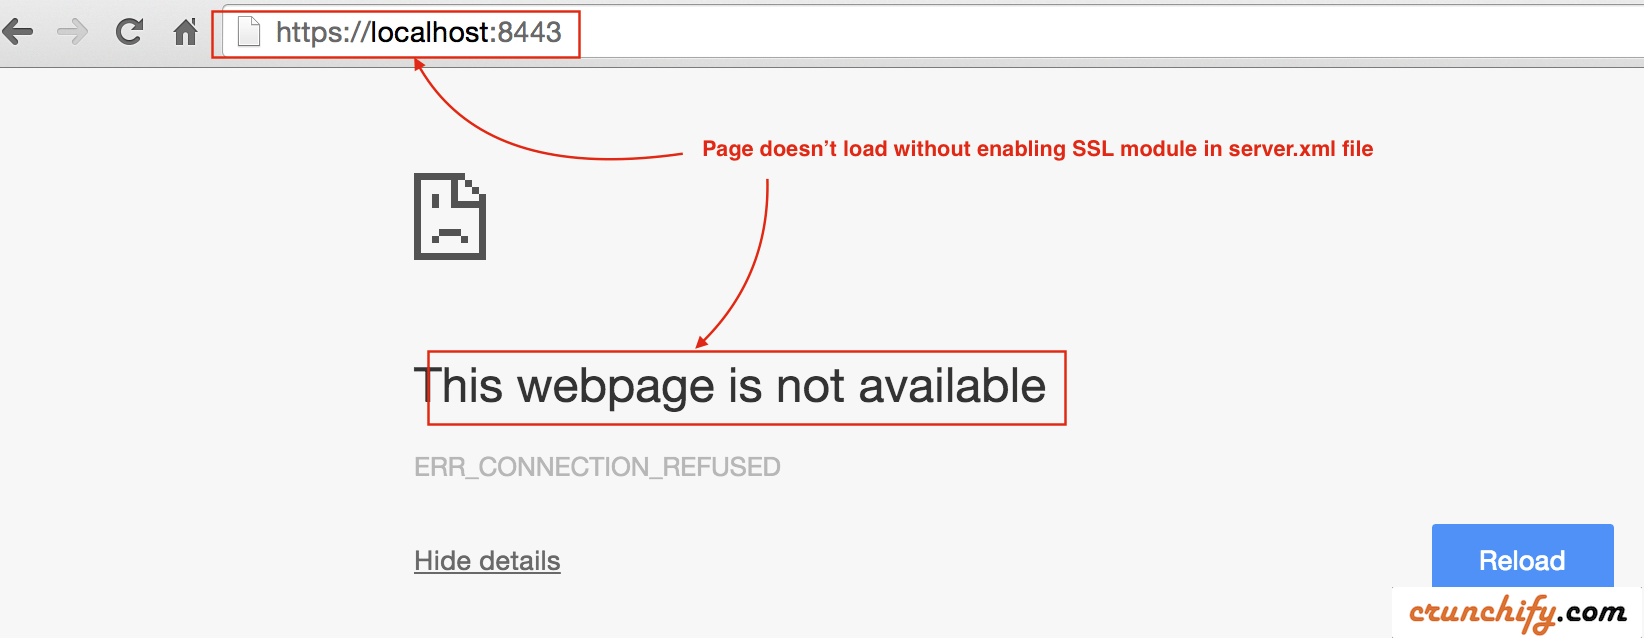
Passo 4. Agora verifique a instância do tomcat na porta 8443 por HTTPS.
- Agora verifique a porta 8443 (URL HTTPS/SSL).
- URL de acesso:
https://localhost:8443 - Você deve ver a mensagem de erro. A página não deve carregar.
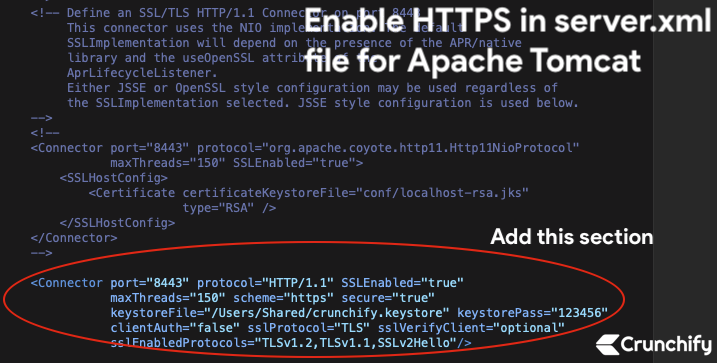
Passo-5. Atualizar arquivo /conf/server.xml
Como geramos a solicitação de keystore e assinatura de certificado acima, precisamos dizer ao tomcat para usar isso.
- Abra o arquivo
server.xmlque está localizado na<tomcat_home>/conf/e modifique as configurações. - No nosso caso, é a pasta
/Users/Shared/apache-tomcat-9.0.30/conf.
Adicione a seção abaixo diretamente ao arquivo server.xml:

|
1 2 3 4 5 |
< Connector port = "8443" protocol = "HTTP/1.1" SSLEnabled = "true" maxThreads = "150" scheme = "https" secure = "true" keystoreFile = "/Users/Shared/crunchify.keystore" keystorePass = "123456" clientAuth = "false" sslProtocol = "TLS" sslVerifyClient = "optional" sslEnabledProtocols = "TLSv1.2,TLSv1.1,SSLv2Hello" / > |
- Aqui a senha é
123456que usei naStep-1. - Protocolo: HTTP/1.1
Salvar Arquivo. Em seguida, vamos parar e iniciar o Tomcat Server.
Passo-6. Pare e inicie o Apache Tomcat.
- bash-3.2$ /Users/Shared/apache-tomcat-9.0.30/bin/shutdown.sh
- bash-3.2$ /Users/Shared/apache-tomcat-9.0.30/bin/startup.sh
|
1 2 3 4 5 6 7 8 9 10 11 12 13 14 15 16 17 |
bash - 3.2 $ / Users / Shared / apache - tomcat - 9.0.30 / bin / shutdown . sh Using CATALINA_BASE : / Users / Shared / apache - tomcat - 9.0.30 Using CATALINA_HOME : / Users / Shared / apache - tomcat - 9.0.30 Using CATALINA_TMPDIR : / Users / Shared / apache - tomcat - 9.0.30 / temp Using JRE_HOME : / Library / Java / JavaVirtualMachines / jdk - 13.0.1.jdk / Contents / Home Using CLASSPATH : / Users / Shared / apache - tomcat - 9.0.30 / bin / bootstrap . jar : / Users / Shared / apache - tomcat - 9.0.30 / bin / tomcat - juli . jar NOTE : Picked up JDK_JAVA_OPTIONS : -- add - opens = java . base / java . lang = ALL - UNNAMED -- add - opens = java . base / java . io = ALL - UNNAMED -- add - opens = java . rmi / sun . rmi . transport = ALL - UNNAMED bash - 3.2 $ / Users / Shared / apache - tomcat - 9.0.30 / bin / startup . sh Using CATALINA_BASE : / Users / Shared / apache - tomcat - 9.0.30 Using CATALINA_HOME : / Users / Shared / apache - tomcat - 9.0.30 Using CATALINA_TMPDIR : / Users / Shared / apache - tomcat - 9.0.30 / temp Using JRE_HOME : / Library / Java / JavaVirtualMachines / jdk - 13.0.1.jdk / Contents / Home Using CLASSPATH : / Users / Shared / apache - tomcat - 9.0.30 / bin / bootstrap . jar : / Users / Shared / apache - tomcat - 9.0.30 / bin / tomcat - juli . jar Tomcat started . |
Passo-7. Verifique o URL e a certificação HTTPS: https://localhost:8443
Agora, pressione o URL seguro HTTPS novamente para verificar se a página foi carregada com sucesso.
Cromada:
- Por padrão, o
Chrome Blocks all insecure HTTPS. - Ative o
Chrome flagpara carregar certificados inválidos para recursos carregados do localhost
- Ir para o Chrome
- Abrir guia
- digite:
chrome://flags/#allow-insecure-localhost - Ativar sinalizador no menu suspenso
- Reiniciar o Chrome

Safari e Mozilla Firefox:
-
Accept invalid certificate errore visite o site.
Você deve ver a página do Apache Tomcat carregando por HTTPS na porta 8443
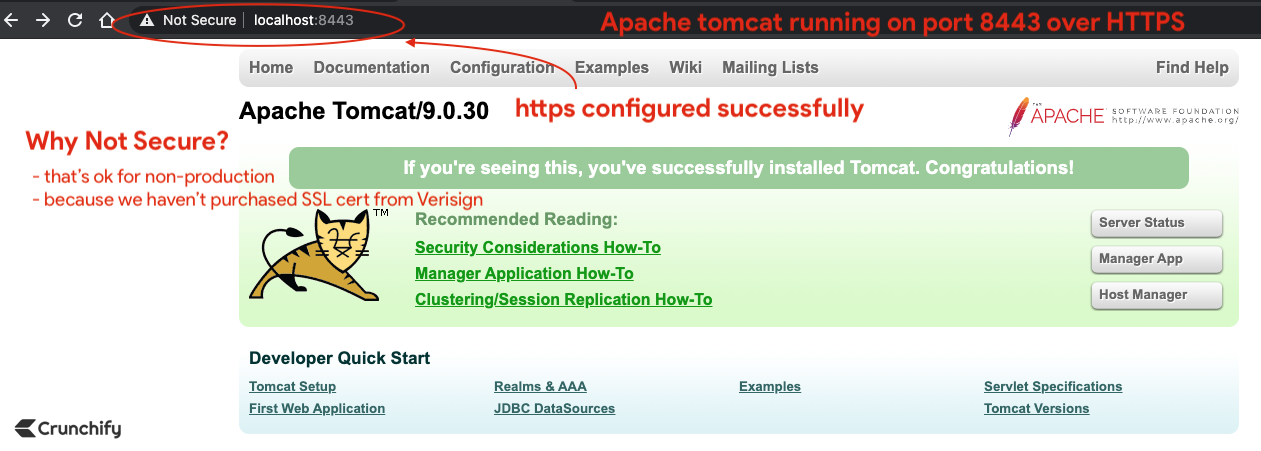
Estás pronto. Você notou red padlock ? Não se preocupe. Não compramos o certificado SSL da Verisign ou da Comodo.
No ambiente de produção, você pode não ver esse sinal de cruz vermelha.
Clique no certificado no navegador e nosso certificado autoassinado padrão deve ser
valid for 90dias.
Ponto de bônus:
Como verificar o cert content do seu certificado usando o comando keytool ?
|
1 |
bash - 3.2 # keytool -list -keystore /Users/<username>/crunchify.keystore |
Resultado:
|
1 2 3 4 5 6 7 8 9 10 11 12 |
bash - 3.2 $ keytool - list - keystore / Users / Shared / crunchify . keystore Enter keystore password : Keystore type : PKCS12 Keystore provider : SUN Your keystore contains 1 entry crunchify , Apr 24 , 2020 , PrivateKeyEntry , Certificate fingerprint ( SHA - 256 ) : 9D : 26 : 77 : E0 : E8 : 79 : 5B : 46 : 57 : 64 : 04 : 95 : B8 : 22 : 9C : E2 : 9F : A4 : 82 : CB : 01 : B5 : 80 : 62 : 75 : 90 : 48 : 27 : 5F : 60 : CB : C8 bash - 3.2 $ |