
在 Apache Tomcat 服務器上啟用 HTTPS 或 SSL 正確方式的分步指南 – 端口 8443
已發表: 2021-04-03我開始使用 Apache Tomcat 已經快 12 年了。 我相信當我做我的第一個低年級項目時,它是在 Tomcat 版本1.x上。 現在它已經在8.0版本上。 在我的日常工作生活中,我大部分時間都在與 Tomcat Server 保持聯繫,沒有它就活不下去。
在 Crunchify 上,我們已經發表了近 40 篇關於Apache Tomcat的文章。 在大部分教程中,我在端口 8080 上運行服務器,這是server.xml文件中配置的默認端口。
在本教程中,我們將詳細介紹how to enable HTTPS/SSL on Apache Tomcat Server的所有步驟。
讓我們開始吧:
第1步。 創建密鑰庫
keytool :我們將使用keytool命令生成安全密鑰 - 這是密鑰和證書管理工具。
命令:
|
1 2 3 4 |
bash - 3.2 $ pwd / Users / Shared bash - 3.2 $ keytool - genkey - alias crunchify - keyalg RSA - keystore / Users / Shared / crunchify . keystore |
文件將在文件夾/Users/Shared下創建。
|
1 2 3 4 5 6 7 8 9 10 11 12 13 14 15 16 17 18 19 20 |
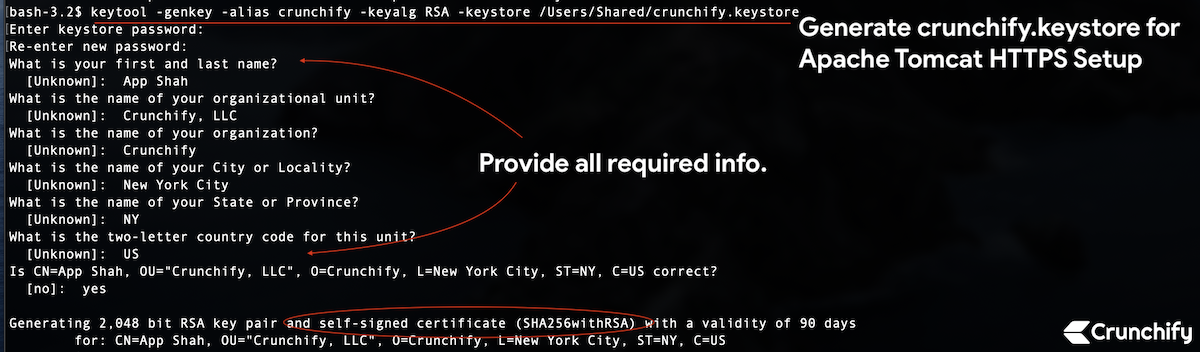
bash - 3.2 $ keytool - genkey - alias crunchify - keyalg RSA - keystore / Users / Shared / crunchify . keystore Enter keystore password : Re - enter new password : What is your first and last name ? [ Unknown ] : App Shah What is the name of your organizational unit ? [ Unknown ] : Crunchify , LLC What is the name of your organization ? [ Unknown ] : Crunchify What is the name of your City or Locality ? [ Unknown ] : New York City What is the name of your State or Province ? [ Unknown ] : NY What is the two - letter country code for this unit ? [ Unknown ] : US Is CN = App Shah , OU = "Crunchify, LLC" , O = Crunchify , L = New York City , ST = NY , C = US correct ? [ no ] : yes Generating 2 , 048 bit RSA key pair and self - signed certificate ( SHA256withRSA ) with a validity of 90 days for : CN = App Shah , OU = "Crunchify, LLC" , O = Crunchify , L = New York City , ST = NY , C = US |
我正在使用 Mac OS X,因此如果您在 Windows 上,請相應地替換您的路徑。 我使用了密碼123456 。
第2步。 創建自簽名證書籤名請求
|
1 2 |
bash - 3.2 $ keytool - certreq - keyalg RSA - alias crunchify - file crunchify . csr - keystore crunchify . keystore Enter keystore password : |
輸入密碼:123456
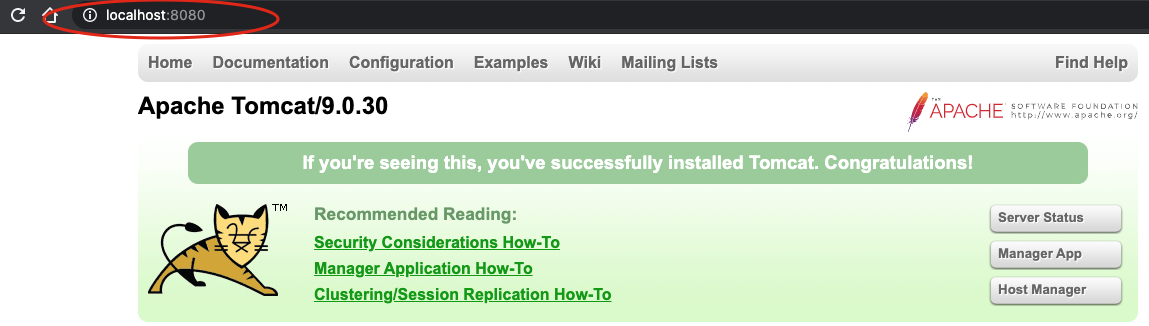
步驟 3。 讓我們首先檢查一下 Tomcat 是否通過 HTTP 在端口 8080 上運行。
使用命令Start tomcat 服務器:< startup.sh >/bin/startup.sh。
確保您位於正確的 Tomcat 路徑位置。
|
1 2 3 4 5 6 7 8 9 10 11 |
bash - 3.2 # pwd / Users / Shared / apache - tomcat - 9.0.30 / bin bash - 3.2 $ . / startup . sh Using CATALINA_BASE : / Users / Shared / apache - tomcat - 9.0.30 Using CATALINA_HOME : / Users / Shared / apache - tomcat - 9.0.30 Using CATALINA_TMPDIR : / Users / Shared / apache - tomcat - 9.0.30 / temp Using JRE_HOME : / Library / Java / JavaVirtualMachines / jdk - 13.0.1.jdk / Contents / Home Using CLASSPATH : / Users / Shared / apache - tomcat - 9.0.30 / bin / bootstrap . jar : / Users / Shared / apache - tomcat - 9.0.30 / bin / tomcat - juli . jar Tomcat started . |
點擊 URL: http://localhost:8080以確保服務器已啟動並正在運行。
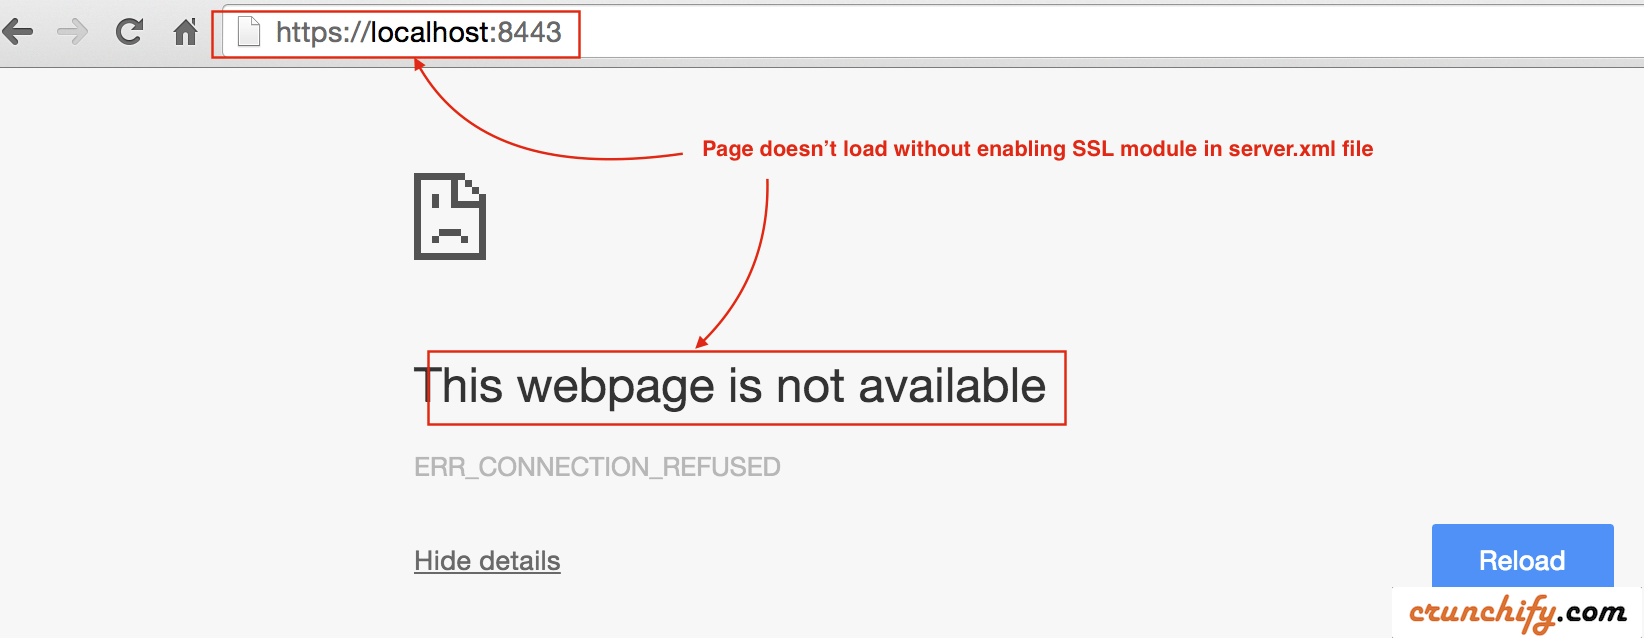
第四步。 現在通過 HTTPS 檢查端口 8443 上的 tomcat 實例。
- 現在檢查端口 8443(HTTPS/SSL URL)。
- 點擊網址:
https://localhost:8443 - 您應該會看到錯誤消息。 頁面根本不應該加載。
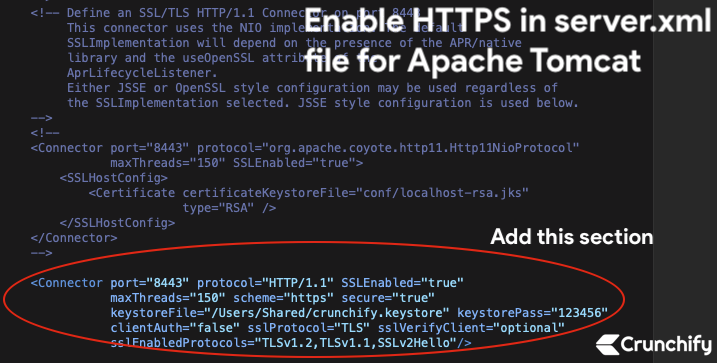
步驟 5。 更新 /conf/server.xml 文件
由於我們在上面生成了密鑰庫和證書籤名請求,我們需要告訴 tomcat 使用它。
- 打開位於
<tomcat_home>/conf/文件夾的server.xml文件並修改設置。 - 在我們的例子中,它是
/Users/Shared/apache-tomcat-9.0.30/conf文件夾。
將以下部分直接添加到 server.xml 文件中:

|
1 2 3 4 5 |
< Connector port = "8443" protocol = "HTTP/1.1" SSLEnabled = "true" maxThreads = "150" scheme = "https" secure = "true" keystoreFile = "/Users/Shared/crunchify.keystore" keystorePass = "123456" clientAuth = "false" sslProtocol = "TLS" sslVerifyClient = "optional" sslEnabledProtocols = "TLSv1.2,TLSv1.1,SSLv2Hello" / > |
- 這裡的密碼是我在
Step-1中使用的123456。 - 協議:HTTP/1.1
保存存檔。 接下來我們將停止並啟動 Tomcat 服務器。
步驟 6。 停止和啟動 Apache Tomcat。
- bash-3.2$ /Users/Shared/apache-tomcat-9.0.30/bin/shutdown.sh
- bash-3.2$ /Users/Shared/apache-tomcat-9.0.30/bin/startup.sh
|
1 2 3 4 5 6 7 8 9 10 11 12 13 14 15 16 17 |
bash - 3.2 $ / Users / Shared / apache - tomcat - 9.0.30 / bin / shutdown . sh Using CATALINA_BASE : / Users / Shared / apache - tomcat - 9.0.30 Using CATALINA_HOME : / Users / Shared / apache - tomcat - 9.0.30 Using CATALINA_TMPDIR : / Users / Shared / apache - tomcat - 9.0.30 / temp Using JRE_HOME : / Library / Java / JavaVirtualMachines / jdk - 13.0.1.jdk / Contents / Home Using CLASSPATH : / Users / Shared / apache - tomcat - 9.0.30 / bin / bootstrap . jar : / Users / Shared / apache - tomcat - 9.0.30 / bin / tomcat - juli . jar NOTE : Picked up JDK_JAVA_OPTIONS : -- add - opens = java . base / java . lang = ALL - UNNAMED -- add - opens = java . base / java . io = ALL - UNNAMED -- add - opens = java . rmi / sun . rmi . transport = ALL - UNNAMED bash - 3.2 $ / Users / Shared / apache - tomcat - 9.0.30 / bin / startup . sh Using CATALINA_BASE : / Users / Shared / apache - tomcat - 9.0.30 Using CATALINA_HOME : / Users / Shared / apache - tomcat - 9.0.30 Using CATALINA_TMPDIR : / Users / Shared / apache - tomcat - 9.0.30 / temp Using JRE_HOME : / Library / Java / JavaVirtualMachines / jdk - 13.0.1.jdk / Contents / Home Using CLASSPATH : / Users / Shared / apache - tomcat - 9.0.30 / bin / bootstrap . jar : / Users / Shared / apache - tomcat - 9.0.30 / bin / tomcat - juli . jar Tomcat started . |
步驟 7。 檢查 HTTPS url 和認證:https://localhost:8443
現在再次點擊 HTTPS 安全 URL 以檢查您的頁面是否已成功加載。
鉻合金:
- 默認情況下,
Chrome Blocks all insecure HTTPS站點。 - 啟用
Chrome flag以加載從 localhost 加載的資源的無效證書
- 轉到 Chrome
- 打開標籤
- 類型:
chrome://flags/#allow-insecure-localhost - 從下拉列表中啟用標誌
- 重新啟動 Chrome

Safari 和 Mozilla 火狐:
-
Accept invalid certificate error並訪問站點。
您應該看到 Apache Tomcat 頁面通過 HTTPS 在端口 8443 上加載
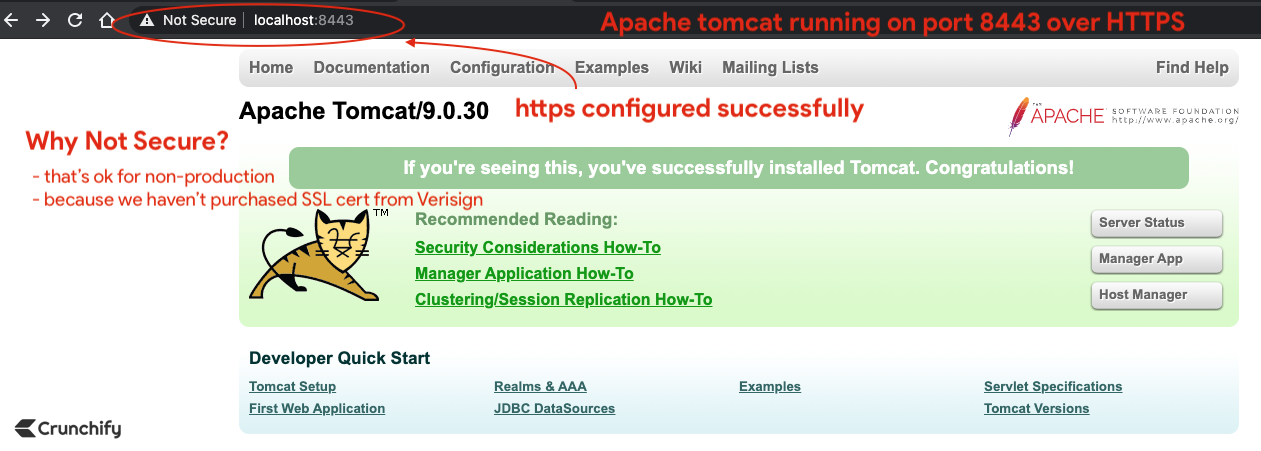
你都準備好了。 你注意到red padlock了嗎? 別擔心。 我們沒有從 Verisign 或 Comodo 購買 SSL 證書。
在生產環境中,您可能看不到那個紅十字標誌。
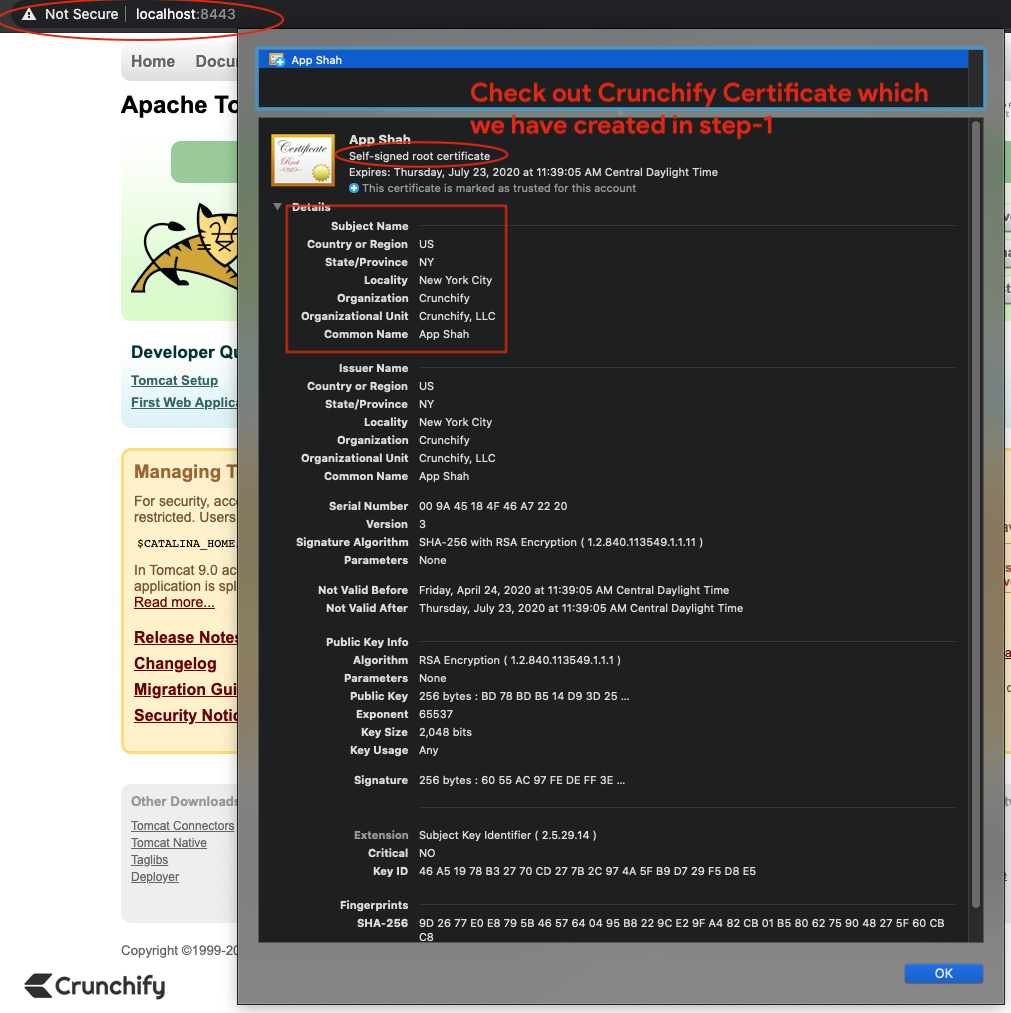
單擊瀏覽器中的證書,我們的默認自簽名證書應
valid for 90天。
獎勵點:
如何使用命令keytool檢查您的cert content ?
|
1 |
bash - 3.2 # keytool -list -keystore /Users/<username>/crunchify.keystore |
結果:
|
1 2 3 4 5 6 7 8 9 10 11 12 |
bash - 3.2 $ keytool - list - keystore / Users / Shared / crunchify . keystore Enter keystore password : Keystore type : PKCS12 Keystore provider : SUN Your keystore contains 1 entry crunchify , Apr 24 , 2020 , PrivateKeyEntry , Certificate fingerprint ( SHA - 256 ) : 9D : 26 : 77 : E0 : E8 : 79 : 5B : 46 : 57 : 64 : 04 : 95 : B8 : 22 : 9C : E2 : 9F : A4 : 82 : CB : 01 : B5 : 80 : 62 : 75 : 90 : 48 : 27 : 5F : 60 : CB : C8 bash - 3.2 $ |