
Guía paso a paso para habilitar HTTPS o SSL de forma correcta en el servidor Apache Tomcat: puerto 8443
Publicado: 2021-04-03Hace casi 12 años que comencé a usar Apache Tomcat. Creo que cuando hice mi primer proyecto de grado, estaba en la versión 1.x de Tomcat. Ahora ya está en la versión 8.0 . Principalmente he estado en contacto con Tomcat Server en mi vida laboral diaria, simplemente no puedo vivir sin él.
En Crunchify ya hemos publicado casi 40 artículos sobre Apache Tomcat . En la mayor parte del tutorial, ejecuté el servidor en el puerto 8080, que es el puerto predeterminado configurado en el archivo server.xml .
En este tutorial, repasaremos todos los pasos en detalle sobre how to enable HTTPS/SSL on Apache Tomcat Server .
Empecemos:
Paso 1. Crear almacén de claves
keytool : generaremos una clave segura usando el comando keytool , que es una herramienta de administración de claves y certificados.
Mando:
|
1 2 3 4 |
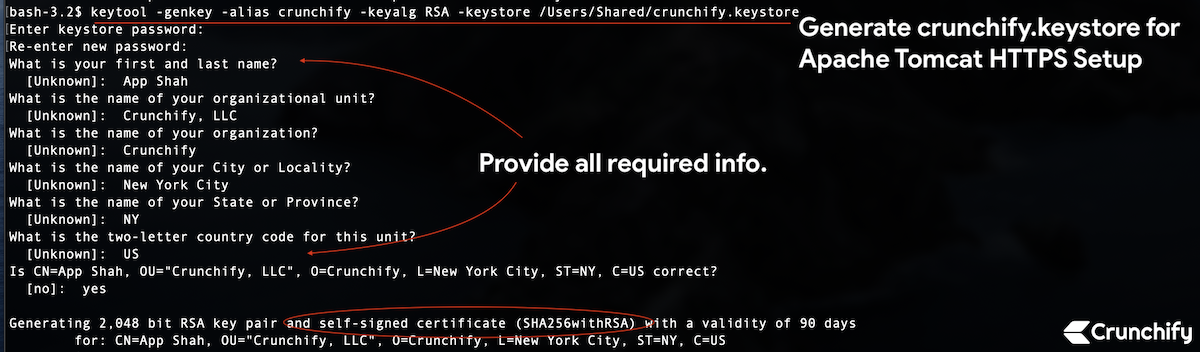
bash - 3.2 $ pwd / Users / Shared bash - 3.2 $ keytool - genkey - alias crunchify - keyalg RSA - keystore / Users / Shared / crunchify . keystore |
El archivo se creará en la carpeta /Users/Shared .
|
1 2 3 4 5 6 7 8 9 10 11 12 13 14 15 16 17 18 19 20 |
bash - 3.2 $ keytool - genkey - alias crunchify - keyalg RSA - keystore / Users / Shared / crunchify . keystore Enter keystore password : Re - enter new password : What is your first and last name ? [ Unknown ] : App Shah What is the name of your organizational unit ? [ Unknown ] : Crunchify , LLC What is the name of your organization ? [ Unknown ] : Crunchify What is the name of your City or Locality ? [ Unknown ] : New York City What is the name of your State or Province ? [ Unknown ] : NY What is the two - letter country code for this unit ? [ Unknown ] : US Is CN = App Shah , OU = "Crunchify, LLC" , O = Crunchify , L = New York City , ST = NY , C = US correct ? [ no ] : yes Generating 2 , 048 bit RSA key pair and self - signed certificate ( SHA256withRSA ) with a validity of 90 days for : CN = App Shah , OU = "Crunchify, LLC" , O = Crunchify , L = New York City , ST = NY , C = US |
Estoy usando Mac OS X, así que reemplace su ruta en consecuencia si está en Windows. He usado la contraseña 123456 .
Paso 2. Crear solicitud de firma de certificado autofirmado
|
1 2 |
bash - 3.2 $ keytool - certreq - keyalg RSA - alias crunchify - file crunchify . csr - keystore crunchify . keystore Enter keystore password : |
Introduzca la contraseña: 123456
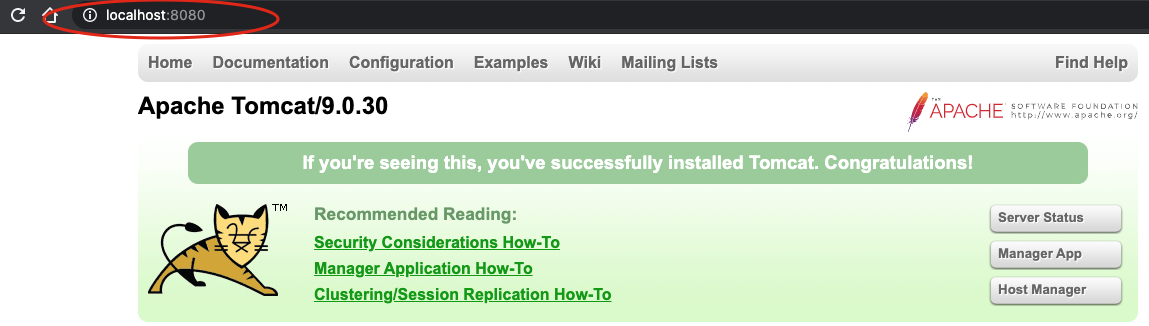
Paso 3. Verifiquemos primero que Tomcat se esté ejecutando en el puerto 8080 a través de HTTP.
Start el servidor Tomcat usando el comando: <tomcat_home> startup.sh .
Asegúrese de estar en la ubicación correcta de la ruta Tomcat.
|
1 2 3 4 5 6 7 8 9 10 11 |
bash - 3.2 # pwd / Users / Shared / apache - tomcat - 9.0.30 / bin bash - 3.2 $ . / startup . sh Using CATALINA_BASE : / Users / Shared / apache - tomcat - 9.0.30 Using CATALINA_HOME : / Users / Shared / apache - tomcat - 9.0.30 Using CATALINA_TMPDIR : / Users / Shared / apache - tomcat - 9.0.30 / temp Using JRE_HOME : / Library / Java / JavaVirtualMachines / jdk - 13.0.1.jdk / Contents / Home Using CLASSPATH : / Users / Shared / apache - tomcat - 9.0.30 / bin / bootstrap . jar : / Users / Shared / apache - tomcat - 9.0.30 / bin / tomcat - juli . jar Tomcat started . |
Presiona la URL: http://localhost:8080 para asegurarte de que el servidor esté funcionando.
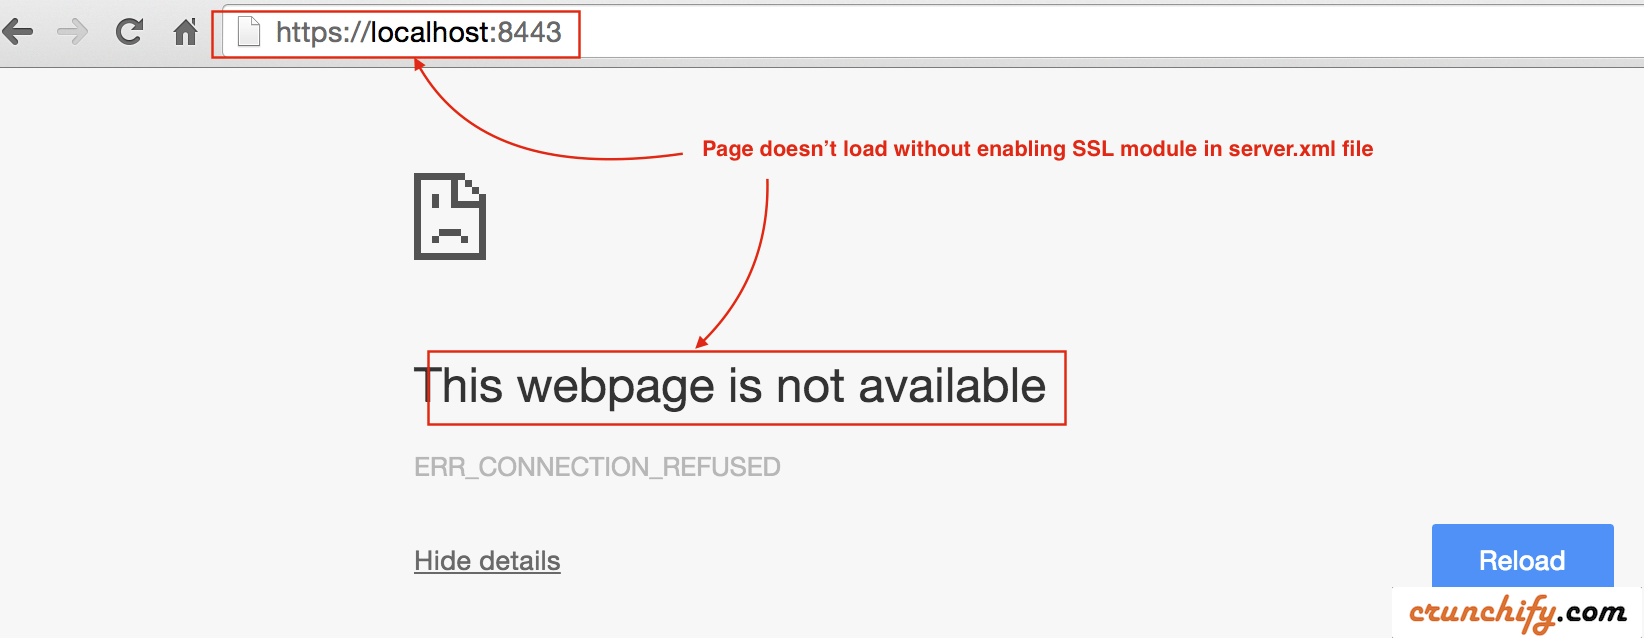
Etapa 4. Ahora verifique la instancia de Tomcat en el puerto 8443 a través de HTTPS.
- Ahora verifique el puerto 8443 (URL HTTPS/SSL).
- Hit URL:
https://localhost:8443 - Debería ver un mensaje de error. La página no debería cargarse en absoluto.
Paso-5. Actualice el archivo /conf/server.xml
Como hemos generado una solicitud de firma de certificado y almacén de claves anteriormente, debemos decirle a tomcat que lo use.
- Abra el archivo
server.xmlque se encuentra en<tomcat_home>/conf/y modifique la configuración. - En nuestro caso, es la carpeta
/Users/Shared/apache-tomcat-9.0.30/conf.
Agregue la siguiente sección directamente al archivo server.xml:

|
1 2 3 4 5 |
< Connector port = "8443" protocol = "HTTP/1.1" SSLEnabled = "true" maxThreads = "150" scheme = "https" secure = "true" keystoreFile = "/Users/Shared/crunchify.keystore" keystorePass = "123456" clientAuth = "false" sslProtocol = "TLS" sslVerifyClient = "optional" sslEnabledProtocols = "TLSv1.2,TLSv1.1,SSLv2Hello" / > |
- Aquí la contraseña es
123456que usé enStep-1. - Protocolo: HTTP/1.1
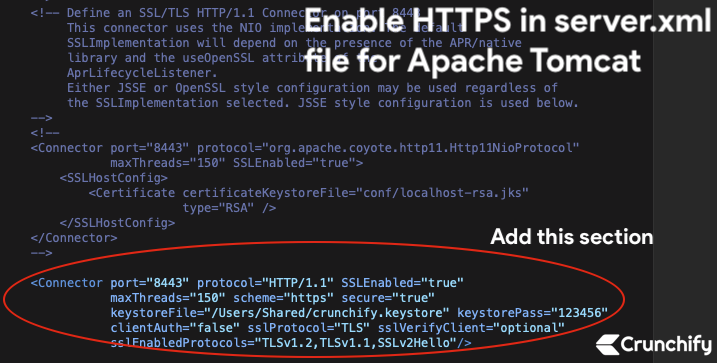
Guardar el archivo. A continuación, detendremos e iniciaremos el servidor Tomcat.
Paso-6. Detenga e inicie Apache Tomcat.
- bash-3.2$ /Usuarios/Compartido/apache-tomcat-9.0.30/bin/shutdown.sh
- bash-3.2$ /Usuarios/Compartido/apache-tomcat-9.0.30/bin/startup.sh
|
1 2 3 4 5 6 7 8 9 10 11 12 13 14 15 16 17 |
bash - 3.2 $ / Users / Shared / apache - tomcat - 9.0.30 / bin / shutdown . sh Using CATALINA_BASE : / Users / Shared / apache - tomcat - 9.0.30 Using CATALINA_HOME : / Users / Shared / apache - tomcat - 9.0.30 Using CATALINA_TMPDIR : / Users / Shared / apache - tomcat - 9.0.30 / temp Using JRE_HOME : / Library / Java / JavaVirtualMachines / jdk - 13.0.1.jdk / Contents / Home Using CLASSPATH : / Users / Shared / apache - tomcat - 9.0.30 / bin / bootstrap . jar : / Users / Shared / apache - tomcat - 9.0.30 / bin / tomcat - juli . jar NOTE : Picked up JDK_JAVA_OPTIONS : -- add - opens = java . base / java . lang = ALL - UNNAMED -- add - opens = java . base / java . io = ALL - UNNAMED -- add - opens = java . rmi / sun . rmi . transport = ALL - UNNAMED bash - 3.2 $ / Users / Shared / apache - tomcat - 9.0.30 / bin / startup . sh Using CATALINA_BASE : / Users / Shared / apache - tomcat - 9.0.30 Using CATALINA_HOME : / Users / Shared / apache - tomcat - 9.0.30 Using CATALINA_TMPDIR : / Users / Shared / apache - tomcat - 9.0.30 / temp Using JRE_HOME : / Library / Java / JavaVirtualMachines / jdk - 13.0.1.jdk / Contents / Home Using CLASSPATH : / Users / Shared / apache - tomcat - 9.0.30 / bin / bootstrap . jar : / Users / Shared / apache - tomcat - 9.0.30 / bin / tomcat - juli . jar Tomcat started . |
Paso-7. Compruebe la URL HTTPS y la certificación: https://localhost:8443
Ahora presione la URL segura HTTPS nuevamente para verificar que su página se cargó correctamente.
Cromo:
- De forma predeterminada,
Chrome Blocks all insecure HTTPS. - Habilite
Chrome flagpara cargar certificados no válidos para recursos cargados desde localhost
- Ir a cromo
- Abrir pestaña
- escriba:
chrome://flags/#allow-insecure-localhost - Habilitar bandera desde el menú desplegable
- Relanzamiento de Chrome

Safari y Mozilla Firefox:
-
Accept invalid certificate errory visite el sitio.
Debería ver la página de Apache Tomcat cargando a través de HTTPS en el puerto 8443
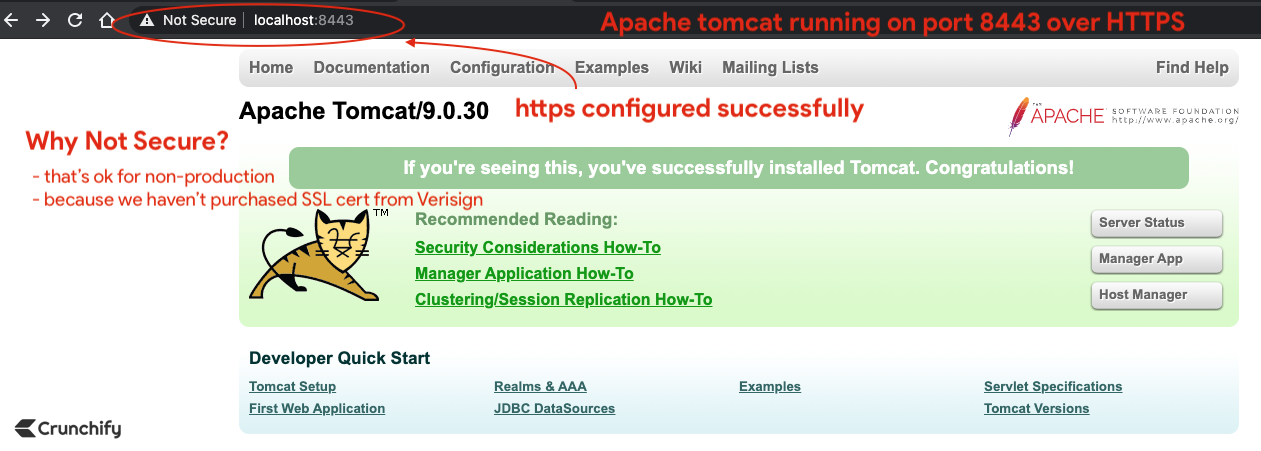
Estas listo. ¿Has notado red padlock ? No te preocupes. No hemos comprado el certificado SSL de Verisign o Comodo.
En el entorno de producción, es posible que no vea ese signo de cruz roja.
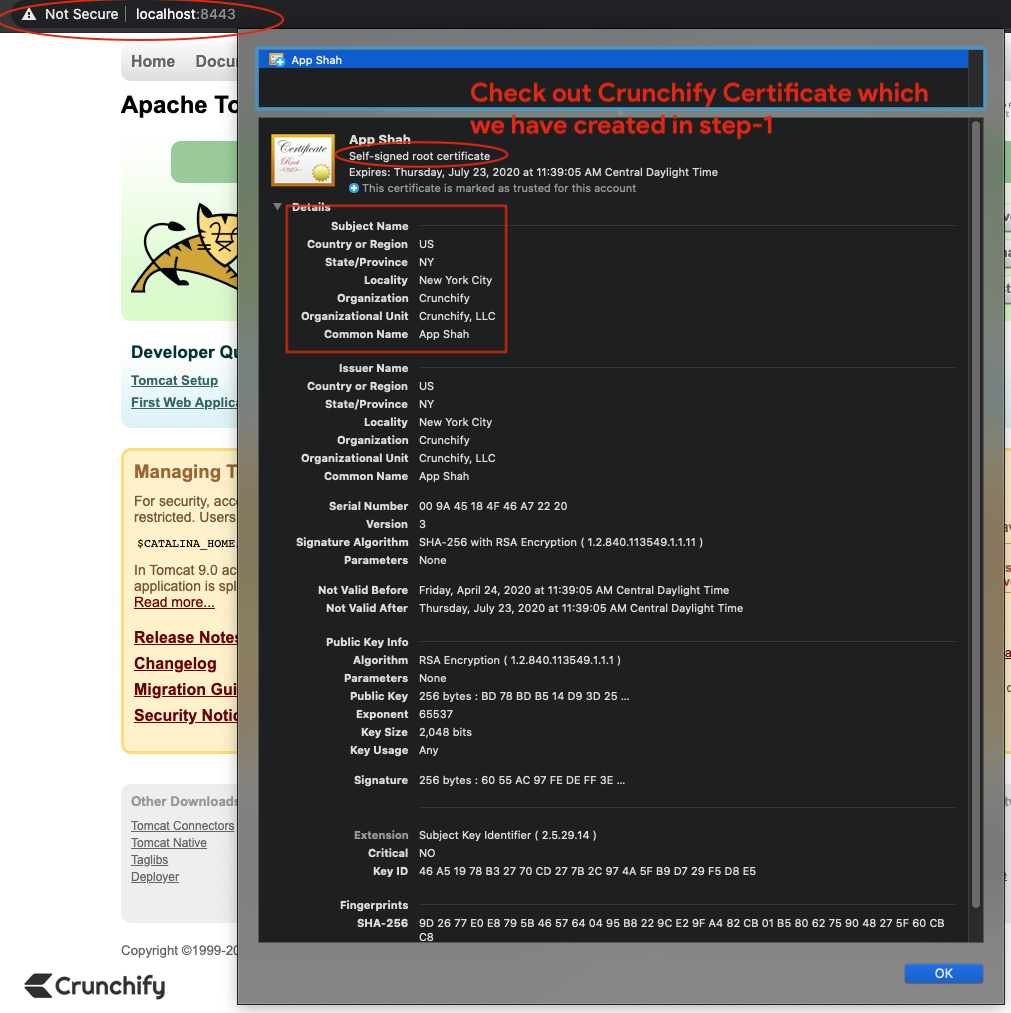
Haga clic en el certificado en el navegador y nuestro certificado autofirmado predeterminado debería ser
valid for 90días.
Punto de bonificación:
¿Cómo verificar el cert content de su certificado usando el comando keytool ?
|
1 |
bash - 3.2 # keytool -list -keystore /Users/<username>/crunchify.keystore |
Resultado:
|
1 2 3 4 5 6 7 8 9 10 11 12 |
bash - 3.2 $ keytool - list - keystore / Users / Shared / crunchify . keystore Enter keystore password : Keystore type : PKCS12 Keystore provider : SUN Your keystore contains 1 entry crunchify , Apr 24 , 2020 , PrivateKeyEntry , Certificate fingerprint ( SHA - 256 ) : 9D : 26 : 77 : E0 : E8 : 79 : 5B : 46 : 57 : 64 : 04 : 95 : B8 : 22 : 9C : E2 : 9F : A4 : 82 : CB : 01 : B5 : 80 : 62 : 75 : 90 : 48 : 27 : 5F : 60 : CB : C8 bash - 3.2 $ |