
Guida passo passo per abilitare HTTPS o SSL in modo corretto su Apache Tomcat Server – Porta 8443
Pubblicato: 2021-04-03Sono passati quasi 12 anni che ho iniziato a usare Apache Tomcat. Credo che quando ho realizzato il mio progetto di prima elementare, fosse su Tomcat versione 1.x Ora è già sulla versione 8.0 . Per lo più sono stato in contatto con Tomcat Server nella mia vita lavorativa quotidiana, semplicemente non posso farne a meno.
Su Crunchify abbiamo già pubblicato quasi 40 articoli su Apache Tomcat . Nella maggior parte del tutorial ho eseguito il server sulla porta 8080 che è la porta predefinita configurata nel file server.xml .
In questo tutorial esamineremo tutti i passaggi in dettaglio su how to enable HTTPS/SSL on Apache Tomcat Server .
Iniziamo:
Passo 1. Crea Keystore
keytool : genereremo una chiave sicura utilizzando il comando keytool , che è uno strumento di gestione delle chiavi e dei certificati.
Comando:
|
1 2 3 4 |
bash - 3.2 $ pwd / Users / Shared bash - 3.2 $ keytool - genkey - alias crunchify - keyalg RSA - keystore / Users / Shared / crunchify . keystore |
Il file verrà creato nella cartella /Users/Shared .
|
1 2 3 4 5 6 7 8 9 10 11 12 13 14 15 16 17 18 19 20 |
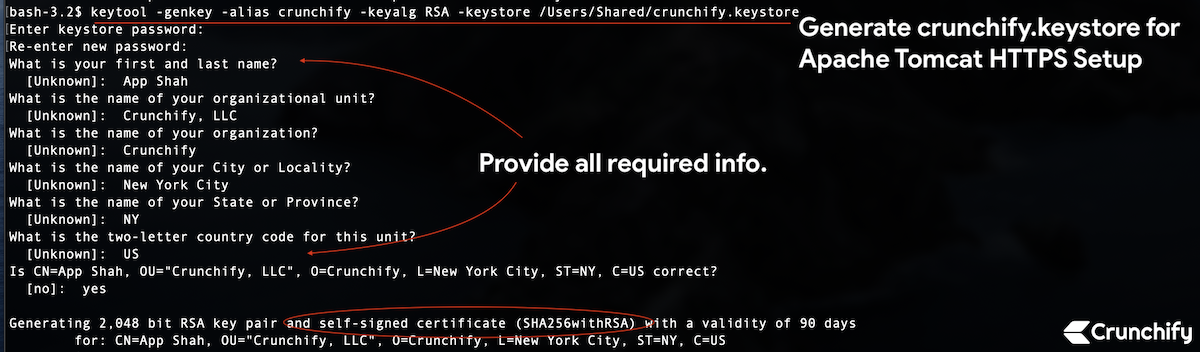
bash - 3.2 $ keytool - genkey - alias crunchify - keyalg RSA - keystore / Users / Shared / crunchify . keystore Enter keystore password : Re - enter new password : What is your first and last name ? [ Unknown ] : App Shah What is the name of your organizational unit ? [ Unknown ] : Crunchify , LLC What is the name of your organization ? [ Unknown ] : Crunchify What is the name of your City or Locality ? [ Unknown ] : New York City What is the name of your State or Province ? [ Unknown ] : NY What is the two - letter country code for this unit ? [ Unknown ] : US Is CN = App Shah , OU = "Crunchify, LLC" , O = Crunchify , L = New York City , ST = NY , C = US correct ? [ no ] : yes Generating 2 , 048 bit RSA key pair and self - signed certificate ( SHA256withRSA ) with a validity of 90 days for : CN = App Shah , OU = "Crunchify, LLC" , O = Crunchify , L = New York City , ST = NY , C = US |
Sto usando Mac OS X, quindi sostituisci il tuo percorso di conseguenza se sei su Windows. Ho usato la password 123456 .
Passo 2. Crea una richiesta di firma del certificato autofirmata
|
1 2 |
bash - 3.2 $ keytool - certreq - keyalg RSA - alias crunchify - file crunchify . csr - keystore crunchify . keystore Enter keystore password : |
Inserisci la password: 123456
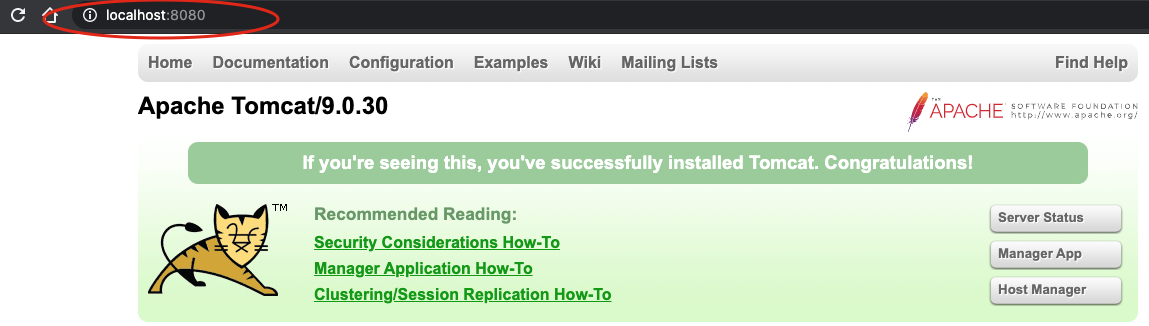
Passaggio 3. Controlliamo prima che Tomcat sia in esecuzione sulla porta 8080 su HTTP.
Start il server Tomcat usando il comando: <tomcat_home>/bin/ startup.sh .
Assicurati di essere nella posizione corretta del percorso Tomcat.
|
1 2 3 4 5 6 7 8 9 10 11 |
bash - 3.2 # pwd / Users / Shared / apache - tomcat - 9.0.30 / bin bash - 3.2 $ . / startup . sh Using CATALINA_BASE : / Users / Shared / apache - tomcat - 9.0.30 Using CATALINA_HOME : / Users / Shared / apache - tomcat - 9.0.30 Using CATALINA_TMPDIR : / Users / Shared / apache - tomcat - 9.0.30 / temp Using JRE_HOME : / Library / Java / JavaVirtualMachines / jdk - 13.0.1.jdk / Contents / Home Using CLASSPATH : / Users / Shared / apache - tomcat - 9.0.30 / bin / bootstrap . jar : / Users / Shared / apache - tomcat - 9.0.30 / bin / tomcat - juli . jar Tomcat started . |
Hit URL: http://localhost:8080 per assicurarsi che il server sia attivo e funzionante.
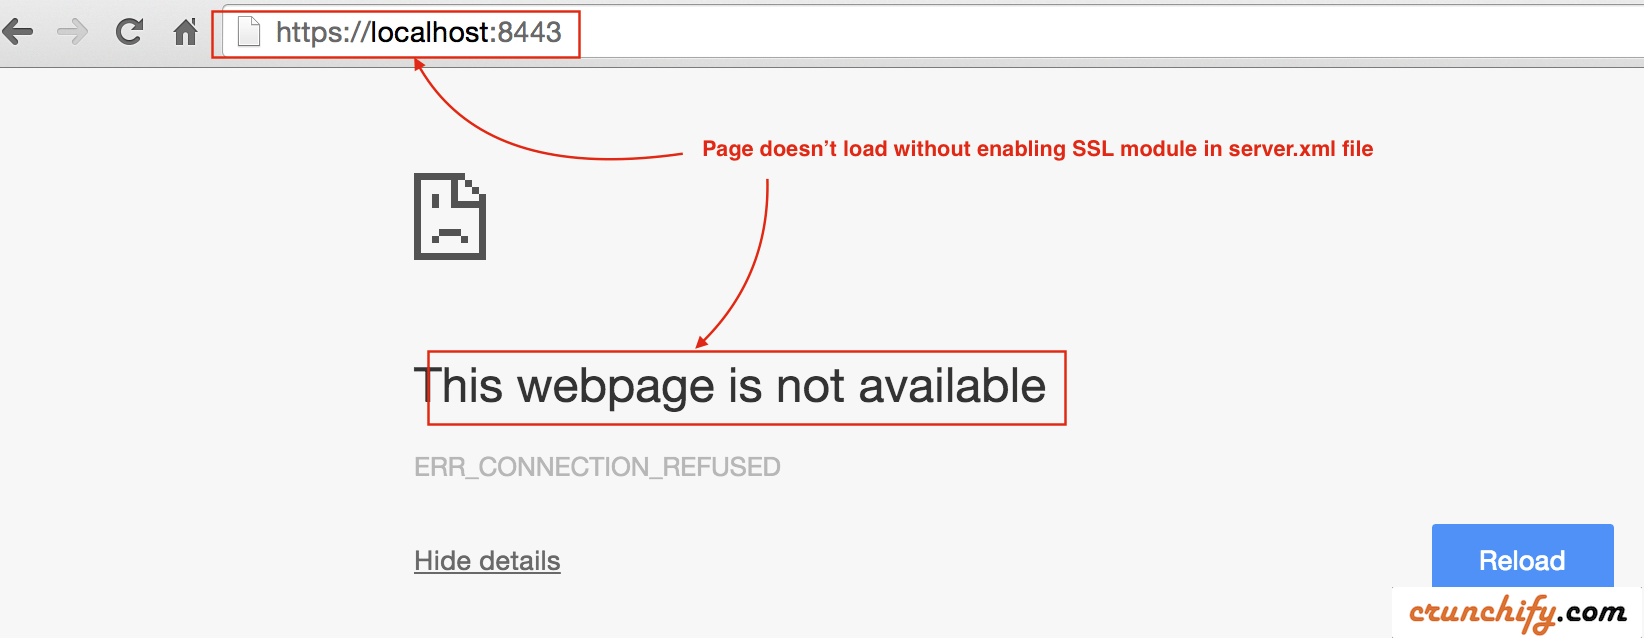
Passaggio 4. Ora controlla l'istanza di Tomcat sulla porta 8443 su HTTPS.
- Ora controlla la porta 8443 (URL HTTPS/SSL).
- Hit URL:
https://localhost:8443 - Dovresti vedere un messaggio di errore. La pagina non dovrebbe caricarsi affatto.
Passaggio 5. Aggiorna il file /conf/server.xml
Poiché abbiamo generato il keystore e la richiesta di firma del certificato sopra, dobbiamo dire a Tomcat di usarlo.
- Aprire il file
server.xmlche si trova nella cartella<tomcat_home>/conf/e modificare le impostazioni. - Nel nostro caso è la cartella
/Users/Shared/apache-tomcat-9.0.30/conf.
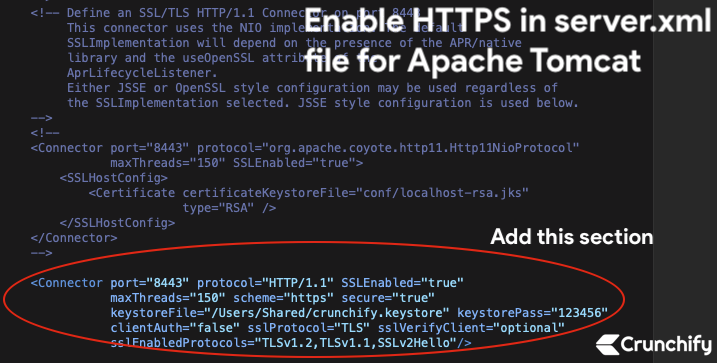
Aggiungi la sezione seguente direttamente al file server.xml:

|
1 2 3 4 5 |
< Connector port = "8443" protocol = "HTTP/1.1" SSLEnabled = "true" maxThreads = "150" scheme = "https" secure = "true" keystoreFile = "/Users/Shared/crunchify.keystore" keystorePass = "123456" clientAuth = "false" sslProtocol = "TLS" sslVerifyClient = "optional" sslEnabledProtocols = "TLSv1.2,TLSv1.1,SSLv2Hello" / > |
- Qui la password è
123456che ho usato nelStep-1. - Protocollo: HTTP/1.1
Salvare il file. Successivamente ci fermeremo e avvieremo Tomcat Server.
Passaggio 6. Arresta e avvia Apache Tomcat.
- bash-3.2$ /Utenti/Condiviso/apache-tomcat-9.0.30/bin/shutdown.sh
- bash-3.2$ /Utenti/Condiviso/apache-tomcat-9.0.30/bin/startup.sh
|
1 2 3 4 5 6 7 8 9 10 11 12 13 14 15 16 17 |
bash - 3.2 $ / Users / Shared / apache - tomcat - 9.0.30 / bin / shutdown . sh Using CATALINA_BASE : / Users / Shared / apache - tomcat - 9.0.30 Using CATALINA_HOME : / Users / Shared / apache - tomcat - 9.0.30 Using CATALINA_TMPDIR : / Users / Shared / apache - tomcat - 9.0.30 / temp Using JRE_HOME : / Library / Java / JavaVirtualMachines / jdk - 13.0.1.jdk / Contents / Home Using CLASSPATH : / Users / Shared / apache - tomcat - 9.0.30 / bin / bootstrap . jar : / Users / Shared / apache - tomcat - 9.0.30 / bin / tomcat - juli . jar NOTE : Picked up JDK_JAVA_OPTIONS : -- add - opens = java . base / java . lang = ALL - UNNAMED -- add - opens = java . base / java . io = ALL - UNNAMED -- add - opens = java . rmi / sun . rmi . transport = ALL - UNNAMED bash - 3.2 $ / Users / Shared / apache - tomcat - 9.0.30 / bin / startup . sh Using CATALINA_BASE : / Users / Shared / apache - tomcat - 9.0.30 Using CATALINA_HOME : / Users / Shared / apache - tomcat - 9.0.30 Using CATALINA_TMPDIR : / Users / Shared / apache - tomcat - 9.0.30 / temp Using JRE_HOME : / Library / Java / JavaVirtualMachines / jdk - 13.0.1.jdk / Contents / Home Using CLASSPATH : / Users / Shared / apache - tomcat - 9.0.30 / bin / bootstrap . jar : / Users / Shared / apache - tomcat - 9.0.30 / bin / tomcat - juli . jar Tomcat started . |
Passaggio 7. Controlla l'URL e la certificazione HTTPS: https://localhost:8443
Ora premi di nuovo l'URL protetto HTTPS per verificare che la pagina sia stata caricata correttamente.
Cromo:
- Per impostazione predefinita,
Chrome Blocks all insecure HTTPS. - Abilita il
Chrome flagper caricare certificati non validi per le risorse caricate da localhost
- Vai su Chrome
- Apri scheda
- digita:
chrome://flags/#allow-insecure-localhost - Abilita flag dal menu a discesa
- Riavvia Chrome

Safari e Mozilla Firefox:
-
Accept invalid certificate errore visita il sito.
Dovresti vedere il caricamento della pagina Apache Tomcat su HTTPS sulla porta 8443
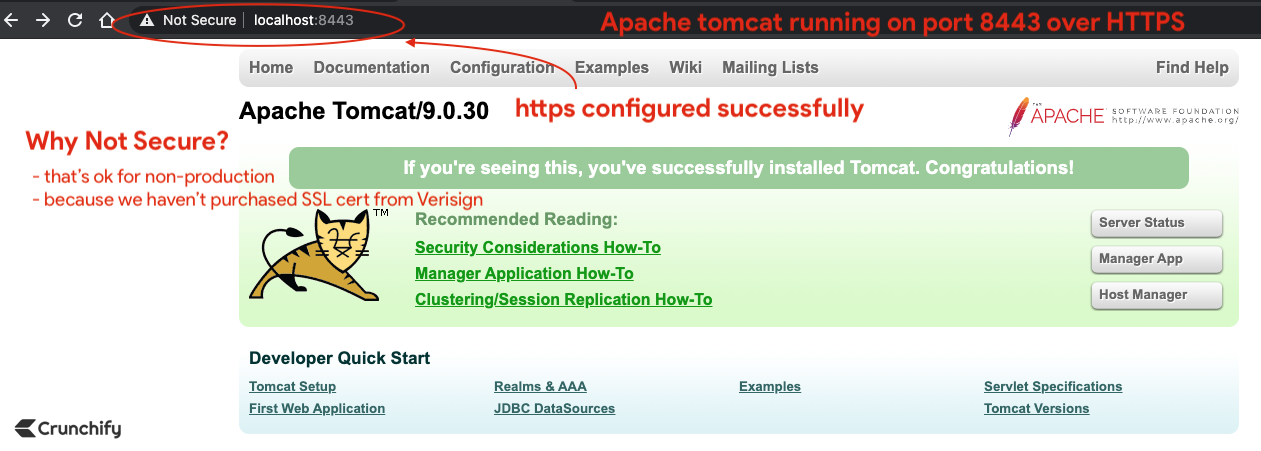
Siete a posto. Hai notato red padlock ? Non preoccuparti. Non abbiamo acquistato certificati SSL da Verisign o Comodo.
Nell'ambiente di produzione potresti non vedere il segno della croce rossa.
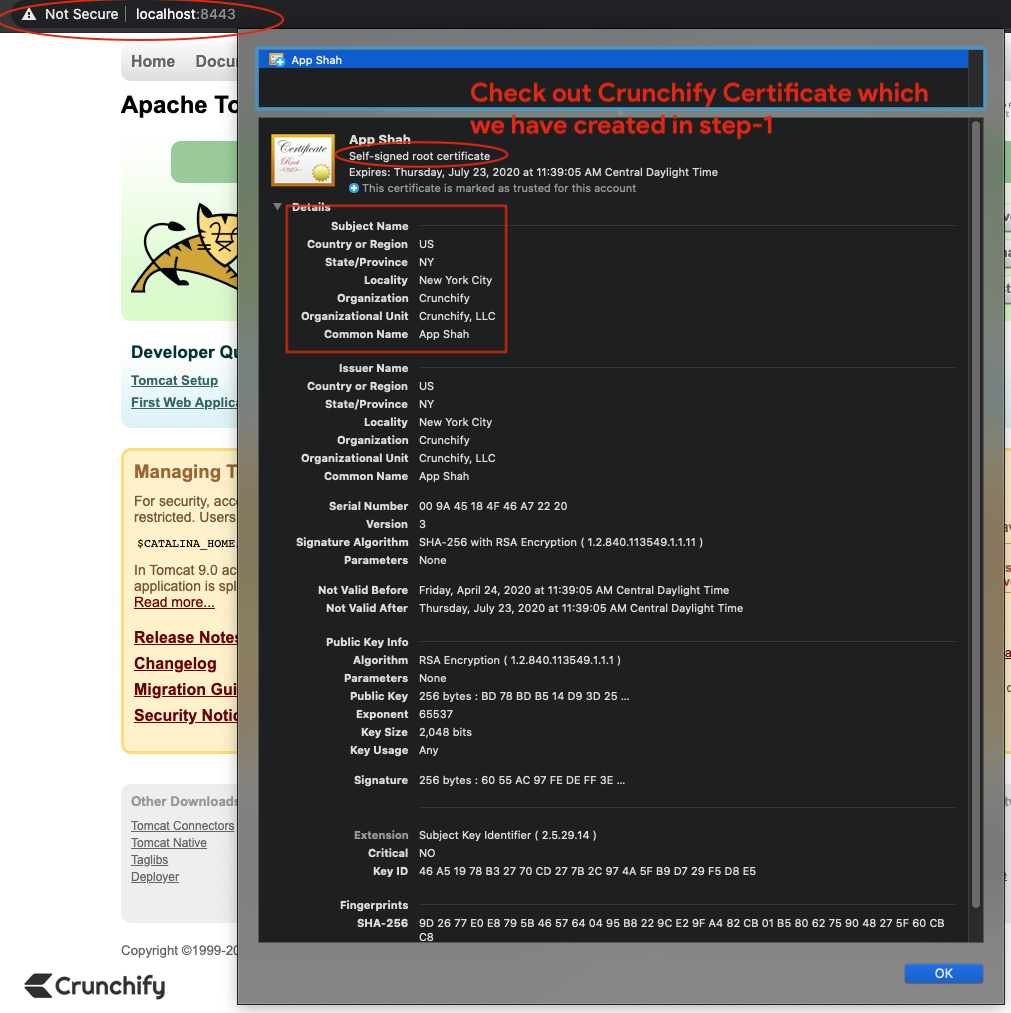
Fai clic su certificato nel browser e il nostro certificato autofirmato predefinito dovrebbe essere
valid for 90giorni.
Punto bonus:
Come controllare il cert content utilizzando il comando keytool ?
|
1 |
bash - 3.2 # keytool -list -keystore /Users/<username>/crunchify.keystore |
Risultato:
|
1 2 3 4 5 6 7 8 9 10 11 12 |
bash - 3.2 $ keytool - list - keystore / Users / Shared / crunchify . keystore Enter keystore password : Keystore type : PKCS12 Keystore provider : SUN Your keystore contains 1 entry crunchify , Apr 24 , 2020 , PrivateKeyEntry , Certificate fingerprint ( SHA - 256 ) : 9D : 26 : 77 : E0 : E8 : 79 : 5B : 46 : 57 : 64 : 04 : 95 : B8 : 22 : 9C : E2 : 9F : A4 : 82 : CB : 01 : B5 : 80 : 62 : 75 : 90 : 48 : 27 : 5F : 60 : CB : C8 bash - 3.2 $ |