
React 테스트 주도 개발: 사용자 스토리에서 프로덕션까지
게시 됨: 2022-03-11이번 포스트에서는 사용자 스토리에서 개발까지 테스트 주도 개발(TDD)을 사용하여 React 앱을 개발해 보겠습니다. 또한 TDD에 Jest와 Enzyme을 사용할 것입니다. 이 가이드를 완료하면 다음을 수행할 수 있습니다.
- 요구 사항에 따라 에픽 및 사용자 스토리를 만듭니다.
- 사용자 스토리를 기반으로 테스트를 만듭니다.
- TDD를 사용하여 React 앱을 개발합니다.
- Enzyme과 Jest를 사용하여 React 앱을 테스트합니다.
- 반응형 디자인을 위해 CSS 변수를 사용/재사용합니다.
- 제공된 props에 따라 다르게 렌더링되고 작동하는 재사용 가능한 React 구성 요소를 만듭니다.
- React PropTypes를 사용하여 유형 검사 구성 요소 props.
이 기사는 React에 대한 기본 지식이 있다고 가정합니다. React가 완전히 처음이라면 공식 튜토리얼을 완료하고 Toptal의 2019 React 튜토리얼: 파트 1 및 파트 2를 살펴보는 것이 좋습니다.
테스트 기반 React 앱 개요
몇 가지 UI 구성 요소로 구성된 기본 뽀모도로 타이머 앱을 빌드합니다. 각 구성 요소에는 해당 테스트 파일에 별도의 테스트 세트가 있습니다. 우선 프로젝트 요구 사항에 따라 다음과 같이 에픽과 사용자 스토리를 만들 수 있습니다.
| 서사시 | 사용자 스토리 | 허용 기준 |
| 사용자로서 시간을 관리하려면 타이머를 사용해야 합니다. | 사용자로서 시간을 카운트다운할 수 있도록 타이머를 시작해야 합니다. | 사용자가 다음을 수행할 수 있는지 확인합니다. * 타이머 시작 * 타이머 시작 카운트다운 참조 사용자가 시작 버튼을 두 번 이상 클릭하더라도 시간 카운트다운이 중단되어서는 안 됩니다. |
| 사용자는 필요할 때만 시간을 카운트다운할 수 있도록 타이머를 중지해야 합니다. | 사용자가 다음을 수행할 수 있는지 확인합니다. * 타이머를 중지 * 타이머가 멈춘 것을 참조하십시오 사용자가 중지 버튼을 두 번 이상 클릭해도 아무 일도 일어나지 않아야 합니다. | |
| 사용자로서 처음부터 시간을 카운트다운할 수 있도록 타이머를 재설정해야 합니다. | 사용자가 다음을 수행할 수 있는지 확인합니다. * 타이머 재설정 *기본값으로 타이머 재설정 참조 |
와이어프레임
프로젝트 설정
먼저 Create React App 을 사용하여 다음과 같이 React 프로젝트를 생성합니다.
$ npx create-react-app react-timer $ cd react-timer $ npm startURL http://localhost:3000에서 새 브라우저 탭이 열리는 것을 볼 수 있습니다. Ctrl+C 를 사용하여 실행 중인 React 앱을 중지할 수 있습니다.
이제 다음과 같이 Jest와 Enzyme 및 일부 종속성을 추가할 것입니다.
$ npm i -D enzyme $ npm i -D react-test-renderer enzyme-adapter-react-16또한 src 디렉토리에 setupTests.js 라는 파일을 추가하거나 업데이트합니다.
import { configure } from 'enzyme'; import Adapter from 'enzyme-adapter-react-16'; configure({ adapter: new Adapter() });Create React App 은 각 테스트 전에 setupTests.js 파일을 실행하기 때문에 Enzyme을 실행하고 적절하게 구성합니다.
CSS 구성
우리는 응용 프로그램에서 CSS 변수를 전역적으로 사용할 수 있기를 원하기 때문에 변수와 기본 CSS 재설정을 작성할 것입니다. :root 범위에서 변수를 정의합니다. 변수를 정의하기 위한 구문은 사용자 정의 속성 표기법을 사용하는 것입니다.
index.css 파일로 이동하여 다음을 추가합니다.
:root { --main-font: “Roboto”, sans-serif; } body, div, p { margin: 0; padding: 0; }이제 CSS를 애플리케이션으로 가져와야 합니다. index.js 파일을 다음과 같이 업데이트합니다.
import React from 'react'; import ReactDOM from 'react-dom'; import './index.css'; ReactDOM.render( <React.StrictMode> <App /> </React.StrictMode> document.getElementById(“root”) )얕은 렌더링 테스트
이미 알고 계시겠지만 TDD 프로세스는 다음과 같습니다.
- 테스트를 추가합니다.
- 모든 테스트를 실행하면 테스트가 실패하는 것을 볼 수 있습니다.
- 테스트를 통과하는 코드를 작성하십시오.
- 모든 테스트를 실행합니다.
- 리팩토링.
- 반복하다.
따라서 얕은 렌더 테스트를 위한 첫 번째 테스트를 추가한 다음 테스트를 통과하는 코드를 작성합니다. 다음과 같이 src/components/App 디렉토리에 App.spec.js 라는 새 사양 파일을 추가합니다.
import React from 'react'; import { shallow } from 'enzyme'; import App from './App'; describe('App', () => { it('should render a <div />', () => { const container = shallow(<App />); expect(container.find('div').length).toEqual(1); }); });그런 다음 테스트를 실행할 수 있습니다.
$ npm test테스트가 실패하는 것을 볼 수 있습니다.
앱 구성 요소
이제 테스트를 통과할 앱 구성 요소를 생성해 보겠습니다. src/components/App 디렉토리에서 App.jsx 로 이동하여 다음과 같이 코드를 추가합니다.
import React from 'react'; const App = () => <div className=”app-container” />; export default App;이제 테스트를 다시 실행합니다.
$ npm test이제 첫 번째 테스트를 통과해야 합니다.
앱 CSS 추가
다음과 같이 App 구성 요소에 일부 스타일을 추가하기 위해 src/components/App 디렉토리에 App.css 파일을 생성할 것입니다.
.app-container { height: 100vh; width: 100vw; align-items: center; display: flex; justify-content: center; }이제 CSS를 App.jsx 파일로 가져올 준비가 되었습니다.
import React from 'react'; import './App.css'; const App = () => <div className=”app-container” />; export default App;다음으로, 다음과 같이 App 구성 요소를 가져오도록 index.js 파일을 업데이트해야 합니다.
import React from "react" import ReactDOM from "react-dom" import "./index.css" import App from "./components/App/App" import * as serviceWorker from "./serviceWorker" ReactDOM.render( <React.StrictMode> <App /> </React.StrictMode>, document.getElementById("root") ) // If you want your app to work offline and load faster, you can change // unregister() to register() below. Note this comes with some pitfalls. // Learn more about service workers: https://bit.ly/CRA-PWA serviceWorker.unregister()타이머 구성 요소 추가
마지막으로 앱에는 Timer 구성 요소가 포함되므로 App.spec.js 파일을 업데이트하여 앱에 Timer 구성 요소가 있는지 확인합니다. 또한 각 테스트 케이스 전에 얕은 렌더 테스트를 수행해야 하므로 첫 번째 테스트 케이스 외부에 컨테이너 변수를 선언할 것입니다.
import React from "react" import { shallow } from "enzyme" import App from "./App" import Timer from "../Timer/Timer" describe("App", () => { let container beforeEach(() => (container = shallow(<App />))) it("should render a <div />", () => { expect(container.find("div").length).toEqual(1) }) it("should render the Timer Component", () => { expect(container.containsMatchingElement(<Timer />)).toEqual(true) }) }) 이 단계에서 npm test 를 실행하면 아직 Timer 구성 요소가 없기 때문에 테스트가 실패합니다.
타이머 얕은 렌더링 테스트 작성
이제 src/components 디렉토리 아래에 있는 Timer 라는 새 디렉토리에 Timer.spec.js 라는 파일을 생성하겠습니다.
또한 Timer.spec.js 파일에 얕은 렌더 테스트를 추가합니다.
import React from "react" import { shallow } from "enzyme" import Timer from "./Timer" describe("Timer", () => { let container beforeEach(() => (container = shallow(<Timer />))) it("should render a <div />", () => { expect(container.find("div").length).toBeGreaterThanOrEqual(1) }) })테스트는 예상대로 실패합니다.
타이머 구성 요소 만들기
다음으로 Timer.jsx 라는 새 파일을 만들고 사용자 스토리를 기반으로 동일한 변수와 메서드를 정의합니다.
import React, { Component } from 'react'; class Timer extends Component { constructor(props) { super(props); this.state = { minutes: 25, seconds: 0, isOn: false }; } startTimer() { console.log('Starting timer.'); } stopTimer() { console.log('Stopping timer.'); } resetTimer() { console.log('Resetting timer.'); } render = () => { return <div className="timer-container" />; }; } export default Timer; 이것은 테스트를 통과 해야 하고 Timer.spec.js 파일에서 <div /> 를 렌더링해야 하지만 앱 구성 요소에 아직 Timer 구성 요소를 추가하지 않았기 때문에 테스트는 Timer 구성 요소를 렌더링 하지 않아야 합니다.
다음과 같이 App.jsx 파일에 Timer 구성 요소를 추가할 것입니다.
import React from 'react'; import './App.css'; import Timer from '../Timer/Timer'; const App = () => ( <div className="app-container"> <Timer /> </div> ); export default App;이제 모든 테스트를 통과해야 합니다.
타이머 CSS 추가
Timer와 관련된 CSS 변수를 추가하고 더 작은 장치에 대한 미디어 쿼리를 추가할 것입니다.
index.css 파일을 다음과 같이 업데이트합니다.
:root { --timer-background-color: #FFFFFF; --timer-border: 1px solid #000000; --timer-height: 70%; --timer-width: 70%; } body, div, p { margin: 0; padding: 0; } @media screen and (max-width: 1024px) { :root { --timer-height: 100%; --timer-width: 100%; } }또한 components/Timer 디렉토리 아래에 Timer.css 파일을 만들 것입니다.
.timer-container { background-color: var(--timer-background-color); border: var(--timer-border); height: var(--timer-height); width: var(--timer-width); }Timer.css 파일을 가져오려면 Timer.jsx 를 업데이트해야 합니다.
import React, { Component } from "react" import "./Timer.css"지금 React 앱을 실행하면 브라우저에 테두리가 있는 간단한 화면이 표시됩니다.
TimerButton 얕은 렌더링 테스트 작성
Start, Stop 및 Reset 의 세 가지 버튼이 필요하므로 TimerButton 구성 요소 를 만들 것입니다.
먼저 Timer 구성 요소에 TimerButton 구성 요소가 있는지 확인하기 위해 Timer.spec.js 파일을 업데이트해야 합니다.
it("should render instances of the TimerButton component", () => { expect(container.find("TimerButton").length).toEqual(3) })이제 src/components 디렉토리 아래의 TimerButton 이라는 새 디렉토리에 TimerButton.spec.js 파일을 추가하고 다음과 같이 파일에 테스트를 추가해 보겠습니다.

import React from "react" import { shallow } from "enzyme" import TimerButton from "./TimerButton" describe("TimerButton", () => { let container beforeEach(() => { container = shallow( <TimerButton buttonAction={jest.fn()} buttonValue={""} /> ) }) it("should render a <div />", () => { expect(container.find("div").length).toBeGreaterThanOrEqual(1) }) })이제 테스트를 실행하면 테스트가 실패한 것을 볼 수 있습니다.
TimerButton 구성 요소에 대한 TimerButton.jsx 파일을 생성해 보겠습니다.
import React from 'react'; import PropTypes from 'prop-types'; const TimerButton = ({ buttonAction, buttonValue }) => ( <div className="button-container" /> ); TimerButton.propTypes = { buttonAction: PropTypes.func.isRequired, buttonValue: PropTypes.string.isRequired, }; export default TimerButton; 이 단계에서 npm test 를 실행하면 테스트 가 TimerButton 구성 요소의 인스턴스를 렌더링해야 하지만 아직 Timer 구성 요소에 TimerButton 구성 요소를 추가하지 않았기 때문에 실패합니다.
TimerButton 구성 요소를 가져오고 Timer.jsx 의 render 메서드에 세 개의 TimerButton 구성 요소를 추가해 보겠습니다 .
render = () => { return ( <div className="timer-container"> <div className="time-display"></div> <div className="timer-button-container"> <TimerButton buttonAction={this.startTimer} buttonValue={'Start'} /> <TimerButton buttonAction={this.stopTimer} buttonValue={'Stop'} /> <TimerButton buttonAction={this.resetTimer} buttonValue={'Reset'} /> </div> </div> ); };타이머 버튼 CSS
이제 TimerButton 구성 요소에 대한 CSS 변수를 추가할 차례입니다. index.css 파일에 :root 범위의 변수를 추가해 보겠습니다.
:root { ... --button-border: 3px solid #000000; --button-text-size: 2em; } @media screen and (max-width: 1024px) { :root { … --button-text-size: 4em; } }또한 src/components 디렉토리 아래의 TimerButton 디렉토리에 TimerButton.css 라는 파일을 생성해 보겠습니다.
.button-container { flex: 1 1 auto; text-align: center; margin: 0px 20px; border: var(--button-border); font-size: var(--button-text-size); } .button-container:hover { cursor: pointer; }그에 따라 TimerButton.jsx를 업데이트하여 TimerButton.css 파일을 가져오고 버튼 값을 표시해 보겠습니다 .
import React from 'react'; import PropTypes from 'prop-types'; import './TimerButton.css'; const TimerButton = ({ buttonAction, buttonValue }) => ( <div className="button-container"> <p className="button-value">{buttonValue}</p> </div> ); TimerButton.propTypes = { buttonAction: PropTypes.func.isRequired, buttonValue: PropTypes.string.isRequired, }; export default TimerButton;또한 세 개의 버튼을 수평으로 정렬하려면 Timer.css 를 업데이트해야 하므로 Timer.css 파일도 업데이트하겠습니다.
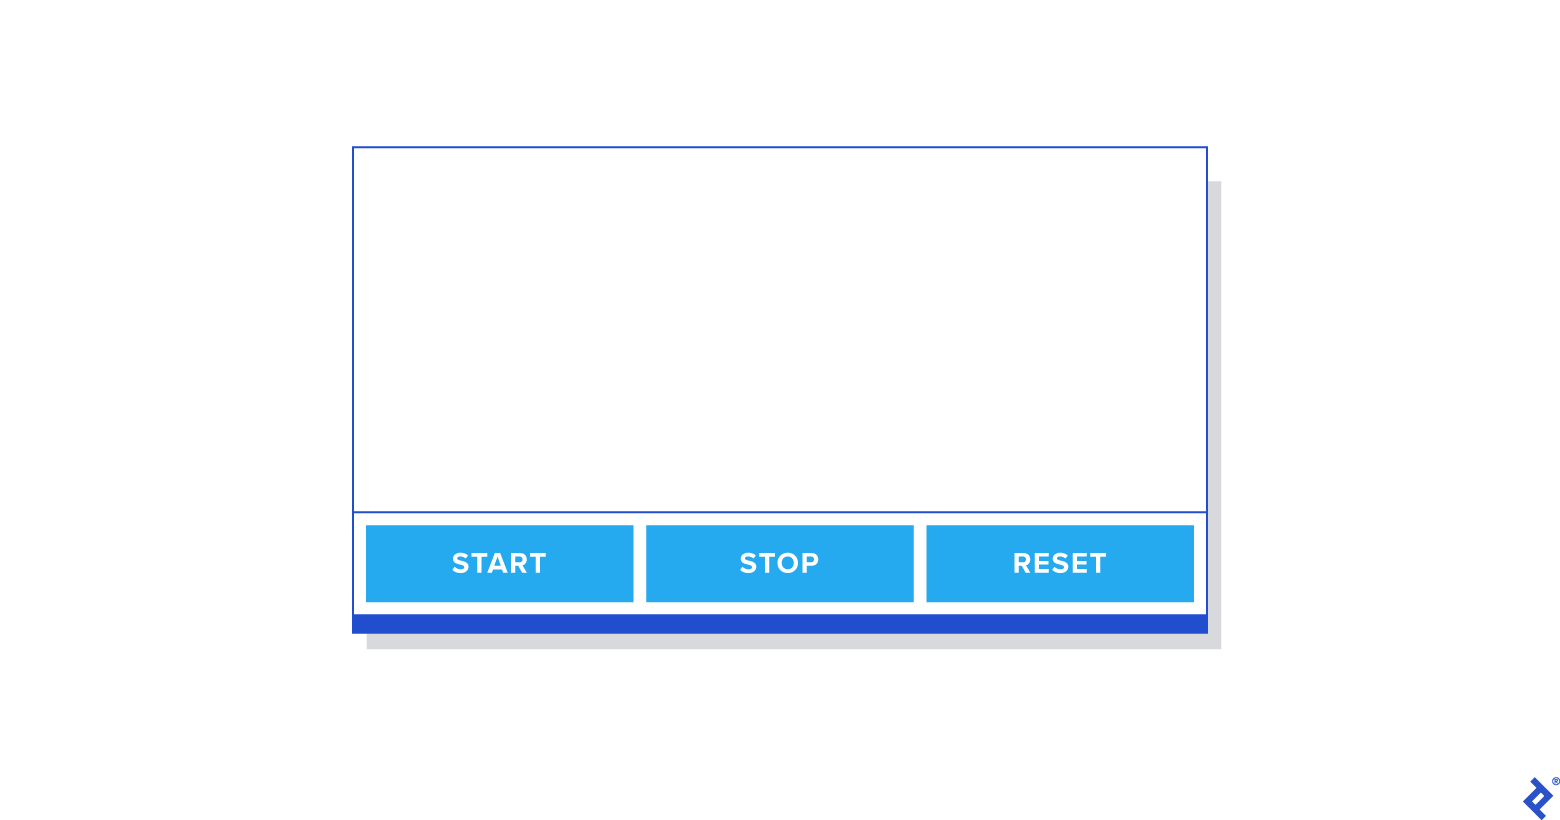
import React from 'react'; import PropTypes from 'prop-types'; import './TimerButton.css'; const TimerButton = ({ buttonAction, buttonValue }) => ( <div className="button-container"> <p className="button-value">{buttonValue}</p> </div> ); TimerButton.propTypes = { buttonAction: PropTypes.func.isRequired, buttonValue: PropTypes.string.isRequired, }; export default TimerButton;지금 React 앱을 실행하면 다음과 같은 화면이 표시됩니다.
타이머 리팩토링
startTimer, stopTimer, restartTimer 및 resetTimer 와 같은 기능을 구현하고 싶기 때문에 Timer를 리팩토링할 것입니다. 먼저 Timer.spec.js 파일을 업데이트하겠습니다.
describe('mounted Timer', () => { let container; beforeEach(() => (container = mount(<Timer />))); it('invokes startTimer when the start button is clicked', () => { const spy = jest.spyOn(container.instance(), 'startTimer'); container.instance().forceUpdate(); expect(spy).toHaveBeenCalledTimes(0); container.find('.start-timer').first().simulate('click'); expect(spy).toHaveBeenCalledTimes(1); }); it('invokes stopTimer when the stop button is clicked', () => { const spy = jest.spyOn(container.instance(), 'stopTimer'); container.instance().forceUpdate(); expect(spy).toHaveBeenCalledTimes(0); container.find('.stop-timer').first().simulate('click'); expect(spy).toHaveBeenCalledTimes(1); }); it('invokes resetTimer when the reset button is clicked', () => { const spy = jest.spyOn(container.instance(), 'resetTimer'); container.instance().forceUpdate(); expect(spy).toHaveBeenCalledTimes(0); container.find('.reset-timer').first().simulate('click'); expect(spy).toHaveBeenCalledTimes(1); }); });테스트를 실행하면 아직 TimerButton 구성 요소를 업데이트하지 않았기 때문에 추가된 테스트가 실패하는 것을 볼 수 있습니다. 클릭 이벤트를 추가하도록 TimerButton 구성 요소를 업데이트해 보겠습니다.
const TimerButton = ({ buttonAction, buttonValue }) => ( <div className="button-container" onClick={() => buttonAction()}> <p className="button-value">{buttonValue}</p> </div> );이제 테스트를 통과해야 합니다.
다음으로 탑재된 타이머 테스트 케이스에서 각 함수가 호출될 때 상태를 확인하기 위해 더 많은 테스트를 추가할 것입니다.
it('should change isOn state true when the start button is clicked', () => { container.instance().forceUpdate(); container.find('.start-timer').first().simulate('click'); expect(container.instance().state.isOn).toEqual(true); }); it('should change isOn state false when the stop button is clicked', () => { container.instance().forceUpdate(); container.find('.stop-timer').first().simulate('click'); expect(container.instance().state.isOn).toEqual(false); }); it('should change isOn state false when the reset button is clicked', () => { container.instance().forceUpdate(); container.find('.stop-timer').first().simulate('click'); expect(container.instance().state.isOn).toEqual(false); expect(container.instance().state.minutes).toEqual(25); expect(container.instance().state.seconds).toEqual(0); });테스트를 실행하면 아직 각 방법을 구현하지 않았기 때문에 테스트가 실패한 것을 볼 수 있습니다. 테스트를 통과하기 위해 각 기능을 구현해 보겠습니다.
startTimer() { this.setState({ isOn: true }); } stopTimer() { this.setState({ isOn: false }); } resetTimer() { this.stopTimer(); this.setState({ minutes: 25, seconds: 0, }); }테스트를 실행하면 테스트가 통과하는 것을 볼 수 있습니다. 이제 Timer.jsx 의 나머지 기능을 구현해 보겠습니다.
import React, { Component } from 'react'; import './Timer.css'; import TimerButton from '../TimerButton/TimerButton'; class Timer extends Component { constructor(props) { super(props); this.state = { minutes: 25, seconds: 0, isOn: false, }; this.startTimer = this.startTimer.bind(this); this.stopTimer = this.stopTimer.bind(this); this.resetTimer = this.resetTimer.bind(this); } startTimer() { if (this.state.isOn === true) { return; } this.myInterval = setInterval(() => { const { seconds, minutes } = this.state; if (seconds > 0) { this.setState(({ seconds }) => ({ seconds: seconds - 1, })); } if (seconds === 0) { if (minutes === 0) { clearInterval(this.myInterval); } else { this.setState(({ minutes }) => ({ minutes: minutes - 1, seconds: 59, })); } } }, 1000); this.setState({ isOn: true }); } stopTimer() { clearInterval(this.myInterval); this.setState({ isOn: false }); } resetTimer() { this.stopTimer(); this.setState({ minutes: 25, seconds: 0, }); } render = () => { const { minutes, seconds } = this.state; return ( <div className="timer-container"> <div className="time-display"> {minutes}:{seconds < 10 ? `0${seconds}` : seconds} </div> <div className="timer-button-container"> <TimerButton className="start-timer" buttonAction={this.startTimer} buttonValue={'Start'} /> <TimerButton className="stop-timer" buttonAction={this.stopTimer} buttonValue={'Stop'} /> <TimerButton className="reset-timer" buttonAction={this.resetTimer} buttonValue={'Reset'} /> </div> </div> ); }; } export default Timer;이전에 준비한 사용자 스토리를 기반으로 모든 기능이 작동하는 것을 볼 수 있습니다.
이것이 TDD를 사용하여 기본 React 앱을 개발한 방법입니다. 사용자 스토리와 허용 기준이 더 구체적이면 테스트 케이스를 더 정확하게 작성할 수 있으므로 더 많은 기여를 할 수 있습니다.
마무리
TDD를 사용하여 애플리케이션을 개발할 때 프로젝트를 에픽이나 사용자 스토리로 나누는 것뿐만 아니라 승인 기준에 대해 잘 준비하는 것도 매우 중요합니다. 이 기사에서는 프로젝트를 세분화하고 React TDD 개발을 위해 준비된 승인 기준을 사용하는 방법을 보여주고 싶었습니다.
React TDD와 관련된 많은 리소스가 있지만 이 기사가 사용자 스토리를 사용하여 React를 사용한 TDD 개발에 대해 조금 배우는 데 도움이 되었기를 바랍니다. 이 접근 방식을 에뮬레이트하기로 선택한 경우 여기에서 전체 소스 코드를 참조하십시오.