
用於 REST API 的帶有 JWT 的 Spring Security
已發表: 2022-03-11Spring 被認為是 Java 生態系統中的可信框架,並被廣泛使用。 將 Spring 稱為框架不再有效,因為它更像是涵蓋各種框架的總稱。 其中一個框架是 Spring Security,它是一個強大且可定制的身份驗證和授權框架。 它被認為是保護基於 Spring 的應用程序的事實標準。
儘管它很受歡迎,但我必須承認,當涉及到單頁應用程序時,它的配置並不簡單直接。 我懷疑原因是它開始更多是作為一個面向 MVC 應用程序的框架,其中網頁呈現發生在服務器端並且通信是基於會話的。
如果後端基於 Java 和 Spring,則使用 Spring Security 進行身份驗證/授權並將其配置為無狀態通信是有意義的。 雖然有很多文章解釋了這是如何完成的,但對我來說,第一次設置它仍然令人沮喪,我不得不閱讀和總結來自多個來源的信息。 這就是我決定寫這篇文章的原因,我將在其中嘗試總結和涵蓋您在配置過程中可能遇到的所有必需的細微細節和弱點。
定義術語
在深入研究技術細節之前,我想明確定義 Spring Security 上下文中使用的術語,以確保我們都說同一種語言。
這些是我們需要解決的術語:
- 身份驗證是指根據提供的憑據驗證用戶身份的過程。 一個常見的例子是在您登錄網站時輸入用戶名和密碼。 您可以將其視為對您是誰的問題的回答。 .
- 授權是指確定用戶是否具有執行特定操作或讀取特定數據的適當權限的過程,假設用戶已成功通過身份驗證。 您可以將其視為對用戶可以執行/閱讀此問題的答案嗎? .
- 原則是指當前認證的用戶。
- 授予權限是指經過身份驗證的用戶的權限。
- 角色是指經過身份驗證的用戶的一組權限。
創建一個基本的 Spring 應用程序
在開始配置 Spring Security 框架之前,讓我們創建一個基本的 Spring Web 應用程序。 為此,我們可以使用 Spring Initializr 並生成模板項目。 對於一個簡單的 Web 應用程序,只需要一個 Spring Web 框架依賴就足夠了:
<dependencies> <dependency> <groupId>org.springframework.boot</groupId> <artifactId>spring-boot-starter-web</artifactId> </dependency> </dependencies>創建項目後,我們可以向其中添加一個簡單的 REST 控制器,如下所示:
@RestController @RequestMapping("hello") public class HelloRestController { @GetMapping("user") public String helloUser() { return "Hello User"; } @GetMapping("admin") public String helloAdmin() { return "Hello Admin"; } }在此之後,如果我們構建並運行該項目,我們可以在 Web 瀏覽器中訪問以下 URL:
-
http://localhost:8080/hello/user將返回字符串Hello User。 -
http://localhost:8080/hello/admin將返回字符串Hello Admin。
現在,我們可以將 Spring Security 框架添加到我們的項目中,我們可以通過將以下依賴項添加到我們的pom.xml文件來做到這一點:
<dependencies> <dependency> <groupId>org.springframework.boot</groupId> <artifactId>spring-boot-starter-security</artifactId> </dependency> </dependencies> 在我們提供相應的配置之前,添加其他 Spring 框架依賴項通常不會立即對應用程序產生影響,但 Spring Security 的不同之處在於它確實會立即產生影響,這通常會使新用戶感到困惑。 添加後,如果我們重建並運行項目,然後嘗試訪問上述 URL 之一而不是查看結果,我們將被重定向到http://localhost:8080/login 。 這是默認行為,因為 Spring Security 框架要求對所有 URL 進行開箱即用的身份驗證。
要通過身份驗證,我們可以使用默認用戶名user並在控制台中找到自動生成的密碼:
Using generated security password: 1fc15145-dfee-4bec-a009-e32ca21c77ce 請記住,每次我們重新運行應用程序時,密碼都會更改。 如果我們想改變這種行為並使密碼靜態化,我們可以將以下配置添加到我們的application.properties文件中:
spring.security.user.password=Test12345_ 現在,如果我們在登錄表單中輸入憑據,我們將被重定向回我們的 URL,我們將看到正確的結果。 請注意,開箱即用的身份驗證過程是基於會話的,如果我們要註銷,可以訪問以下 URL: http://localhost:8080/logout
這種開箱即用的行為可能對我們具有基於會話的身份驗證的經典 MVC Web 應用程序有用,但在單頁應用程序的情況下,它通常沒用,因為在大多數用例中,我們有客戶端渲染和基於 JWT 的無狀態身份驗證。 在這種情況下,我們將不得不大量定制 Spring Security 框架,我們將在本文的其餘部分進行此操作。
例如,我們將實現一個經典的書店 Web 應用程序並創建一個後端,該後端將提供 CRUD API 來創建作者和書籍以及用於用戶管理和身份驗證的 API。
Spring 安全架構概述
在我們開始自定義配置之前,讓我們先討論一下 Spring Security 身份驗證在幕後是如何工作的。
下圖展示了流程並顯示瞭如何處理身份驗證請求:
Spring 安全架構
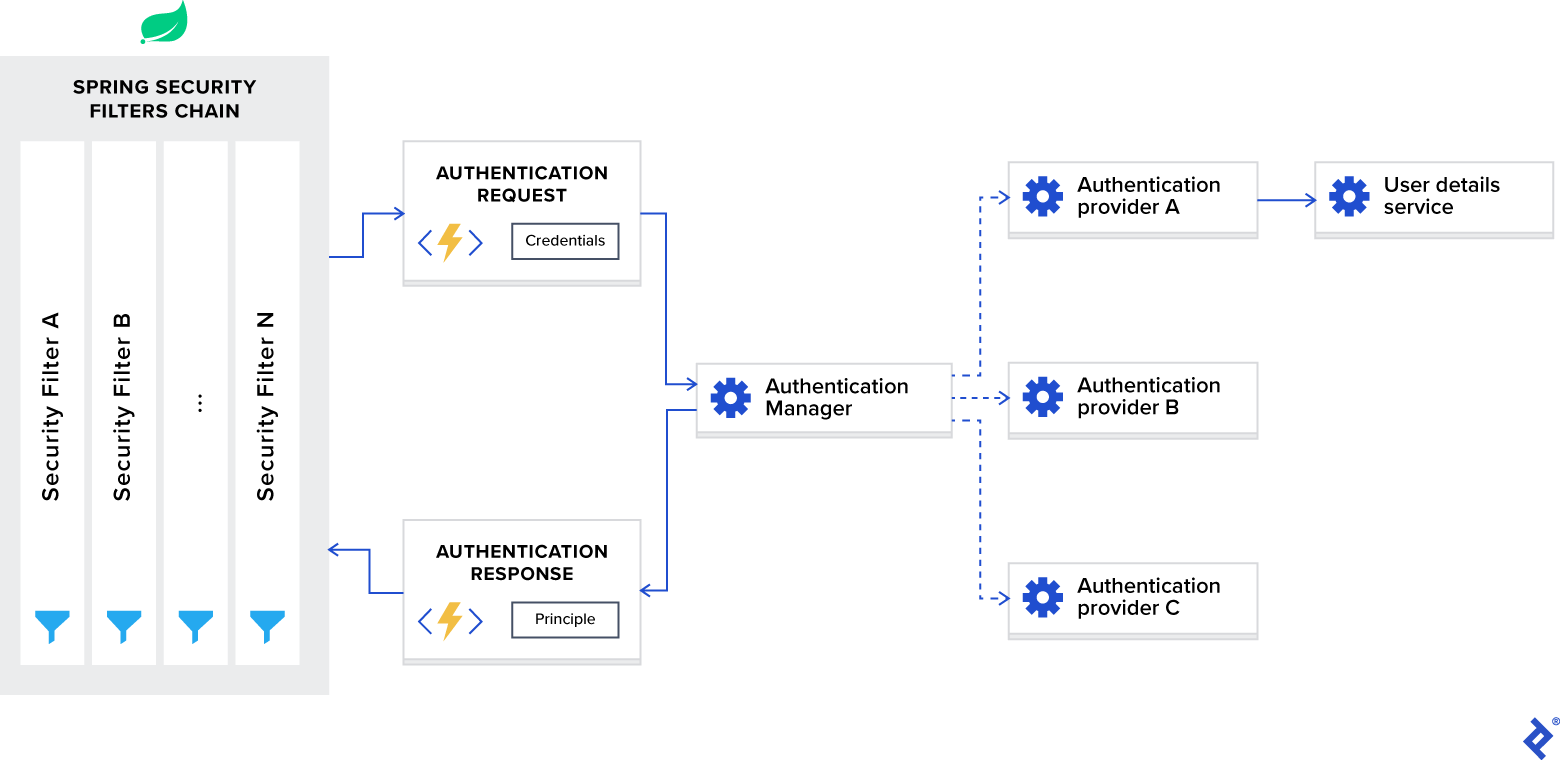
現在,讓我們將這個圖分解成組件並分別討論它們。
Spring Security 過濾器鏈
當您將 Spring Security 框架添加到您的應用程序時,它會自動註冊一個過濾器鏈來攔截所有傳入請求。 該鏈由各種過濾器組成,每個過濾器都處理一個特定的用例。
例如:
- 根據配置檢查請求的 URL 是否可公開訪問。
- 如果是基於會話的身份驗證,請檢查用戶是否已在當前會話中進行身份驗證。
- 檢查用戶是否有權執行請求的操作,等等。
我想提到的一個重要細節是 Spring Security 過濾器以最低順序註冊,並且是第一個調用的過濾器。 對於某些用例,如果您想將自定義過濾器放在它們前面,則需要為它們的順序添加填充。 這可以通過以下配置完成:
spring.security.filter.order=10 一旦我們將此配置添加到我們的application.properties文件中,我們將在 Spring Security 過濾器前面有 10 個自定義過濾器的空間。
身份驗證管理器
您可以將AuthenticationManager視為一個協調器,您可以在其中註冊多個提供者,並根據請求類型,將身份驗證請求傳遞給正確的提供者。
身份驗證提供者
AuthenticationProvider處理特定類型的身份驗證。 它的接口只暴露了兩個功能:
-
authenticate對請求執行身份驗證。 - support 檢查此提供程序是否
supports指定的身份驗證類型。
我們在示例項目中使用的接口的一個重要實現是DaoAuthenticationProvider ,它從UserDetailsService ervice 檢索用戶詳細信息。
用戶詳情服務
UserDetailsService在 Spring 文檔中被描述為加載用戶特定數據的核心接口。
在大多數用例中,身份驗證提供程序根據數據庫中的憑據提取用戶身份信息,然後執行驗證。 因為這個用例很常見,所以 Spring 開發人員決定將它提取為一個單獨的接口,它暴露了單個函數:
-
loadUserByUsername接受用戶名作為參數並返回用戶身份對象。
使用帶有 Spring Security 的 JWT 進行身份驗證
在討論了 Spring Security 框架的內部之後,讓我們將其配置為使用 JWT 令牌進行無狀態身份驗證。
要自定義 Spring Security,我們需要在類路徑中使用@EnableWebSecurity註解進行註解的配置類。 此外,為了簡化定製過程,框架公開了一個WebSecurityConfigurerAdapter類。 我們將擴展這個適配器並覆蓋它的兩個函數,以便:
- 使用正確的提供者配置身份驗證管理器
- 配置網絡安全(公共 URL、私有 URL、授權等)
@EnableWebSecurity public class SecurityConfig extends WebSecurityConfigurerAdapter { @Override protected void configure(AuthenticationManagerBuilder auth) throws Exception { // TODO configure authentication manager } @Override protected void configure(HttpSecurity http) throws Exception { // TODO configure web security } } 在我們的示例應用程序中,我們將用戶身份存儲在 MongoDB 數據庫的users集合中。 這些身份由User實體映射,它們的 CRUD 操作由UserRepo Spring Data 存儲庫定義。
現在,當我們接受身份驗證請求時,我們需要使用提供的憑據從數據庫中檢索正確的身份,然後對其進行驗證。 為此,我們需要實現UserDetailsService接口,定義如下:
public interface UserDetailsService { UserDetails loadUserByUsername(String username) throws UsernameNotFoundException; } 在這裡,我們可以看到需要返回實現了UserDetails接口的對象,我們的User實體實現了它(實現細節請看樣例項目的倉庫)。 考慮到它只暴露了單函數原型,我們可以把它當作一個函數式接口,並以 lambda 表達式的形式提供實現。
@EnableWebSecurity public class SecurityConfig extends WebSecurityConfigurerAdapter { private final UserRepo userRepo; public SecurityConfig(UserRepo userRepo) { this.userRepo = userRepo; } @Override protected void configure(AuthenticationManagerBuilder auth) throws Exception { auth.userDetailsService(username -> userRepo .findByUsername(username) .orElseThrow( () -> new UsernameNotFoundException( format("User: %s, not found", username) ) )); } // Details omitted for brevity } 在這裡, auth.userDetailsService函數調用將使用我們實現的UserDetailsService ervice 接口啟動DaoAuthenticationProvider實例,並將其註冊到身份驗證管理器中。
除了身份驗證提供程序,我們還需要使用正確的密碼編碼模式配置身份驗證管理器,該模式將用於憑據驗證。 為此,我們需要將PasswordEncoder接口的首選實現公開為 bean。
在我們的示例項目中,我們將使用 bcrypt 密碼哈希算法。
@EnableWebSecurity public class SecurityConfig extends WebSecurityConfigurerAdapter { private final UserRepo userRepo; public SecurityConfig(UserRepo userRepo) { this.userRepo = userRepo; } @Override protected void configure(AuthenticationManagerBuilder auth) throws Exception { auth.userDetailsService(username -> userRepo .findByUsername(username) .orElseThrow( () -> new UsernameNotFoundException( format("User: %s, not found", username) ) )); } @Bean public PasswordEncoder passwordEncoder() { return new BCryptPasswordEncoder(); } // Details omitted for brevity }配置了身份驗證管理器後,我們現在需要配置 Web 安全性。 我們正在實現一個 REST API,需要使用 JWT 令牌進行無狀態身份驗證; 因此,我們需要設置以下選項:
- 啟用 CORS 並禁用 CSRF。
- 將會話管理設置為無狀態。
- 設置未經授權的請求異常處理程序。
- 設置端點的權限。
- 添加 JWT 令牌過濾器。
該配置實現如下:
@EnableWebSecurity public class SecurityConfig extends WebSecurityConfigurerAdapter { private final UserRepo userRepo; private final JwtTokenFilter jwtTokenFilter; public SecurityConfig(UserRepo userRepo, JwtTokenFilter jwtTokenFilter) { this.userRepo = userRepo; this.jwtTokenFilter = jwtTokenFilter; } // Details omitted for brevity @Override protected void configure(HttpSecurity http) throws Exception { // Enable CORS and disable CSRF http = http.cors().and().csrf().disable(); // Set session management to stateless http = http .sessionManagement() .sessionCreationPolicy(SessionCreationPolicy.STATELESS) .and(); // Set unauthorized requests exception handler http = http .exceptionHandling() .authenticationEntryPoint( (request, response, ex) -> { response.sendError( HttpServletResponse.SC_UNAUTHORIZED, ex.getMessage() ); } ) .and(); // Set permissions on endpoints http.authorizeRequests() // Our public endpoints .antMatchers("/api/public/**").permitAll() .antMatchers(HttpMethod.GET, "/api/author/**").permitAll() .antMatchers(HttpMethod.POST, "/api/author/search").permitAll() .antMatchers(HttpMethod.GET, "/api/book/**").permitAll() .antMatchers(HttpMethod.POST, "/api/book/search").permitAll() // Our private endpoints .anyRequest().authenticated(); // Add JWT token filter http.addFilterBefore( jwtTokenFilter, UsernamePasswordAuthenticationFilter.class ); } // Used by spring security if CORS is enabled. @Bean public CorsFilter corsFilter() { UrlBasedCorsConfigurationSource source = new UrlBasedCorsConfigurationSource(); CorsConfiguration config = new CorsConfiguration(); config.setAllowCredentials(true); config.addAllowedOrigin("*"); config.addAllowedHeader("*"); config.addAllowedMethod("*"); source.registerCorsConfiguration("/**", config); return new CorsFilter(source); } } 請注意,我們在 Spring Security 內部UsernamePasswordAuthenticationFilter之前添加了JwtTokenFilter 。 我們這樣做是因為此時我們需要訪問用戶身份來執行身份驗證/授權,並且它的提取發生在基於提供的 JWT 令牌的 JWT 令牌過濾器內。 這是按如下方式實現的:
@Component public class JwtTokenFilter extends OncePerRequestFilter { private final JwtTokenUtil jwtTokenUtil; private final UserRepo userRepo; public JwtTokenFilter(JwtTokenUtil jwtTokenUtil, UserRepo userRepo) { this.jwtTokenUtil = jwtTokenUtil; this.userRepo = userRepo; } @Override protected void doFilterInternal(HttpServletRequest request, HttpServletResponse response, FilterChain chain) throws ServletException, IOException { // Get authorization header and validate final String header = request.getHeader(HttpHeaders.AUTHORIZATION); if (isEmpty(header) || !header.startsWith("Bearer ")) { chain.doFilter(request, response); return; } // Get jwt token and validate final String token = header.split(" ")[1].trim(); if (!jwtTokenUtil.validate(token)) { chain.doFilter(request, response); return; } // Get user identity and set it on the spring security context UserDetails userDetails = userRepo .findByUsername(jwtTokenUtil.getUsername(token)) .orElse(null); UsernamePasswordAuthenticationToken authentication = new UsernamePasswordAuthenticationToken( userDetails, null, userDetails == null ? List.of() : userDetails.getAuthorities() ); authentication.setDetails( new WebAuthenticationDetailsSource().buildDetails(request) ); SecurityContextHolder.getContext().setAuthentication(authentication); chain.doFilter(request, response); } }在實現我們的登錄 API 功能之前,我們還需要處理一個步驟——我們需要訪問身份驗證管理器。 默認情況下,它是不可公開訪問的,我們需要在我們的配置類中將其顯式公開為 bean。

這可以按如下方式完成:
@EnableWebSecurity public class SecurityConfig extends WebSecurityConfigurerAdapter { // Details omitted for brevity @Override @Bean public AuthenticationManager authenticationManagerBean() throws Exception { return super.authenticationManagerBean(); } }現在,我們準備實現我們的登錄 API 函數:
@Api(tags = "Authentication") @RestController @RequestMapping(path = "api/public") public class AuthApi { private final AuthenticationManager authenticationManager; private final JwtTokenUtil jwtTokenUtil; private final UserViewMapper userViewMapper; public AuthApi(AuthenticationManager authenticationManager, JwtTokenUtil jwtTokenUtil, UserViewMapper userViewMapper) { this.authenticationManager = authenticationManager; this.jwtTokenUtil = jwtTokenUtil; this.userViewMapper = userViewMapper; } @PostMapping("login") public ResponseEntity<UserView> login(@RequestBody @Valid AuthRequest request) { try { Authentication authenticate = authenticationManager .authenticate( new UsernamePasswordAuthenticationToken( request.getUsername(), request.getPassword() ) ); User user = (User) authenticate.getPrincipal(); return ResponseEntity.ok() .header( HttpHeaders.AUTHORIZATION, jwtTokenUtil.generateAccessToken(user) ) .body(userViewMapper.toUserView(user)); } catch (BadCredentialsException ex) { return ResponseEntity.status(HttpStatus.UNAUTHORIZED).build(); } } }在這裡,我們使用身份驗證管理器驗證提供的憑據,如果成功,我們生成 JWT 令牌並將其作為響應標頭與響應正文中的用戶身份信息一起返回。
使用 Spring Security 進行授權
在上一節中,我們設置了身份驗證過程並配置了公共/私有 URL。 這對於簡單的應用程序可能已經足夠了,但對於大多數實際用例,我們總是需要為用戶提供基於角色的訪問策略。 在本章中,我們將解決這個問題並使用 Spring Security 框架設置基於角色的授權模式。
在我們的示例應用程序中,我們定義了以下三個角色:
-
USER_ADMIN允許我們管理應用程序用戶。 -
AUTHOR_ADMIN允許我們管理作者。 -
BOOK_ADMIN允許我們管理書籍。
現在,我們需要將它們應用到相應的 URL:
-
api/public可公開訪問。 -
api/admin/user可以訪問具有USER_ADMIN角色的用戶。 -
api/author可以訪問具有AUTHOR_ADMIN角色的用戶。 -
api/book可以訪問具有BOOK_ADMIN角色的用戶。
Spring Security 框架為我們提供了兩個選項來設置授權模式:
- 基於 URL 的配置
- 基於註解的配置
首先,讓我們看看基於 URL 的配置是如何工作的。 它可以應用於 Web 安全配置,如下所示:
@EnableWebSecurity public class SecurityConfig extends WebSecurityConfigurerAdapter { // Details omitted for brevity @Override protected void configure(HttpSecurity http) throws Exception { // Enable CORS and disable CSRF http = http.cors().and().csrf().disable(); // Set session management to stateless http = http .sessionManagement() .sessionCreationPolicy(SessionCreationPolicy.STATELESS) .and(); // Set unauthorized requests exception handler http = http .exceptionHandling() .authenticationEntryPoint( (request, response, ex) -> { response.sendError( HttpServletResponse.SC_UNAUTHORIZED, ex.getMessage() ); } ) .and(); // Set permissions on endpoints http.authorizeRequests() // Our public endpoints .antMatchers("/api/public/**").permitAll() .antMatchers(HttpMethod.GET, "/api/author/**").permitAll() .antMatchers(HttpMethod.POST, "/api/author/search").permitAll() .antMatchers(HttpMethod.GET, "/api/book/**").permitAll() .antMatchers(HttpMethod.POST, "/api/book/search").permitAll() // Our private endpoints .antMatchers("/api/admin/user/**").hasRole(Role.USER_ADMIN) .antMatchers("/api/author/**").hasRole(Role.AUTHOR_ADMIN) .antMatchers("/api/book/**").hasRole(Role.BOOK_ADMIN) .anyRequest().authenticated(); // Add JWT token filter http.addFilterBefore( jwtTokenFilter, UsernamePasswordAuthenticationFilter.class ); } // Details omitted for brevity }如您所見,這種方法簡單明了,但也有一個缺點。 我們應用程序中的授權模式可能很複雜,如果我們在一個地方定義所有規則,它將變得非常龐大、複雜且難以閱讀。 正因為如此,我通常更喜歡使用基於註解的配置。
Spring Security 框架為 Web 安全定義了以下註解:
-
@PreAuthorize支持 Spring 表達式語言,用於在執行方法之前提供基於表達式的訪問控制。 -
@PostAuthorize支持 Spring 表達式語言,用於在方法執行後提供基於表達式的訪問控制(提供訪問方法結果的能力)。 -
@PreFilter支持 Spring 表達式語言,用於在執行基於我們定義的自定義安全規則的方法之前過濾集合或數組。 -
@PostFilter支持 Spring 表達式語言,用於根據我們定義的自定義安全規則執行方法後過濾返回的集合或數組(提供訪問方法結果的能力)。 -
@Secured不支持 Spring 表達式語言,用於指定方法的角色列表。 -
@RolesAllowed不支持 Spring 表達式語言,它是 JSR 250 的@Secured註釋的等效註釋。
這些註釋默認是禁用的,可以在我們的應用程序中啟用,如下所示:
@EnableWebSecurity @EnableGlobalMethodSecurity( securedEnabled = true, jsr250Enabled = true, prePostEnabled = true ) public class SecurityConfig extends WebSecurityConfigurerAdapter { // Details omitted for brevity }
securedEnabled = true啟用@Secured註釋。
jsr250Enabled = true啟用@RolesAllowed註釋。
prePostEnabled = true啟用@PreAuthorize 、 @PostAuthorize 、 @PreFilter 、 @PostFilter註釋。
啟用它們後,我們可以在我們的 API 端點上強制執行基於角色的訪問策略,如下所示:
@Api(tags = "UserAdmin") @RestController @RequestMapping(path = "api/admin/user") @RolesAllowed(Role.USER_ADMIN) public class UserAdminApi { // Details omitted for brevity } @Api(tags = "Author") @RestController @RequestMapping(path = "api/author") public class AuthorApi { // Details omitted for brevity @RolesAllowed(Role.AUTHOR_ADMIN) @PostMapping public void create() { } @RolesAllowed(Role.AUTHOR_ADMIN) @PutMapping("{id}") public void edit() { } @RolesAllowed(Role.AUTHOR_ADMIN) @DeleteMapping("{id}") public void delete() { } @GetMapping("{id}") public void get() { } @GetMapping("{id}/book") public void getBooks() { } @PostMapping("search") public void search() { } } @Api(tags = "Book") @RestController @RequestMapping(path = "api/book") public class BookApi { // Details omitted for brevity @RolesAllowed(Role.BOOK_ADMIN) @PostMapping public BookView create() { } @RolesAllowed(Role.BOOK_ADMIN) @PutMapping("{id}") public void edit() { } @RolesAllowed(Role.BOOK_ADMIN) @DeleteMapping("{id}") public void delete() { } @GetMapping("{id}") public void get() { } @GetMapping("{id}/author") public void getAuthors() { } @PostMapping("search") public void search() { } }請注意,可以在類級別和方法級別提供安全註釋。
演示的示例很簡單,並不代表真實場景,但 Spring Security 提供了豐富的註釋集,如果您選擇使用它們,您可以處理複雜的授權模式。
角色名稱默認前綴
在這個單獨的小節中,我想強調一個讓許多新用戶感到困惑的更微妙的細節。
Spring Security 框架區分了兩個術語:
-
Authority代表個人許可。 -
Role代表一組權限。
兩者都可以用一個名為GrantedAuthority的接口來表示,然後在 Spring Security 註釋中使用 Spring Expression Language 進行檢查,如下所示:
-
Authority:@PreAuthorize(“hasAuthority('EDIT_BOOK')”) -
Role:@PreAuthorize(“hasRole('BOOK_ADMIN')”)
為了使這兩個術語之間的區別更加明確,Spring Security 框架默認為角色名稱添加了ROLE_前綴。 因此,它不會檢查名為BOOK_ADMIN的角色,而是檢查ROLE_BOOK_ADMIN 。
就個人而言,我發現這種行為令人困惑,並且更喜歡在我的應用程序中禁用它。 它可以在 Spring Security 配置中禁用,如下所示:
@EnableWebSecurity public class SecurityConfig extends WebSecurityConfigurerAdapter { // Details omitted for brevity @Bean GrantedAuthorityDefaults grantedAuthorityDefaults() { return new GrantedAuthorityDefaults(""); // Remove the ROLE_ prefix } }使用 Spring Security 進行測試
要在使用 Spring Security 框架時使用單元測試或集成測試來測試我們的端點,我們需要添加spring-security-test依賴項以及spring-boot-starter-test 。 我們的pom.xml構建文件將如下所示:
<dependency> <groupId>org.springframework.boot</groupId> <artifactId>spring-boot-starter-test</artifactId> <scope>test</scope> <exclusions> <exclusion> <groupId>org.junit.vintage</groupId> <artifactId>junit-vintage-engine</artifactId> </exclusion> </exclusions> </dependency> <dependency> <groupId>org.springframework.security</groupId> <artifactId>spring-security-test</artifactId> <scope>test</scope> </dependency>這種依賴使我們可以訪問一些註釋,這些註釋可用於向我們的測試函數添加安全上下文。
這些註釋是:
-
@WithMockUser可以添加到測試方法中以模擬使用模擬用戶運行。 -
@WithUserDetails可以添加到測試方法中,以模擬從UserDetailservice 返回的UserDetailsService運行。 -
@WithAnonymousUser可以添加到測試方法中以模擬匿名用戶的運行。 當用戶想要以特定用戶身份運行大多數測試並覆蓋一些匿名方法時,這很有用。 -
@WithSecurityContext決定使用什麼SecurityContext,上面描述的所有三個註解都是基於它的。 如果我們有一個特定的用例,我們可以創建自己的註釋,使用@WithSecurityContext來創建我們想要的任何SecurityContext。 它的討論超出了本文的範圍,請參閱 Spring Security 文檔了解更多詳細信息。
使用特定用戶運行測試的最簡單方法是使用@WithMockUser註釋。 我們可以使用它創建一個模擬用戶並運行測試,如下所示:
@Test @WithMockUser(username="[email protected]", roles={"USER_ADMIN"}) public void test() { // Details omitted for brevity } 但是,這種方法有幾個缺點。 首先,模擬用戶不存在,如果您運行集成測試,稍後從數據庫中查詢用戶信息,則測試將失敗。 其次,mock user是org.springframework.security.core.userdetails.User類的實例,它是Spring框架內部對UserDetails接口的實現,如果我們有自己的實現,後面可能會產生衝突,在測試執行。
如果以前的缺點是我們應用程序的障礙,那麼@WithUserDetails註釋就是要走的路。 當我們有自定義UserDetails和UserDetailsService實現時使用它。 它假定用戶存在,因此我們必須在數據庫中創建實際行或在運行測試之前提供UserDetailsService模擬實例。
這就是我們如何使用這個註解:
@Test @WithUserDetails("[email protected]") public void test() { // Details omitted for brevity }這是我們示例項目的集成測試中的首選註釋,因為我們有上述接口的自定義實現。
使用@WithAnonymousUser允許以匿名用戶身份運行。 當您希望以特定用戶運行大多數測試但以匿名用戶身份運行少數測試時,這尤其方便。 例如,以下將使用模擬用戶運行test1和test2測試用例,使用匿名用戶運行test3 :
@SpringBootTest @AutoConfigureMockMvc @WithMockUser public class WithUserClassLevelAuthenticationTests { @Test public void test1() { // Details omitted for brevity } @Test public void test2() { // Details omitted for brevity } @Test @WithAnonymousUser public void test3() throws Exception { // Details omitted for brevity } }包起來
最後,我想提一下,Spring Security 框架可能不會贏得任何選美比賽,而且它肯定有一個陡峭的學習曲線。 我遇到過很多情況,由於其初始配置的複雜性,它被一些本土解決方案取代。 但是一旦開發人員了解了它的內部結構並設法設置了初始配置,它的使用就會變得相對簡單。
在本文中,我嘗試演示了配置的所有細微細節,希望這些示例對您有用。 有關完整的代碼示例,請參閱我的示例 Spring Security 項目的 Git 存儲庫。