
用于 REST API 的带有 JWT 的 Spring Security
已发表: 2022-03-11Spring 被认为是 Java 生态系统中的可信框架,并被广泛使用。 将 Spring 称为框架不再有效,因为它更像是涵盖各种框架的总称。 其中一个框架是 Spring Security,它是一个强大且可定制的身份验证和授权框架。 它被认为是保护基于 Spring 的应用程序的事实标准。
尽管它很受欢迎,但我必须承认,当涉及到单页应用程序时,它的配置并不简单直接。 我怀疑原因是它开始更多是作为一个面向 MVC 应用程序的框架,其中网页呈现发生在服务器端并且通信是基于会话的。
如果后端基于 Java 和 Spring,则使用 Spring Security 进行身份验证/授权并将其配置为无状态通信是有意义的。 虽然有很多文章解释了这是如何完成的,但对我来说,第一次设置它仍然令人沮丧,我不得不阅读和总结来自多个来源的信息。 这就是我决定写这篇文章的原因,我将在其中尝试总结和涵盖您在配置过程中可能遇到的所有必需的细微细节和弱点。
定义术语
在深入研究技术细节之前,我想明确定义 Spring Security 上下文中使用的术语,以确保我们都说同一种语言。
这些是我们需要解决的术语:
- 身份验证是指根据提供的凭据验证用户身份的过程。 一个常见的例子是在您登录网站时输入用户名和密码。 您可以将其视为对您是谁的问题的回答。 .
- 授权是指确定用户是否具有执行特定操作或读取特定数据的适当权限的过程,假设用户已成功通过身份验证。 您可以将其视为对用户可以执行/阅读此问题的答案吗? .
- 原则是指当前认证的用户。
- 授予权限是指经过身份验证的用户的权限。
- 角色是指经过身份验证的用户的一组权限。
创建一个基本的 Spring 应用程序
在开始配置 Spring Security 框架之前,让我们创建一个基本的 Spring Web 应用程序。 为此,我们可以使用 Spring Initializr 并生成模板项目。 对于一个简单的 Web 应用程序,只需要一个 Spring Web 框架依赖就足够了:
<dependencies> <dependency> <groupId>org.springframework.boot</groupId> <artifactId>spring-boot-starter-web</artifactId> </dependency> </dependencies>创建项目后,我们可以向其中添加一个简单的 REST 控制器,如下所示:
@RestController @RequestMapping("hello") public class HelloRestController { @GetMapping("user") public String helloUser() { return "Hello User"; } @GetMapping("admin") public String helloAdmin() { return "Hello Admin"; } }在此之后,如果我们构建并运行该项目,我们可以在 Web 浏览器中访问以下 URL:
-
http://localhost:8080/hello/user将返回字符串Hello User。 -
http://localhost:8080/hello/admin将返回字符串Hello Admin。
现在,我们可以将 Spring Security 框架添加到我们的项目中,我们可以通过将以下依赖项添加到我们的pom.xml文件来做到这一点:
<dependencies> <dependency> <groupId>org.springframework.boot</groupId> <artifactId>spring-boot-starter-security</artifactId> </dependency> </dependencies> 在我们提供相应的配置之前,添加其他 Spring 框架依赖项通常不会立即对应用程序产生影响,但 Spring Security 的不同之处在于它确实会立即产生影响,这通常会使新用户感到困惑。 添加后,如果我们重建并运行项目,然后尝试访问上述 URL 之一而不是查看结果,我们将被重定向到http://localhost:8080/login 。 这是默认行为,因为 Spring Security 框架要求对所有 URL 进行开箱即用的身份验证。
要通过身份验证,我们可以使用默认用户名user并在控制台中找到自动生成的密码:
Using generated security password: 1fc15145-dfee-4bec-a009-e32ca21c77ce 请记住,每次我们重新运行应用程序时,密码都会更改。 如果我们想改变这种行为并使密码静态化,我们可以将以下配置添加到我们的application.properties文件中:
spring.security.user.password=Test12345_ 现在,如果我们在登录表单中输入凭据,我们将被重定向回我们的 URL,我们将看到正确的结果。 请注意,开箱即用的身份验证过程是基于会话的,如果我们要注销,可以访问以下 URL: http://localhost:8080/logout
这种开箱即用的行为可能对我们具有基于会话的身份验证的经典 MVC Web 应用程序有用,但在单页应用程序的情况下,它通常没用,因为在大多数用例中,我们有客户端渲染和基于 JWT 的无状态身份验证。 在这种情况下,我们将不得不大量定制 Spring Security 框架,我们将在本文的其余部分进行此操作。
例如,我们将实现一个经典的书店 Web 应用程序并创建一个后端,该后端将提供 CRUD API 来创建作者和书籍以及用于用户管理和身份验证的 API。
Spring 安全架构概述
在我们开始自定义配置之前,让我们先讨论一下 Spring Security 身份验证在幕后是如何工作的。
下图展示了流程并显示了如何处理身份验证请求:
Spring 安全架构
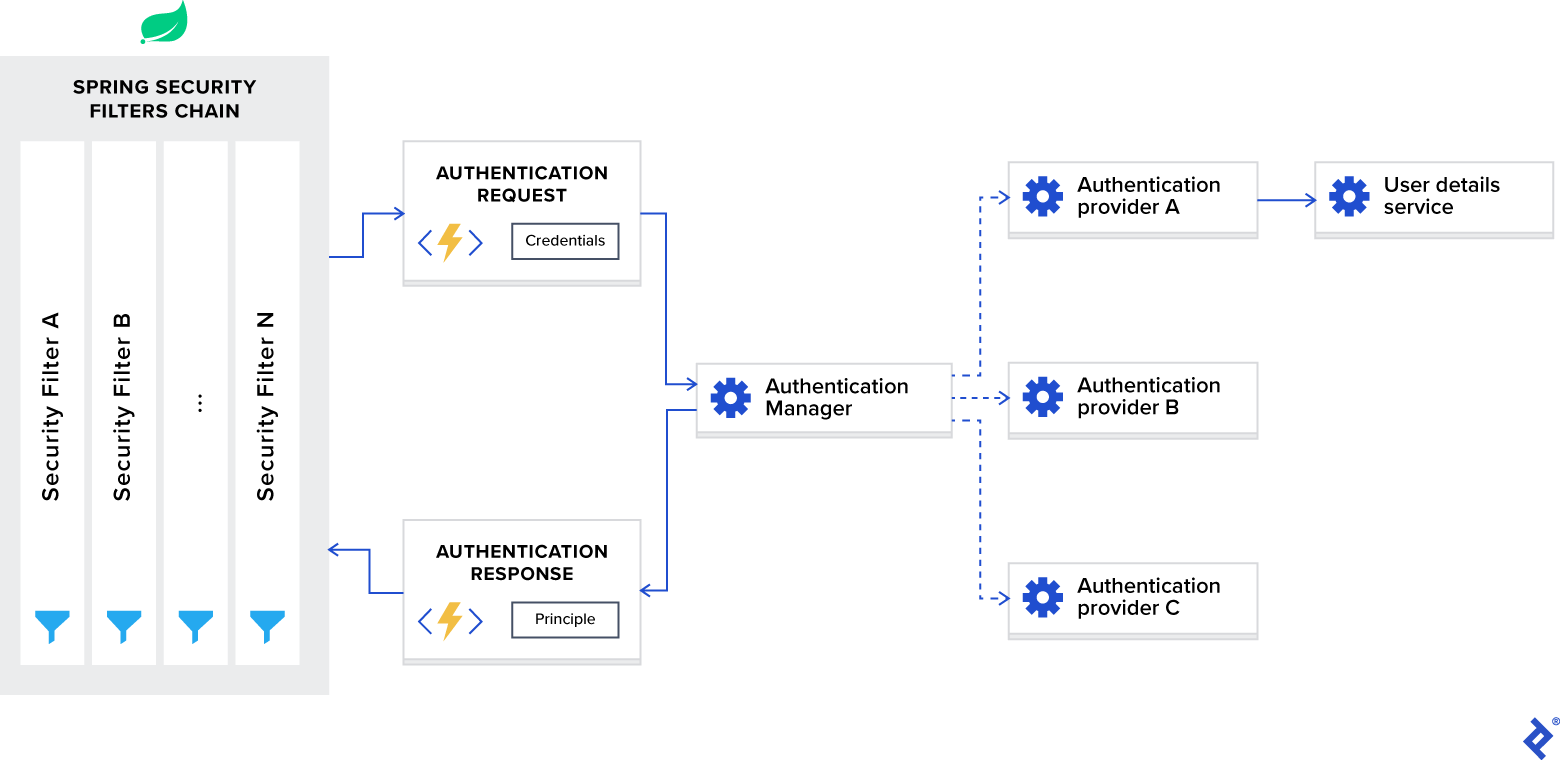
现在,让我们将这个图分解成组件并分别讨论它们。
Spring Security 过滤器链
当您将 Spring Security 框架添加到您的应用程序时,它会自动注册一个过滤器链来拦截所有传入请求。 该链由各种过滤器组成,每个过滤器都处理一个特定的用例。
例如:
- 根据配置检查请求的 URL 是否可公开访问。
- 如果是基于会话的身份验证,请检查用户是否已在当前会话中进行身份验证。
- 检查用户是否有权执行请求的操作,等等。
我想提到的一个重要细节是 Spring Security 过滤器以最低顺序注册,并且是第一个调用的过滤器。 对于某些用例,如果您想将自定义过滤器放在它们前面,则需要为它们的顺序添加填充。 这可以通过以下配置完成:
spring.security.filter.order=10 一旦我们将此配置添加到我们的application.properties文件中,我们将在 Spring Security 过滤器前面有 10 个自定义过滤器的空间。
身份验证管理器
您可以将AuthenticationManager视为一个协调器,您可以在其中注册多个提供者,并根据请求类型,将身份验证请求传递给正确的提供者。
身份验证提供者
AuthenticationProvider处理特定类型的身份验证。 它的接口只暴露了两个功能:
-
authenticate对请求执行身份验证。 - support 检查此提供程序是否
supports指定的身份验证类型。
我们在示例项目中使用的接口的一个重要实现是DaoAuthenticationProvider ,它从UserDetailsService ervice 检索用户详细信息。
用户详情服务
UserDetailsService在 Spring 文档中被描述为加载用户特定数据的核心接口。
在大多数用例中,身份验证提供程序根据数据库中的凭据提取用户身份信息,然后执行验证。 因为这个用例很常见,所以 Spring 开发人员决定将它提取为一个单独的接口,它暴露了单个函数:
-
loadUserByUsername接受用户名作为参数并返回用户身份对象。
使用带有 Spring Security 的 JWT 进行身份验证
在讨论了 Spring Security 框架的内部之后,让我们将其配置为使用 JWT 令牌进行无状态身份验证。
要自定义 Spring Security,我们需要在类路径中使用@EnableWebSecurity注解进行注解的配置类。 此外,为了简化定制过程,框架公开了一个WebSecurityConfigurerAdapter类。 我们将扩展这个适配器并覆盖它的两个函数,以便:
- 使用正确的提供者配置身份验证管理器
- 配置网络安全(公共 URL、私有 URL、授权等)
@EnableWebSecurity public class SecurityConfig extends WebSecurityConfigurerAdapter { @Override protected void configure(AuthenticationManagerBuilder auth) throws Exception { // TODO configure authentication manager } @Override protected void configure(HttpSecurity http) throws Exception { // TODO configure web security } } 在我们的示例应用程序中,我们将用户身份存储在 MongoDB 数据库的users集合中。 这些身份由User实体映射,它们的 CRUD 操作由UserRepo Spring Data 存储库定义。
现在,当我们接受身份验证请求时,我们需要使用提供的凭据从数据库中检索正确的身份,然后对其进行验证。 为此,我们需要实现UserDetailsService接口,定义如下:
public interface UserDetailsService { UserDetails loadUserByUsername(String username) throws UsernameNotFoundException; } 在这里,我们可以看到需要返回实现了UserDetails接口的对象,我们的User实体实现了它(实现细节请看样例项目的仓库)。 考虑到它只暴露了单函数原型,我们可以把它当作一个函数式接口,并以 lambda 表达式的形式提供实现。
@EnableWebSecurity public class SecurityConfig extends WebSecurityConfigurerAdapter { private final UserRepo userRepo; public SecurityConfig(UserRepo userRepo) { this.userRepo = userRepo; } @Override protected void configure(AuthenticationManagerBuilder auth) throws Exception { auth.userDetailsService(username -> userRepo .findByUsername(username) .orElseThrow( () -> new UsernameNotFoundException( format("User: %s, not found", username) ) )); } // Details omitted for brevity } 在这里, auth.userDetailsService函数调用将使用我们实现的UserDetailsService ervice 接口启动DaoAuthenticationProvider实例,并将其注册到身份验证管理器中。
除了身份验证提供程序,我们还需要使用正确的密码编码模式配置身份验证管理器,该模式将用于凭据验证。 为此,我们需要将PasswordEncoder接口的首选实现公开为 bean。
在我们的示例项目中,我们将使用 bcrypt 密码哈希算法。
@EnableWebSecurity public class SecurityConfig extends WebSecurityConfigurerAdapter { private final UserRepo userRepo; public SecurityConfig(UserRepo userRepo) { this.userRepo = userRepo; } @Override protected void configure(AuthenticationManagerBuilder auth) throws Exception { auth.userDetailsService(username -> userRepo .findByUsername(username) .orElseThrow( () -> new UsernameNotFoundException( format("User: %s, not found", username) ) )); } @Bean public PasswordEncoder passwordEncoder() { return new BCryptPasswordEncoder(); } // Details omitted for brevity }配置了身份验证管理器后,我们现在需要配置 Web 安全性。 我们正在实现一个 REST API,需要使用 JWT 令牌进行无状态身份验证; 因此,我们需要设置以下选项:
- 启用 CORS 并禁用 CSRF。
- 将会话管理设置为无状态。
- 设置未经授权的请求异常处理程序。
- 设置端点的权限。
- 添加 JWT 令牌过滤器。
该配置实现如下:
@EnableWebSecurity public class SecurityConfig extends WebSecurityConfigurerAdapter { private final UserRepo userRepo; private final JwtTokenFilter jwtTokenFilter; public SecurityConfig(UserRepo userRepo, JwtTokenFilter jwtTokenFilter) { this.userRepo = userRepo; this.jwtTokenFilter = jwtTokenFilter; } // Details omitted for brevity @Override protected void configure(HttpSecurity http) throws Exception { // Enable CORS and disable CSRF http = http.cors().and().csrf().disable(); // Set session management to stateless http = http .sessionManagement() .sessionCreationPolicy(SessionCreationPolicy.STATELESS) .and(); // Set unauthorized requests exception handler http = http .exceptionHandling() .authenticationEntryPoint( (request, response, ex) -> { response.sendError( HttpServletResponse.SC_UNAUTHORIZED, ex.getMessage() ); } ) .and(); // Set permissions on endpoints http.authorizeRequests() // Our public endpoints .antMatchers("/api/public/**").permitAll() .antMatchers(HttpMethod.GET, "/api/author/**").permitAll() .antMatchers(HttpMethod.POST, "/api/author/search").permitAll() .antMatchers(HttpMethod.GET, "/api/book/**").permitAll() .antMatchers(HttpMethod.POST, "/api/book/search").permitAll() // Our private endpoints .anyRequest().authenticated(); // Add JWT token filter http.addFilterBefore( jwtTokenFilter, UsernamePasswordAuthenticationFilter.class ); } // Used by spring security if CORS is enabled. @Bean public CorsFilter corsFilter() { UrlBasedCorsConfigurationSource source = new UrlBasedCorsConfigurationSource(); CorsConfiguration config = new CorsConfiguration(); config.setAllowCredentials(true); config.addAllowedOrigin("*"); config.addAllowedHeader("*"); config.addAllowedMethod("*"); source.registerCorsConfiguration("/**", config); return new CorsFilter(source); } } 请注意,我们在 Spring Security 内部UsernamePasswordAuthenticationFilter之前添加了JwtTokenFilter 。 我们这样做是因为此时我们需要访问用户身份以执行身份验证/授权,并且它的提取发生在基于提供的 JWT 令牌的 JWT 令牌过滤器内。 这是按如下方式实现的:
@Component public class JwtTokenFilter extends OncePerRequestFilter { private final JwtTokenUtil jwtTokenUtil; private final UserRepo userRepo; public JwtTokenFilter(JwtTokenUtil jwtTokenUtil, UserRepo userRepo) { this.jwtTokenUtil = jwtTokenUtil; this.userRepo = userRepo; } @Override protected void doFilterInternal(HttpServletRequest request, HttpServletResponse response, FilterChain chain) throws ServletException, IOException { // Get authorization header and validate final String header = request.getHeader(HttpHeaders.AUTHORIZATION); if (isEmpty(header) || !header.startsWith("Bearer ")) { chain.doFilter(request, response); return; } // Get jwt token and validate final String token = header.split(" ")[1].trim(); if (!jwtTokenUtil.validate(token)) { chain.doFilter(request, response); return; } // Get user identity and set it on the spring security context UserDetails userDetails = userRepo .findByUsername(jwtTokenUtil.getUsername(token)) .orElse(null); UsernamePasswordAuthenticationToken authentication = new UsernamePasswordAuthenticationToken( userDetails, null, userDetails == null ? List.of() : userDetails.getAuthorities() ); authentication.setDetails( new WebAuthenticationDetailsSource().buildDetails(request) ); SecurityContextHolder.getContext().setAuthentication(authentication); chain.doFilter(request, response); } }在实现我们的登录 API 功能之前,我们还需要处理一个步骤——我们需要访问身份验证管理器。 默认情况下,它是不可公开访问的,我们需要在我们的配置类中将其显式公开为 bean。

这可以按如下方式完成:
@EnableWebSecurity public class SecurityConfig extends WebSecurityConfigurerAdapter { // Details omitted for brevity @Override @Bean public AuthenticationManager authenticationManagerBean() throws Exception { return super.authenticationManagerBean(); } }现在,我们准备实现我们的登录 API 函数:
@Api(tags = "Authentication") @RestController @RequestMapping(path = "api/public") public class AuthApi { private final AuthenticationManager authenticationManager; private final JwtTokenUtil jwtTokenUtil; private final UserViewMapper userViewMapper; public AuthApi(AuthenticationManager authenticationManager, JwtTokenUtil jwtTokenUtil, UserViewMapper userViewMapper) { this.authenticationManager = authenticationManager; this.jwtTokenUtil = jwtTokenUtil; this.userViewMapper = userViewMapper; } @PostMapping("login") public ResponseEntity<UserView> login(@RequestBody @Valid AuthRequest request) { try { Authentication authenticate = authenticationManager .authenticate( new UsernamePasswordAuthenticationToken( request.getUsername(), request.getPassword() ) ); User user = (User) authenticate.getPrincipal(); return ResponseEntity.ok() .header( HttpHeaders.AUTHORIZATION, jwtTokenUtil.generateAccessToken(user) ) .body(userViewMapper.toUserView(user)); } catch (BadCredentialsException ex) { return ResponseEntity.status(HttpStatus.UNAUTHORIZED).build(); } } }在这里,我们使用身份验证管理器验证提供的凭据,如果成功,我们生成 JWT 令牌并将其作为响应标头与响应正文中的用户身份信息一起返回。
使用 Spring Security 进行授权
在上一节中,我们设置了身份验证过程并配置了公共/私有 URL。 这对于简单的应用程序可能已经足够了,但对于大多数实际用例,我们总是需要为用户提供基于角色的访问策略。 在本章中,我们将解决这个问题并使用 Spring Security 框架设置基于角色的授权模式。
在我们的示例应用程序中,我们定义了以下三个角色:
-
USER_ADMIN允许我们管理应用程序用户。 -
AUTHOR_ADMIN允许我们管理作者。 -
BOOK_ADMIN允许我们管理书籍。
现在,我们需要将它们应用到相应的 URL:
-
api/public可公开访问。 -
api/admin/user可以访问具有USER_ADMIN角色的用户。 -
api/author可以访问具有AUTHOR_ADMIN角色的用户。 -
api/book可以访问具有BOOK_ADMIN角色的用户。
Spring Security 框架为我们提供了两个选项来设置授权模式:
- 基于 URL 的配置
- 基于注解的配置
首先,让我们看看基于 URL 的配置是如何工作的。 它可以应用于 Web 安全配置,如下所示:
@EnableWebSecurity public class SecurityConfig extends WebSecurityConfigurerAdapter { // Details omitted for brevity @Override protected void configure(HttpSecurity http) throws Exception { // Enable CORS and disable CSRF http = http.cors().and().csrf().disable(); // Set session management to stateless http = http .sessionManagement() .sessionCreationPolicy(SessionCreationPolicy.STATELESS) .and(); // Set unauthorized requests exception handler http = http .exceptionHandling() .authenticationEntryPoint( (request, response, ex) -> { response.sendError( HttpServletResponse.SC_UNAUTHORIZED, ex.getMessage() ); } ) .and(); // Set permissions on endpoints http.authorizeRequests() // Our public endpoints .antMatchers("/api/public/**").permitAll() .antMatchers(HttpMethod.GET, "/api/author/**").permitAll() .antMatchers(HttpMethod.POST, "/api/author/search").permitAll() .antMatchers(HttpMethod.GET, "/api/book/**").permitAll() .antMatchers(HttpMethod.POST, "/api/book/search").permitAll() // Our private endpoints .antMatchers("/api/admin/user/**").hasRole(Role.USER_ADMIN) .antMatchers("/api/author/**").hasRole(Role.AUTHOR_ADMIN) .antMatchers("/api/book/**").hasRole(Role.BOOK_ADMIN) .anyRequest().authenticated(); // Add JWT token filter http.addFilterBefore( jwtTokenFilter, UsernamePasswordAuthenticationFilter.class ); } // Details omitted for brevity }如您所见,这种方法简单明了,但也有一个缺点。 我们应用程序中的授权模式可能很复杂,如果我们在一个地方定义所有规则,它将变得非常庞大、复杂且难以阅读。 正因为如此,我通常更喜欢使用基于注解的配置。
Spring Security 框架为 Web 安全定义了以下注解:
-
@PreAuthorize支持 Spring 表达式语言,用于在执行方法之前提供基于表达式的访问控制。 -
@PostAuthorize支持 Spring 表达式语言,用于在方法执行后提供基于表达式的访问控制(提供访问方法结果的能力)。 -
@PreFilter支持 Spring 表达式语言,用于在执行基于我们定义的自定义安全规则的方法之前过滤集合或数组。 -
@PostFilter支持 Spring 表达式语言,用于根据我们定义的自定义安全规则执行方法后过滤返回的集合或数组(提供访问方法结果的能力)。 -
@Secured不支持 Spring 表达式语言,用于指定方法的角色列表。 -
@RolesAllowed不支持 Spring 表达式语言,它是 JSR 250 的@Secured注释的等效注释。
这些注释默认是禁用的,可以在我们的应用程序中启用,如下所示:
@EnableWebSecurity @EnableGlobalMethodSecurity( securedEnabled = true, jsr250Enabled = true, prePostEnabled = true ) public class SecurityConfig extends WebSecurityConfigurerAdapter { // Details omitted for brevity }
securedEnabled = true启用@Secured注释。
jsr250Enabled = true启用@RolesAllowed注释。
prePostEnabled = true启用@PreAuthorize 、 @PostAuthorize 、 @PreFilter 、 @PostFilter注释。
启用它们后,我们可以在我们的 API 端点上强制执行基于角色的访问策略,如下所示:
@Api(tags = "UserAdmin") @RestController @RequestMapping(path = "api/admin/user") @RolesAllowed(Role.USER_ADMIN) public class UserAdminApi { // Details omitted for brevity } @Api(tags = "Author") @RestController @RequestMapping(path = "api/author") public class AuthorApi { // Details omitted for brevity @RolesAllowed(Role.AUTHOR_ADMIN) @PostMapping public void create() { } @RolesAllowed(Role.AUTHOR_ADMIN) @PutMapping("{id}") public void edit() { } @RolesAllowed(Role.AUTHOR_ADMIN) @DeleteMapping("{id}") public void delete() { } @GetMapping("{id}") public void get() { } @GetMapping("{id}/book") public void getBooks() { } @PostMapping("search") public void search() { } } @Api(tags = "Book") @RestController @RequestMapping(path = "api/book") public class BookApi { // Details omitted for brevity @RolesAllowed(Role.BOOK_ADMIN) @PostMapping public BookView create() { } @RolesAllowed(Role.BOOK_ADMIN) @PutMapping("{id}") public void edit() { } @RolesAllowed(Role.BOOK_ADMIN) @DeleteMapping("{id}") public void delete() { } @GetMapping("{id}") public void get() { } @GetMapping("{id}/author") public void getAuthors() { } @PostMapping("search") public void search() { } }请注意,可以在类级别和方法级别提供安全注释。
演示的示例很简单,并不代表真实场景,但 Spring Security 提供了丰富的注释集,如果您选择使用它们,您可以处理复杂的授权模式。
角色名称默认前缀
在这个单独的小节中,我想强调一个让许多新用户感到困惑的更微妙的细节。
Spring Security 框架区分了两个术语:
-
Authority代表个人许可。 -
Role代表一组权限。
两者都可以用一个名为GrantedAuthority的接口来表示,然后在 Spring Security 注释中使用 Spring Expression Language 进行检查,如下所示:
-
Authority:@PreAuthorize(“hasAuthority('EDIT_BOOK')”) -
Role:@PreAuthorize(“hasRole('BOOK_ADMIN')”)
为了使这两个术语之间的区别更加明确,Spring Security 框架默认为角色名称添加了ROLE_前缀。 因此,它不会检查名为BOOK_ADMIN的角色,而是检查ROLE_BOOK_ADMIN 。
就个人而言,我发现这种行为令人困惑,并且更喜欢在我的应用程序中禁用它。 它可以在 Spring Security 配置中禁用,如下所示:
@EnableWebSecurity public class SecurityConfig extends WebSecurityConfigurerAdapter { // Details omitted for brevity @Bean GrantedAuthorityDefaults grantedAuthorityDefaults() { return new GrantedAuthorityDefaults(""); // Remove the ROLE_ prefix } }使用 Spring Security 进行测试
要在使用 Spring Security 框架时使用单元测试或集成测试来测试我们的端点,我们需要添加spring-security-test依赖项以及spring-boot-starter-test 。 我们的pom.xml构建文件将如下所示:
<dependency> <groupId>org.springframework.boot</groupId> <artifactId>spring-boot-starter-test</artifactId> <scope>test</scope> <exclusions> <exclusion> <groupId>org.junit.vintage</groupId> <artifactId>junit-vintage-engine</artifactId> </exclusion> </exclusions> </dependency> <dependency> <groupId>org.springframework.security</groupId> <artifactId>spring-security-test</artifactId> <scope>test</scope> </dependency>这种依赖使我们可以访问一些注释,这些注释可用于向我们的测试函数添加安全上下文。
这些注释是:
-
@WithMockUser可以添加到测试方法中以模拟使用模拟用户运行。 -
@WithUserDetails可以添加到测试方法中,以模拟从UserDetailservice 返回的UserDetailsService运行。 -
@WithAnonymousUser可以添加到测试方法中以模拟匿名用户的运行。 当用户想要以特定用户身份运行大多数测试并覆盖一些匿名方法时,这很有用。 -
@WithSecurityContext决定使用什么SecurityContext,上面描述的所有三个注解都是基于它的。 如果我们有一个特定的用例,我们可以创建自己的注释,使用@WithSecurityContext来创建我们想要的任何SecurityContext。 它的讨论超出了本文的范围,请参阅 Spring Security 文档了解更多详细信息。
使用特定用户运行测试的最简单方法是使用@WithMockUser注释。 我们可以使用它创建一个模拟用户并运行测试,如下所示:
@Test @WithMockUser(username="[email protected]", roles={"USER_ADMIN"}) public void test() { // Details omitted for brevity } 但是,这种方法有几个缺点。 首先,模拟用户不存在,如果您运行集成测试,稍后从数据库中查询用户信息,则测试将失败。 其次,mock user是org.springframework.security.core.userdetails.User类的实例,它是Spring框架内部对UserDetails接口的实现,如果我们有自己的实现,后面可能会产生冲突,在测试执行。
如果以前的缺点是我们应用程序的障碍,那么@WithUserDetails注释就是要走的路。 当我们有自定义UserDetails和UserDetailsService实现时使用它。 它假定用户存在,因此我们必须在数据库中创建实际行或在运行测试之前提供UserDetailsService模拟实例。
这就是我们如何使用这个注解:
@Test @WithUserDetails("[email protected]") public void test() { // Details omitted for brevity }这是我们示例项目的集成测试中的首选注释,因为我们有上述接口的自定义实现。
使用@WithAnonymousUser允许以匿名用户身份运行。 当您希望以特定用户运行大多数测试但以匿名用户身份运行少数测试时,这尤其方便。 例如,以下将使用模拟用户运行test1和test2测试用例,使用匿名用户运行test3 :
@SpringBootTest @AutoConfigureMockMvc @WithMockUser public class WithUserClassLevelAuthenticationTests { @Test public void test1() { // Details omitted for brevity } @Test public void test2() { // Details omitted for brevity } @Test @WithAnonymousUser public void test3() throws Exception { // Details omitted for brevity } }包起来
最后,我想提一下,Spring Security 框架可能不会赢得任何选美比赛,而且它肯定有一个陡峭的学习曲线。 我遇到过很多情况,由于其初始配置的复杂性,它被一些本土解决方案取代。 但是一旦开发人员了解了它的内部结构并设法设置了初始配置,它的使用就会变得相对简单。
在本文中,我尝试演示了配置的所有细微细节,希望这些示例对您有用。 有关完整的代码示例,请参阅我的示例 Spring Security 项目的 Git 存储库。