
วิธีอ่านค่า config.properties โดยใช้ขอบเขต 'singleton' ของ Spring MVC ใน Java
เผยแพร่แล้ว: 2018-08-29
เมื่อก่อนฉันได้เขียนบทช่วยสอนเกี่ยวกับวิธีอ่านไฟล์ปรับแต่งด้วยวิธีดั้งเดิม แต่ถ้าคุณต้องการโหลดเป็นเฟรมเวิร์ก Spring MVC
เป็นเรื่องปกติที่คุณอาจต้องเข้าถึงค่า config.properties บางค่าตลอดเวลาในคลาส Java ของคุณ มีวิธีง่ายๆ ในการใช้ขอบเขตซิงเกิลตันของ Spring MVC
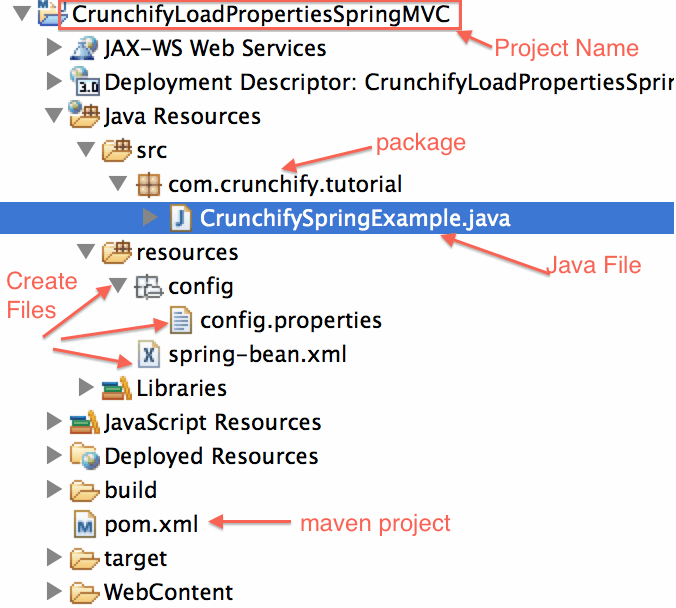
โปรดดูภาพพื้นที่ทำงานที่สมบูรณ์ด้านล่าง
เราจำเป็นต้องสร้าง 4 ไฟล์:
- CrunchifySpringExample.java ภายใต้แพ็คเกจ
com.crunchify.tutorial - config.properties ใต้
/go/config/folder - ไฟล์ spring-bean.xml ใต้โฟลเดอร์
/resources - ไฟล์ pom.xml (แปลงโปรเจ็กต์เป็นโปรเจ็กต์ Maven)
มาเริ่มกันเลย:
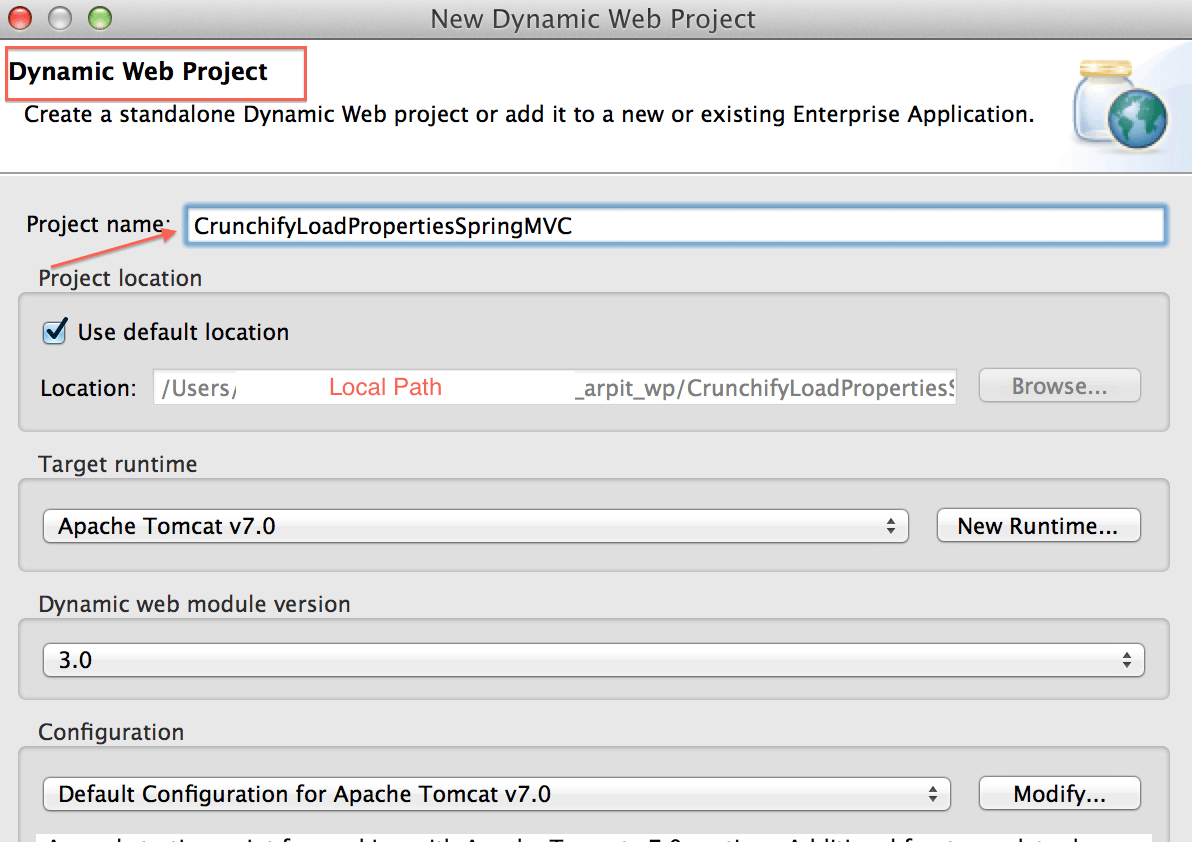
ขั้นตอนที่ 1
สร้างโครงการเว็บไดนามิกที่เรียกว่า CrunchifyLoadPropertiesSpringMVC
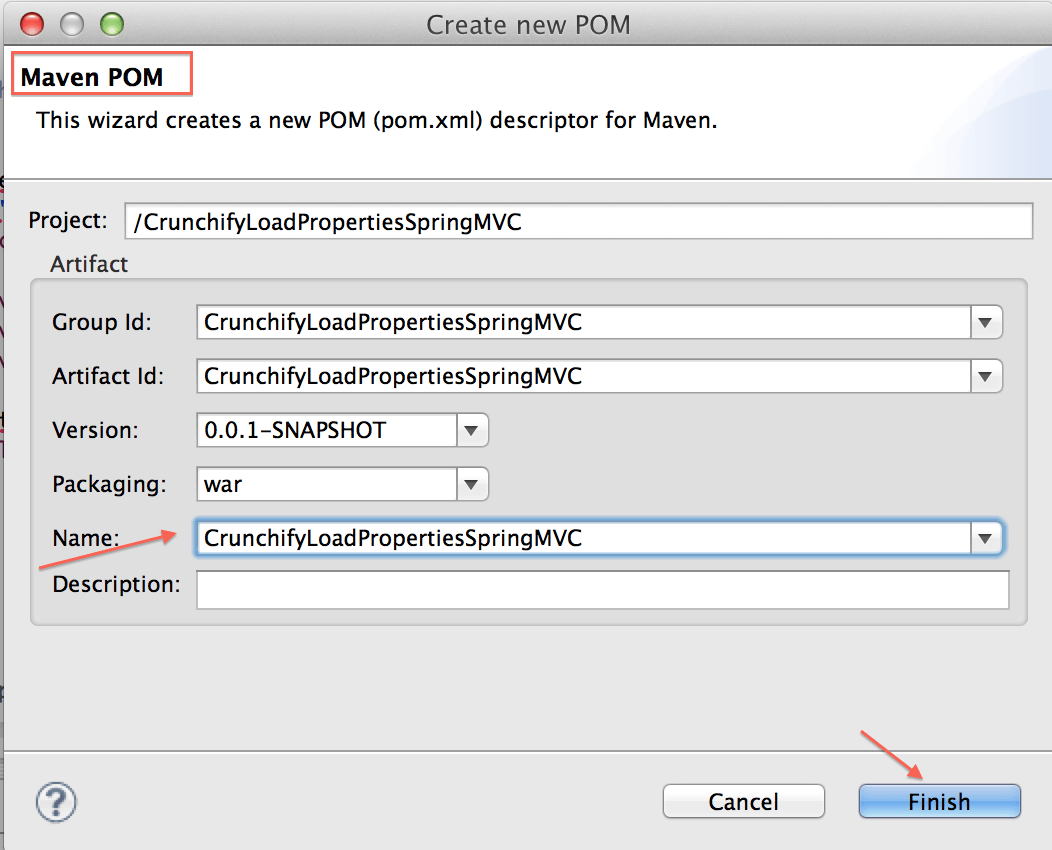
ขั้นตอนที่ 2
แปลงโครงการเป็นโครงการ Maven
สิ่งนี้จะสร้างไฟล์ pom.xml และเราจะเพิ่มการพึ่งพา Spring
ขั้นตอนที่ 3
สร้างไฟล์ CrunchifySpringExample.java
|
1 2 3 4 5 6 7 8 9 10 11 12 13 14 15 16 17 18 19 20 21 22 23 24 25 26 27 28 29 30 31 32 33 34 35 36 37 38 39 40 41 42 43 44 |
package com . crunchify . tutorial ; import org . springframework . beans . factory . annotation . Autowired ; import org . springframework . beans . factory . annotation . Value ; import org . springframework . context . annotation . Scope ; import org . springframework . context . support . ClassPathXmlApplicationContext ; import org . springframework . stereotype . Component ; /** * * @author Crunchify.com */ @Component ( "crunchifySpringExample" ) @Scope ( "singleton" ) public class CrunchifySpringExample { private static boolean springExample ; private static String springTutorial ; private static String url ; @Autowired public CrunchifySpringExample ( @Value ( "${CRUNCHIFY_URL}" ) String url , @Value ( "${SPRING_TUTORIAL}" ) String springTutorial , @Value ( "${IS_THIS_SPRING_EXAMPLE}" ) boolean springExample ) { CrunchifySpringExample . springExample = springExample ; CrunchifySpringExample . springTutorial = springTutorial ; CrunchifySpringExample . url = url ; } @SuppressWarnings ( { "resource" , "unused" } ) public static void main ( String [ ] args ) { try { ClassPathXmlApplicationContext ctx = new ClassPathXmlApplicationContext ( new String [ ] { "spring-bean.xml" } ) ; } catch ( Throwable e ) { System . out . println ( e ) ; } System . out . println ( "\nLoading Properties from Config File during application startup: \n\nSPRING_TUTORIAL: " + springTutorial ) ; System . out . println ( "IS_THIS_SPRING_EXAMPLE: " + springExample ) ; System . out . println ( "CRUNCHIFY_URL: " + url ) ; } } |
ขั้นตอนที่ 4
นี่คือไฟล์ pom.xml ของฉัน
|
1 2 3 4 5 6 7 8 9 10 11 12 13 14 15 16 17 18 19 20 21 22 23 24 25 26 27 28 29 30 31 32 33 34 35 36 37 38 39 40 41 42 43 44 45 46 47 48 49 50 51 52 53 54 55 56 57 58 59 60 61 62 63 64 65 66 67 |
< project xmlns = "http://maven.apache.org/POM/4.0.0" xmlns : xsi = "http://www.w3.org/2001/XMLSchema-instance" xsi : schemaLocation = "http://maven.apache.org/POM/4.0.0 http://maven.apache.org/xsd/maven-4.0.0.xsd" > < modelVersion > 4.0.0 < / modelVersion > < groupId > CrunchifyLoadPropertiesSpringMVC < / groupId > < artifactId > CrunchifyLoadPropertiesSpringMVC < / artifactId > < version > 0.0.1 - SNAPSHOT < / version > < packaging > war < / packaging > < name > CrunchifyLoadPropertiesSpringMVC < / name > < build > < sourceDirectory > src < / sourceDirectory > < plugins > < plugin > < artifactId > maven - compiler - plugin < / artifactId > < version > 3.1 < / version > < configuration > < source > 1.7 < / source > < target > 1.7 < / target > < / configuration > < / plugin > < plugin > < artifactId > maven - war - plugin < / artifactId > < version > 2.3 < / version > < configuration > < warSourceDirectory > WebContent < / warSourceDirectory > < failOnMissingWebXml > false < / failOnMissingWebXml > < / configuration > < / plugin > < / plugins > < / build > < properties > < project . build . sourceEncoding > UTF - 8 < / project . build . sourceEncoding > < spring . version > 4.0.2.RELEASE < / spring . version > < / properties > < dependencies > < ! -- Spring base -- > < dependency > < groupId > org . springframework < / groupId > < artifactId > spring - aop < / artifactId > < version > $ { spring . version } < / version > < exclusions > < exclusion > < groupId > commons - logging < / groupId > < artifactId > commons - logging < / artifactId > < / exclusion > < / exclusions > < / dependency > < ! -- Spring MVC -- > < dependency > < groupId > org . springframework < / groupId > < artifactId > spring - webmvc < / artifactId > < version > $ { spring . version } < / version > < / dependency > < dependency > < groupId > org . springframework < / groupId > < artifactId > spring - web < / artifactId > < version > $ { spring . version } < / version > < / dependency > < dependency > < groupId > commons - logging < / groupId > < artifactId > commons - logging < / artifactId > < version > 1.1.1 < / version > < / dependency > < / dependencies > < / project > |
ขั้นตอนที่ -5
หากคุณไม่เห็นโฟลเดอร์ " resources " สร้างอย่างใดอย่างหนึ่ง


ขั้นตอนที่ 6
สร้าง config.properties โดยมีเนื้อหาด้านล่าง
|
1 2 3 4 |
# Crunchify Properties IS_THIS_SPRING_EXAMPLE = true SPRING_TUTORIAL = CRUNCHIFY_TUTORIAL CRUNCHIFY_URL = https : //crunchify.com |
ขั้นตอนที่ 7
เนื้อหาของไฟล์ spring-bean.xml
|
1 2 3 4 5 6 7 8 9 10 11 12 13 14 15 16 |
<? xml version = "1.0" encoding = "UTF-8" ?> < beans xmlns = "http://www.springframework.org/schema/beans" xmlns : util = "http://www.springframework.org/schema/util" xmlns : xsi = "http://www.w3.org/2001/XMLSchema-instance" xmlns : context = "http://www.springframework.org/schema/context" xsi : schemaLocation = " http://www.springframework.org/schema/beans http://www.springframework.org/schema/beans/spring-beans-3.0.xsd http://www.springframework.org/schema/util http://www.springframework.org/schema/util/spring-util-3.0.xsd http://www.springframework.org/schema/context http://www.springframework.org/schema/context/spring-context-3.0.xsd" > < util : properties id = "nodeProperty" location = "classpath:config/config.properties" / > < context : property - placeholder properties - ref = "nodeProperty" / > < context : component - scan base - package = "com.crunchify.tutorial" / > < / beans > |
ขั้นตอนที่-8
ตอนนี้ให้รัน CrunchifySpringExample.java และคุณควรเห็นผลลัพธ์เช่นนี้
ขั้นตอนที่ 9
เอาท์พุต
|
1 2 3 4 5 6 7 8 9 10 11 12 |
Jul 05 , 2014 3 : 38 : 52 PM org . springframework . context . support . AbstractApplicationContext prepareRefresh INFO : Refreshing org . springframework . context . support . ClassPathXmlApplicationContext @ 7e3bfb66 : startup date [ Sat Jul 05 15 : 38 : 52 CDT 2014 ] ; root of context hierarchy Jul 05 , 2014 3 : 38 : 52 PM org . springframework . beans . factory . xml . XmlBeanDefinitionReader loadBeanDefinitions INFO : Loading XML bean definitions from class path resource [ spring - bean . xml ] Jul 05 , 2014 3 : 38 : 52 PM org . springframework . core . io . support . PropertiesLoaderSupport loadProperties INFO : Loading properties file from class path resource [ config / config . properties ] Loading Properties from Config File during application startup : SPRING_TUTORIAL : CRUNCHIFY_TUTORIAL IS_THIS_SPRING_EXAMPLE : true CRUNCHIFY_URL : https : //crunchify.com |
สนุกและมีความสุขในการเข้ารหัส ..