
Android Studio를 사용하여 간단한 계산기 Android 앱을 만드는 방법
게시 됨: 2017-07-06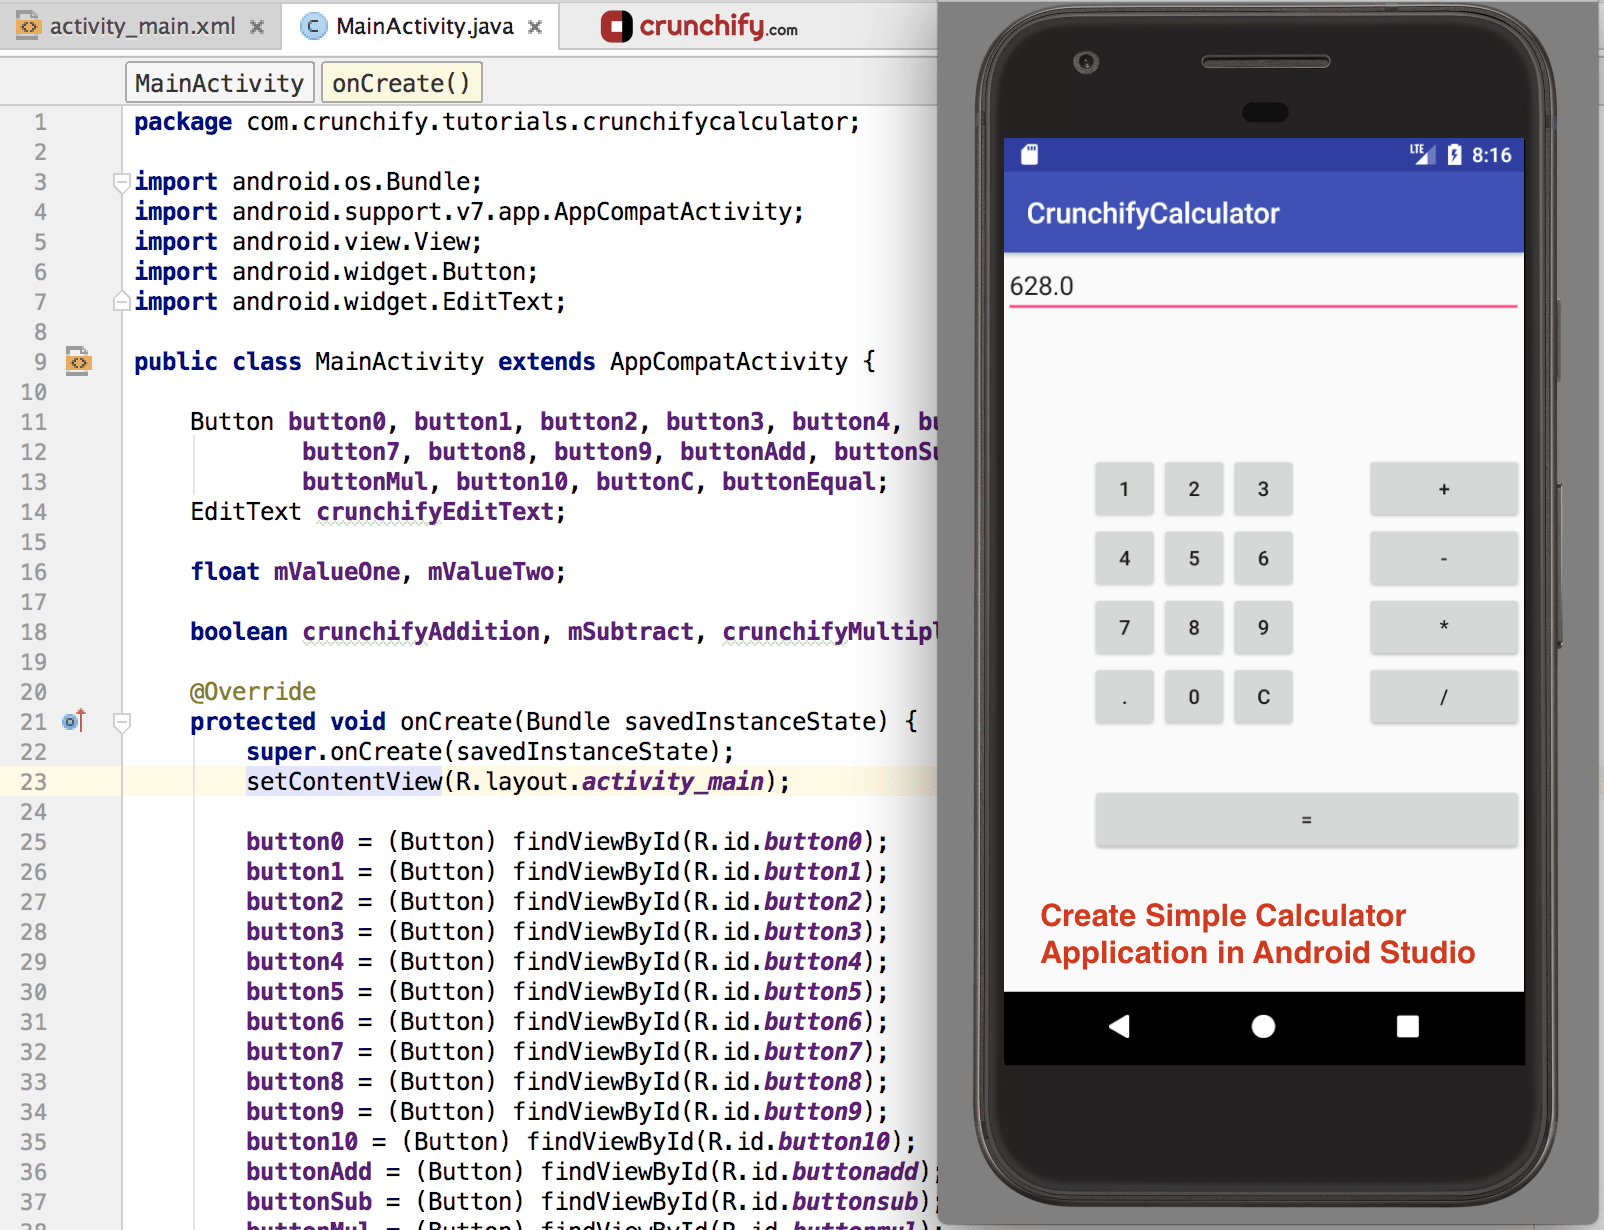
이전 기사에서 간단한 Android 애플리케이션을 만드는 방법에 대한 자세한 단계를 작성했습니다. 그 특정 앱에서 나는 또한 안드로이드 버튼의 개념과 안드로이드의 기본 개념을 설명했습니다.
Android 섹션에서 내 다른 모든 기사를 찾을 수 있습니다.
이 기사에서 우리는 calculator android app 을 만들 것입니다. 이것은 기능이 제한된 간단한 계산기입니다.
계속 진행하기 전에 전체 HelloWorld 자습서를 살펴보는 것이 좋습니다. 여기 다시 링크가 있습니다: 나의 첫 HelloWorld Android 앱
- 간단한 계산기 앱을 만드는 방법 – 전체 자습서
- Android Studio를 사용하여 간단한 계산기 만들기
- Android 개발: 기본 계산기 만들기
- 간단한 계산기 Android 앱 만들기
- Android용 계산기 앱을 만드는 방법
계산기 Android 앱을 시작해 보겠습니다.
1 단계
- Android 스튜디오를 엽니다.
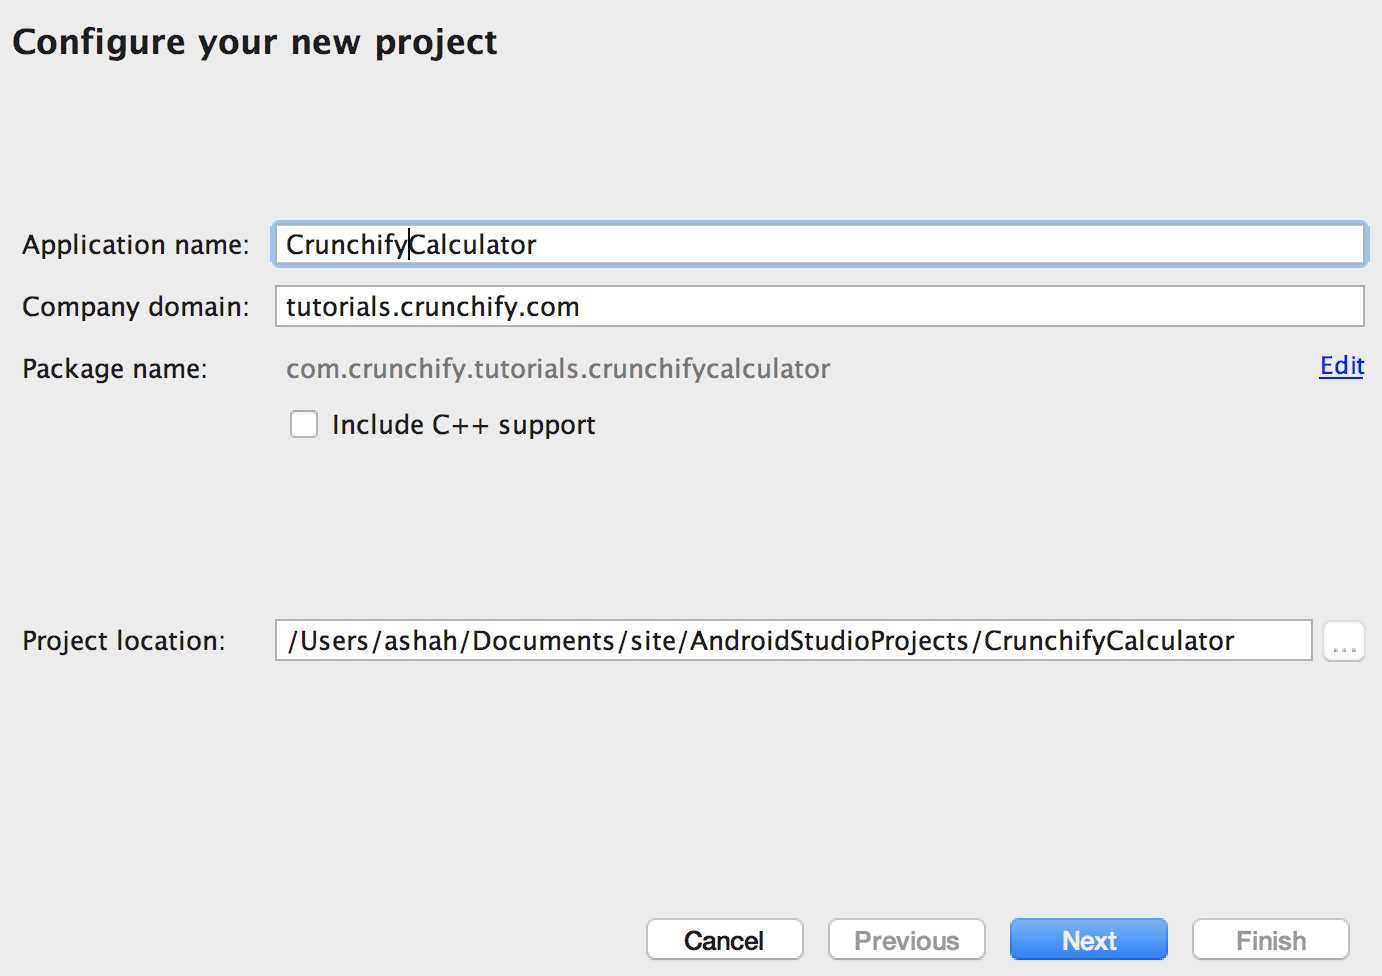
- 새 Android 스튜디오 프로젝트 시작을 클릭합니다.
- 응용 프로그램 이름을
CrunchifyCalculator로 지정하고 다른 필드는 그대로 두고 NEXT를 클릭합니다.
2 단계
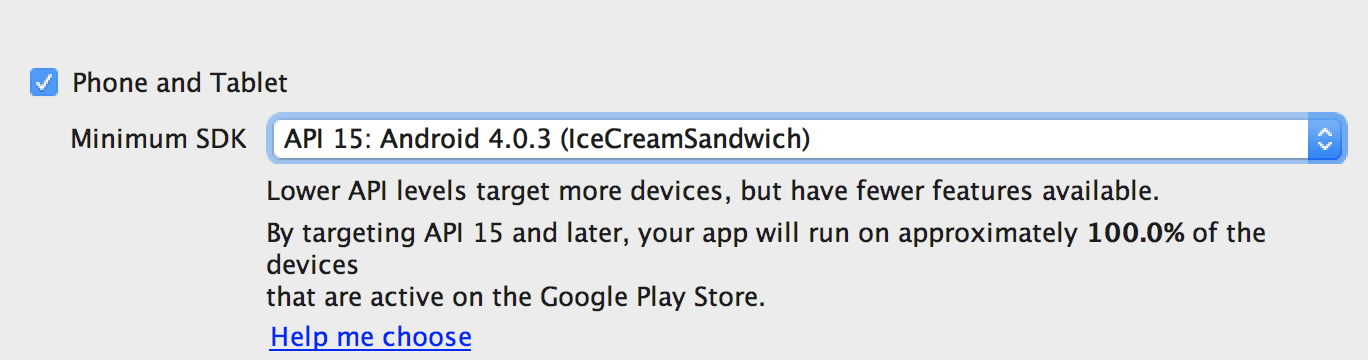
- 최소 SDK
API 15: Android 4.0.3(IceCreamSandwich)을 선택합니다. 저는 API 15(IceCreamSandwich)를 선택했는데 기기의 거의 94%를 커버하고 거의 모든 기능을 갖추고 있기 때문입니다. 100% 장치를 포함하려면 API 8: Android 2.2(Froyo)를 선택할 수 있습니다.
3단계
-
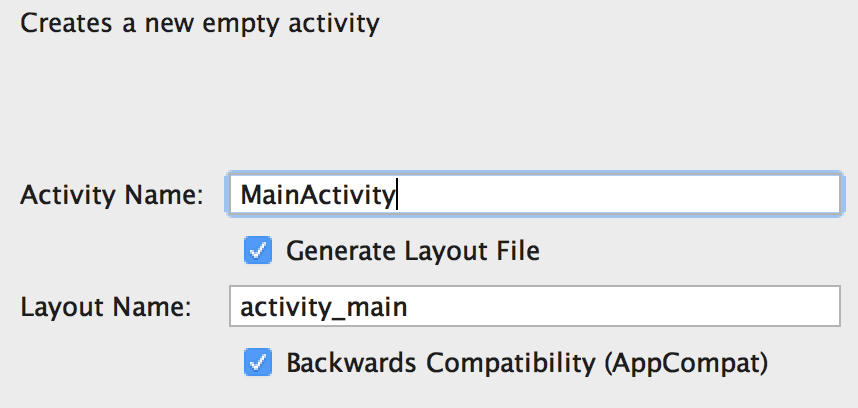
Empty Activity을 선택하고 다음을 클릭합니다. - 활동 이름
MainActivity는 그대로 두고 모든 것을 그대로 둡니다. 마침을 클릭합니다.
4단계
- 완료를 클릭한 후 활동 및 파일을 빌드하는 데 약 2분 정도 걸립니다.
- 다음은 애플리케이션의 최종 프로젝트 구조입니다.
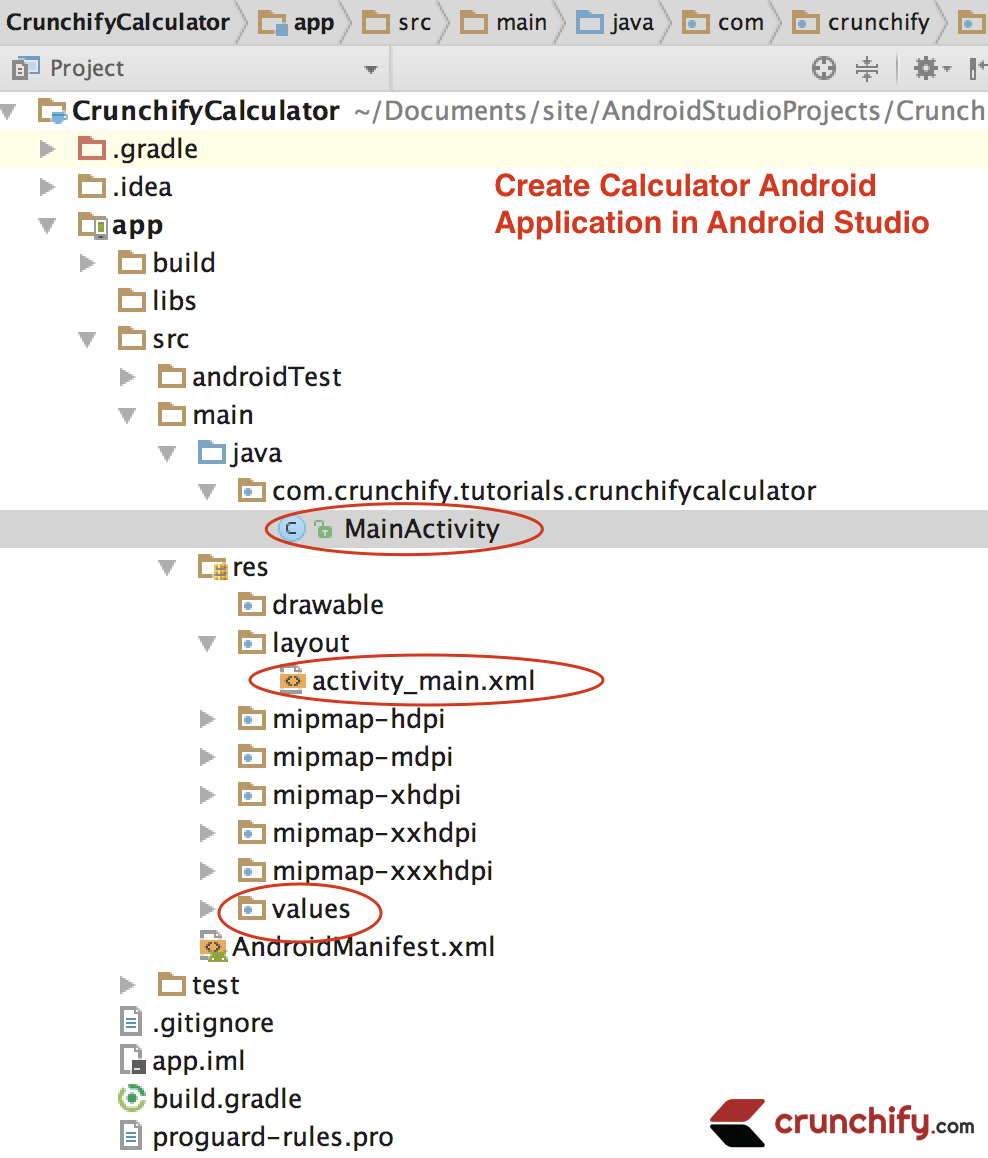
5단계
- 이제 MainActivity.java 파일에 Java 코드를 추가해야 합니다.
- 따라서 IDE의 왼쪽에서
MainActivity.java파일을 엽니다(app -> java -> com.crunchify.tutorials.crunchifycalculator -> MainActivity.java).
코드 아래에서 강조 표시된 줄에 대한 설명을 찾을 수 있습니다.
|
1 2 3 4 5 6 7 8 9 10 11 12 13 14 15 16 17 18 19 20 21 22 23 24 25 26 27 28 29 30 31 32 33 34 35 36 37 38 39 40 41 42 43 44 45 46 47 48 49 50 51 52 53 54 55 56 57 58 59 60 61 62 63 64 65 66 67 68 69 70 71 72 73 74 75 76 77 78 79 80 81 82 83 84 85 86 87 88 89 90 91 92 93 94 95 96 97 98 99 100 101 102 103 104 105 106 107 108 109 110 111 112 113 114 115 116 117 118 119 120 121 122 123 124 125 126 127 128 129 130 131 132 133 134 135 136 137 138 139 140 141 142 143 144 145 146 147 148 149 150 151 152 153 154 155 156 157 158 159 160 161 162 163 164 165 166 167 168 169 170 171 172 173 174 175 176 177 178 179 180 181 182 183 184 185 186 187 188 189 190 191 192 193 194 195 196 197 |
package com . crunchify . tutorials . crunchifycalculator ; import android . os . Bundle ; import android . support . v7 . app . AppCompatActivity ; import android . view . View ; import android . widget . Button ; import android . widget . EditText ; public class MainActivity extends AppCompatActivity { Button button0 , button1 , button2 , button3 , button4 , button5 , button6 , button7 , button8 , button9 , buttonAdd , buttonSub , buttonDivision , buttonMul , button10 , buttonC , buttonEqual ; EditText crunchifyEditText ; float mValueOne , mValueTwo ; boolean crunchifyAddition , mSubtract , crunchifyMultiplication , crunchifyDivision ; @ Override protected void onCreate ( Bundle savedInstanceState ) { super . onCreate ( savedInstanceState ) ; setContentView ( R . layout . activity_main ) ; button0 = ( Button ) findViewById ( R . id . button0 ) ; button1 = ( Button ) findViewById ( R . id . button1 ) ; button2 = ( Button ) findViewById ( R . id . button2 ) ; button3 = ( Button ) findViewById ( R . id . button3 ) ; button4 = ( Button ) findViewById ( R . id . button4 ) ; button5 = ( Button ) findViewById ( R . id . button5 ) ; button6 = ( Button ) findViewById ( R . id . button6 ) ; button7 = ( Button ) findViewById ( R . id . button7 ) ; button8 = ( Button ) findViewById ( R . id . button8 ) ; button9 = ( Button ) findViewById ( R . id . button9 ) ; button10 = ( Button ) findViewById ( R . id . button10 ) ; buttonAdd = ( Button ) findViewById ( R . id . buttonadd ) ; buttonSub = ( Button ) findViewById ( R . id . buttonsub ) ; buttonMul = ( Button ) findViewById ( R . id . buttonmul ) ; buttonDivision = ( Button ) findViewById ( R . id . buttondiv ) ; buttonC = ( Button ) findViewById ( R . id . buttonC ) ; buttonEqual = ( Button ) findViewById ( R . id . buttoneql ) ; crunchifyEditText = ( EditText ) findViewById ( R . id . edt1 ) ; button1 . setOnClickListener ( new View . OnClickListener ( ) { @ Override public void onClick ( View v ) { crunchifyEditText . setText ( crunchifyEditText . getText ( ) + "1" ) ; } } ) ; button2 . setOnClickListener ( new View . OnClickListener ( ) { @ Override public void onClick ( View v ) { crunchifyEditText . setText ( crunchifyEditText . getText ( ) + "2" ) ; } } ) ; button3 . setOnClickListener ( new View . OnClickListener ( ) { @ Override public void onClick ( View v ) { crunchifyEditText . setText ( crunchifyEditText . getText ( ) + "3" ) ; } } ) ; button4 . setOnClickListener ( new View . OnClickListener ( ) { @ Override public void onClick ( View v ) { crunchifyEditText . setText ( crunchifyEditText . getText ( ) + "4" ) ; } } ) ; button5 . setOnClickListener ( new View . OnClickListener ( ) { @ Override public void onClick ( View v ) { crunchifyEditText . setText ( crunchifyEditText . getText ( ) + "5" ) ; } } ) ; button6 . setOnClickListener ( new View . OnClickListener ( ) { @ Override public void onClick ( View v ) { crunchifyEditText . setText ( crunchifyEditText . getText ( ) + "6" ) ; } } ) ; button7 . setOnClickListener ( new View . OnClickListener ( ) { @ Override public void onClick ( View v ) { crunchifyEditText . setText ( crunchifyEditText . getText ( ) + "7" ) ; } } ) ; button8 . setOnClickListener ( new View . OnClickListener ( ) { @ Override public void onClick ( View v ) { crunchifyEditText . setText ( crunchifyEditText . getText ( ) + "8" ) ; } } ) ; button9 . setOnClickListener ( new View . OnClickListener ( ) { @ Override public void onClick ( View v ) { crunchifyEditText . setText ( crunchifyEditText . getText ( ) + "9" ) ; } } ) ; button0 . setOnClickListener ( new View . OnClickListener ( ) { @ Override public void onClick ( View v ) { crunchifyEditText . setText ( crunchifyEditText . getText ( ) + "0" ) ; } } ) ; buttonAdd . setOnClickListener ( new View . OnClickListener ( ) { @ Override public void onClick ( View v ) { if ( crunchifyEditText == null ) { crunchifyEditText . setText ( "" ) ; } else { mValueOne = Float . parseFloat ( crunchifyEditText . getText ( ) + "" ) ; crunchifyAddition = true ; crunchifyEditText . setText ( null ) ; } } } ) ; buttonSub . setOnClickListener ( new View . OnClickListener ( ) { @ Override public void onClick ( View v ) { mValueOne = Float . parseFloat ( crunchifyEditText . getText ( ) + "" ) ; mSubtract = true ; crunchifyEditText . setText ( null ) ; } } ) ; buttonMul . setOnClickListener ( new View . OnClickListener ( ) { @ Override public void onClick ( View v ) { mValueOne = Float . parseFloat ( crunchifyEditText . getText ( ) + "" ) ; crunchifyMultiplication = true ; crunchifyEditText . setText ( null ) ; } } ) ; buttonDivision . setOnClickListener ( new View . OnClickListener ( ) { @ Override public void onClick ( View v ) { mValueOne = Float . parseFloat ( crunchifyEditText . getText ( ) + "" ) ; crunchifyDivision = true ; crunchifyEditText . setText ( null ) ; } } ) ; buttonEqual . setOnClickListener ( new View . OnClickListener ( ) { @ Override public void onClick ( View v ) { mValueTwo = Float . parseFloat ( crunchifyEditText . getText ( ) + "" ) ; if ( crunchifyAddition == true ) { crunchifyEditText . setText ( mValueOne + mValueTwo + "" ) ; crunchifyAddition = false ; } if ( mSubtract == true ) { crunchifyEditText . setText ( mValueOne - mValueTwo + "" ) ; mSubtract = false ; } if ( crunchifyMultiplication == true ) { crunchifyEditText . setText ( mValueOne * mValueTwo + "" ) ; crunchifyMultiplication = false ; } if ( crunchifyDivision == true ) { crunchifyEditText . setText ( mValueOne / mValueTwo + "" ) ; crunchifyDivision = false ; } } } ) ; buttonC . setOnClickListener ( new View . OnClickListener ( ) { @ Override public void onClick ( View v ) { crunchifyEditText . setText ( "" ) ; } } ) ; button10 . setOnClickListener ( new View . OnClickListener ( ) { @ Override public void onClick ( View v ) { crunchifyEditText . setText ( crunchifyEditText . getText ( ) + "." ) ; } } ) ; } } |
여기에 1개의 EditText가 있습니다. 콘텐츠 유형을 정의합니다.
코드를 조금 더 이해합시다.

- 11-14행: 여기에서 Buttons 및 EditText에 대한 참조를 만들었습니다.
- 16행: 여기에서 value1과 value2에 대한 두 개의 부동 변수를 만들었습니다.
- 21행: Activity 클래스의 메서드인 onCreate() 메서드를 재정의합니다.
- 45-50행: Button1에 onClickListener를 설정합니다. Button1을 클릭하면 EditText가 표시됩니다.
- 모든 버튼에 대해 동일한 로직을 구현했습니다.
- 115-127행: 여기에서 추가 버튼에 대한 클릭 리스너를 설정했습니다.
- 여기에 조건을 넣습니다. EditText가 Null이면 EditText를 빈 값으로 설정합니다. 그렇지 않으면 추가 버튼을 클릭하기 전과 추가 버튼을 클릭한 후에 두 개의 값을 추가합니다.
- 또한
crunchifyAddition부울 값을 True로 설정했습니다. 이 true는 추가 버튼이 클릭되었음을 나타내며 사용자가 "=" 버튼을 클릭할 때 사용됩니다. - buttonSub, ButtonMul, buttonDivision과 같은 다른 버튼에 대해서도 동일한 논리를 구현합니다.
- Line 156 – 183: 여기에서 "=" 버튼에 clickListener를 설정합니다. 여기에 사용자가 추가 버튼을 클릭하면 추가 버튼의 클릭 리스너에서
crunchifyAddition값이 True로 설정되는 것과 같은 조건을 넣습니다. - 이에 따라 클릭한 버튼에 따라 해당 동작이 수행됩니다.
|
1 2 3 4 |
if ( crunchifyAddition == true ) { crunchifyEditText . setText ( mValueOne + mValueTwo + "" ) ; crunchifyAddition = false ; } |
"=" 버튼보다 먼저 추가 버튼을 클릭하면 위와 같이 추가 동작이 수행됩니다.
- 작업이 수행된 후 추가 작업을 다시 수행할 수 있도록
crunchifyAddition값을 false로 설정합니다.
다음은 계산기의 프런트 엔드를 디자인하는 데 도움이 되는 레이아웃 파일입니다.
|
1 2 3 4 5 6 7 8 9 10 11 12 13 14 15 16 17 18 19 20 21 22 23 24 25 26 27 28 29 30 31 32 33 34 35 36 37 38 39 40 41 42 43 44 45 46 47 48 49 50 51 52 53 54 55 56 57 58 59 60 61 62 63 64 65 66 67 68 69 70 71 72 73 74 75 76 77 78 79 80 81 82 83 84 85 86 87 88 89 90 91 92 93 94 95 96 97 98 99 100 101 102 103 104 105 106 107 108 109 110 111 112 113 114 115 116 117 118 119 120 121 122 123 124 125 126 127 128 129 130 131 132 133 134 135 136 137 138 139 140 141 142 143 144 145 146 147 148 149 150 151 152 153 154 155 156 157 158 159 160 161 162 163 164 165 166 167 168 169 170 171 172 173 174 175 176 177 178 179 180 181 182 183 184 185 186 187 188 189 190 191 192 193 |
<? xml version = "1.0" encoding = "utf-8" ?> < RelativeLayout xmlns : android = "http://schemas.android.com/apk/res/android" xmlns : tools = "http://schemas.android.com/tools" android : id = "@+id/relative1" android : layout_width = "match_parent" android : layout_height = "match_parent" tools : context = ".MainActivity" > < EditText android : id = "@+id/edt1" android : layout_width = "match_parent" android : layout_height = "wrap_content" / > < Button android : id = "@+id/button1" style = "?android:attr/buttonStyleSmall" android : layout_width = "wrap_content" android : layout_height = "wrap_content" android : layout_alignEnd = "@+id/button4" android : layout_alignRight = "@+id/button4" android : layout_below = "@+id/edt1" android : layout_marginTop = "94dp" android : text = "1" / > < Button android : id = "@+id/button2" style = "?android:attr/buttonStyleSmall" android : layout_width = "wrap_content" android : layout_height = "wrap_content" android : layout_alignTop = "@+id/button1" android : layout_toLeftOf = "@+id/button3" android : layout_toStartOf = "@+id/button3" android : text = "2" / > < Button android : id = "@+id/button3" style = "?android:attr/buttonStyleSmall" android : layout_width = "wrap_content" android : layout_height = "wrap_content" android : layout_alignTop = "@+id/button2" android : layout_centerHorizontal = "true" android : text = "3" / > < Button android : id = "@+id/button4" style = "?android:attr/buttonStyleSmall" android : layout_width = "wrap_content" android : layout_height = "wrap_content" android : layout_below = "@+id/button1" android : layout_toLeftOf = "@+id/button2" android : text = "4" / > < Button android : id = "@+id/button5" style = "?android:attr/buttonStyleSmall" android : layout_width = "wrap_content" android : layout_height = "wrap_content" android : layout_alignBottom = "@+id/button4" android : layout_alignLeft = "@+id/button2" android : layout_alignStart = "@+id/button2" android : text = "5" / > < Button android : id = "@+id/button6" style = "?android:attr/buttonStyleSmall" android : layout_width = "wrap_content" android : layout_height = "wrap_content" android : layout_alignLeft = "@+id/button3" android : layout_alignStart = "@+id/button3" android : layout_below = "@+id/button3" android : text = "6" / > < Button android : id = "@+id/button7" style = "?android:attr/buttonStyleSmall" android : layout_width = "wrap_content" android : layout_height = "wrap_content" android : layout_below = "@+id/button4" android : layout_toLeftOf = "@+id/button2" android : text = "7" / > < Button android : id = "@+id/button8" style = "?android:attr/buttonStyleSmall" android : layout_width = "wrap_content" android : layout_height = "wrap_content" android : layout_alignLeft = "@+id/button5" android : layout_alignStart = "@+id/button5" android : layout_below = "@+id/button5" android : text = "8" / > < Button android : id = "@+id/button9" style = "?android:attr/buttonStyleSmall" android : layout_width = "wrap_content" android : layout_height = "wrap_content" android : layout_alignLeft = "@+id/button6" android : layout_alignStart = "@+id/button6" android : layout_below = "@+id/button6" android : text = "9" / > < Button android : id = "@+id/buttonadd" style = "?android:attr/buttonStyleSmall" android : layout_width = "wrap_content" android : layout_height = "wrap_content" android : layout_alignEnd = "@+id/edt1" android : layout_alignRight = "@+id/edt1" android : layout_alignTop = "@+id/button3" android : layout_marginLeft = "46dp" android : layout_marginStart = "46dp" android : layout_toRightOf = "@+id/button3" android : text = "+" / > < Button android : id = "@+id/buttonsub" style = "?android:attr/buttonStyleSmall" android : layout_width = "wrap_content" android : layout_height = "wrap_content" android : layout_alignEnd = "@+id/buttonadd" android : layout_alignLeft = "@+id/buttonadd" android : layout_alignRight = "@+id/buttonadd" android : layout_alignStart = "@+id/buttonadd" android : layout_below = "@+id/buttonadd" android : text = "-" / > < Button android : id = "@+id/buttonmul" style = "?android:attr/buttonStyleSmall" android : layout_width = "wrap_content" android : layout_height = "wrap_content" android : layout_alignLeft = "@+id/buttonsub" android : layout_alignParentEnd = "true" android : layout_alignParentRight = "true" android : layout_alignStart = "@+id/buttonsub" android : layout_below = "@+id/buttonsub" android : text = "*" / > < Button android : id = "@+id/button10" style = "?android:attr/buttonStyleSmall" android : layout_width = "wrap_content" android : layout_height = "wrap_content" android : layout_below = "@+id/button7" android : layout_toLeftOf = "@+id/button2" android : text = "." / > < Button android : id = "@+id/button0" style = "?android:attr/buttonStyleSmall" android : layout_width = "wrap_content" android : layout_height = "wrap_content" android : layout_alignLeft = "@+id/button8" android : layout_alignStart = "@+id/button8" android : layout_below = "@+id/button8" android : text = "0" / > < Button android : id = "@+id/buttonC" style = "?android:attr/buttonStyleSmall" android : layout_width = "wrap_content" android : layout_height = "wrap_content" android : layout_alignLeft = "@+id/button9" android : layout_alignStart = "@+id/button9" android : layout_below = "@+id/button9" android : text = "C" / > < Button android : id = "@+id/buttondiv" style = "?android:attr/buttonStyleSmall" android : layout_width = "wrap_content" android : layout_height = "wrap_content" android : layout_alignEnd = "@+id/buttonmul" android : layout_alignLeft = "@+id/buttonmul" android : layout_alignRight = "@+id/buttonmul" android : layout_alignStart = "@+id/buttonmul" android : layout_below = "@+id/buttonmul" android : text = "/" / > < Button android : id = "@+id/buttoneql" android : layout_width = "wrap_content" android : layout_height = "wrap_content" android : layout_alignEnd = "@+id/buttondiv" android : layout_alignLeft = "@+id/button10" android : layout_alignRight = "@+id/buttondiv" android : layout_alignStart = "@+id/button10" android : layout_below = "@+id/button0" android : layout_marginTop = "37dp" android : text = "=" / > < / RelativeLayout > |
이제 모든 것이 잘 작동하고 계산기 안드로이드 앱을 실행할 준비가 되었습니다. 내 모바일을 사용하여 앱을 실행하려면 에뮬레이터 또는 장치를 사용할 수 있습니다.
계산기 Android 앱 실행
- Android 장치 관리자를 클릭합니다.
Android device manager창에서 사용자 정의 장치를 선택한 후START을 클릭합니다. - 실행 버튼을 클릭합니다.
- 장치 또는 에뮬레이터를 선택하고 확인을 클릭합니다.
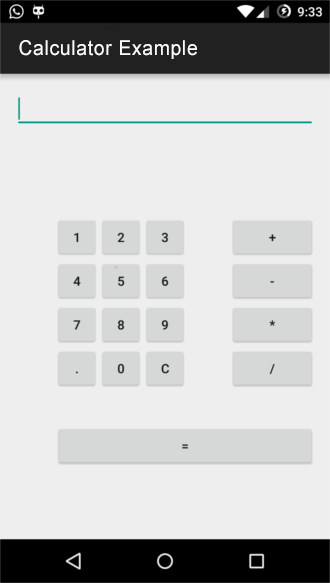
- 이제 이 스크린샷과 같이 계산기 안드로이드 앱이 실행되는 것을 볼 수 있습니다.
축하 해요!! 모든 단계를 수행하고 이 지점에 도달했다면 모든 단계를 올바르게 수행했으며 계산기 안드로이드 앱이 제대로 실행되고 있음을 의미합니다.