
如何使用 Android Studio 創建簡單的計算器 Android 應用
已發表: 2017-07-06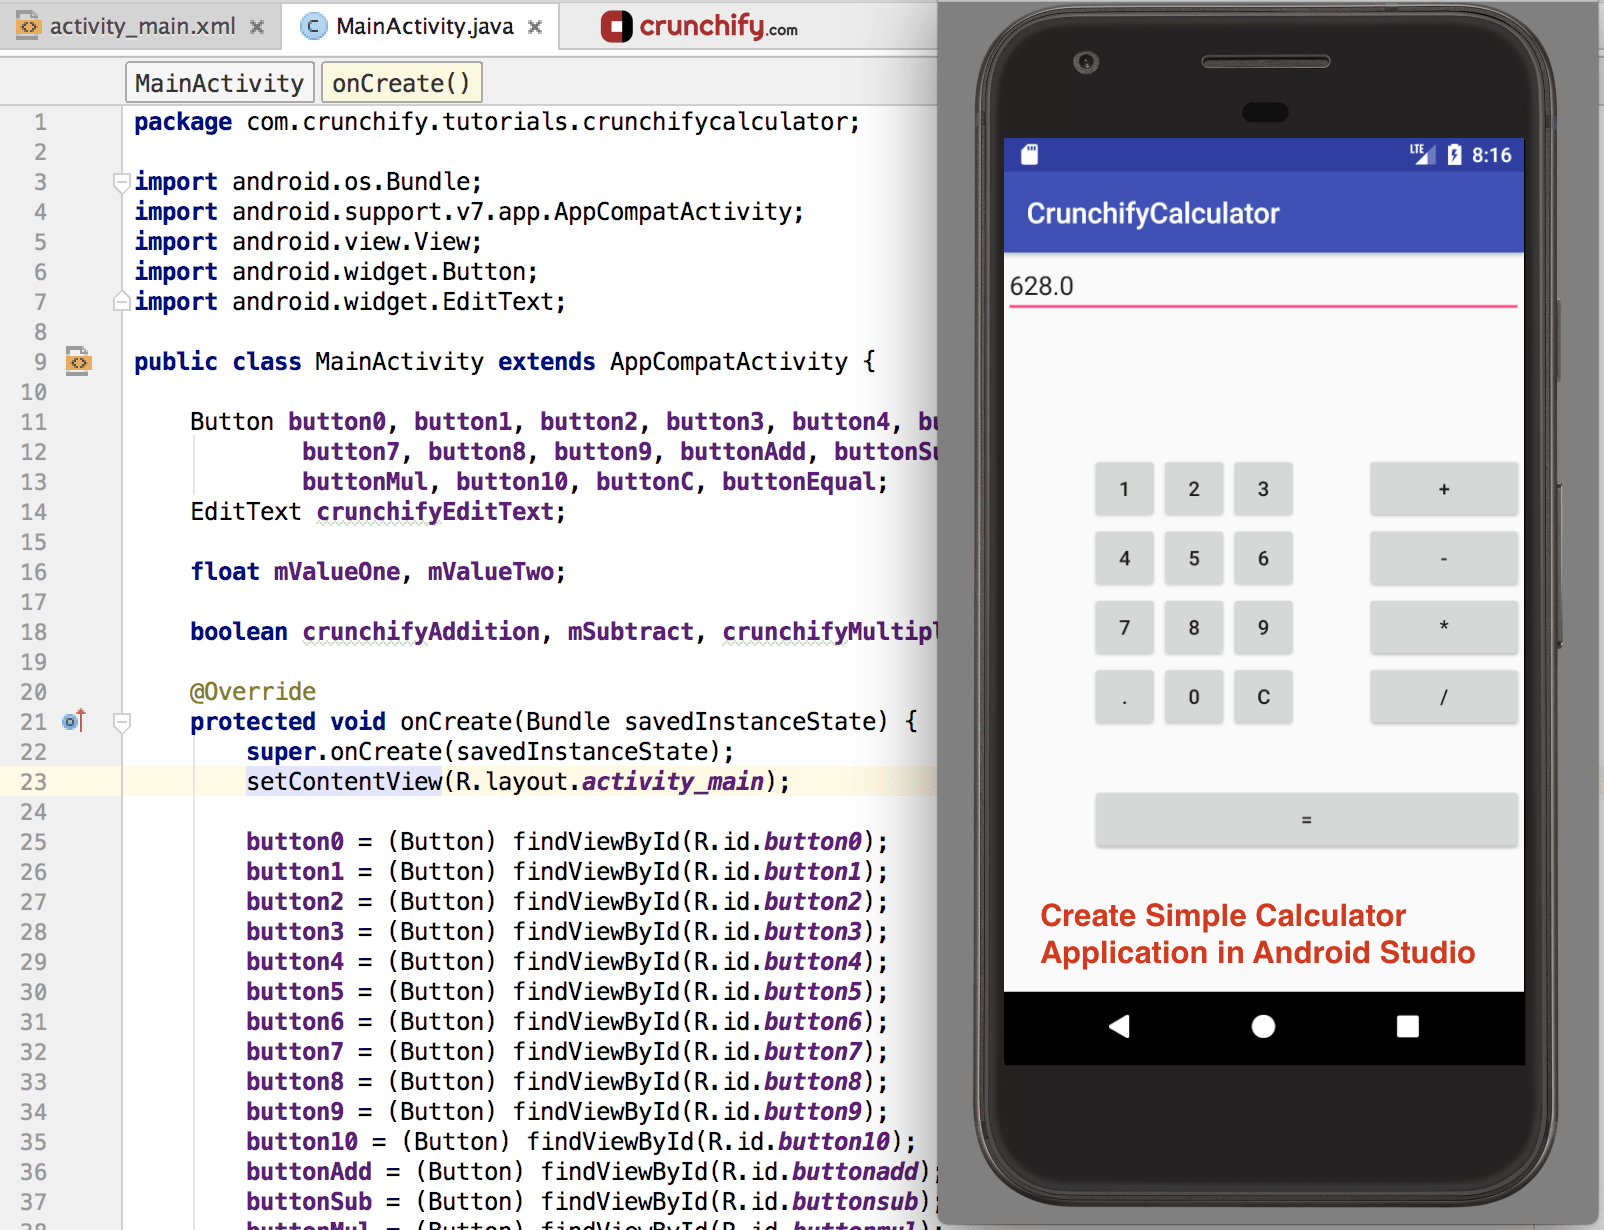
在我之前的文章中,我寫了關於如何創建一個簡單的 android 應用程序的詳細步驟。 在那個特定的應用程序中,我還解釋了 android 按鈕的概念和 android 的基本概念。
你可以在 Android 部分找到我所有的其他文章。
在本文中,我們將創建一個calculator android app 。 這是一個功能有限的簡單計算器。
在我們繼續之前,最好回顧一下完整的 HelloWorld 教程。 這裡再次鏈接:我的第一個 HelloWorld Android 應用程序
- 如何構建一個簡單的計算器應用程序 - 完整教程
- 使用 Android Studio 構建一個簡單的計算器
- Android 開發:創建基本計算器
- 創建簡單的計算器 Android 應用
- 如何為 Android 創建一個計算器應用程序
讓我們開始使用我們的計算器安卓應用程序:
第1步
- 打開你的 Android Studio
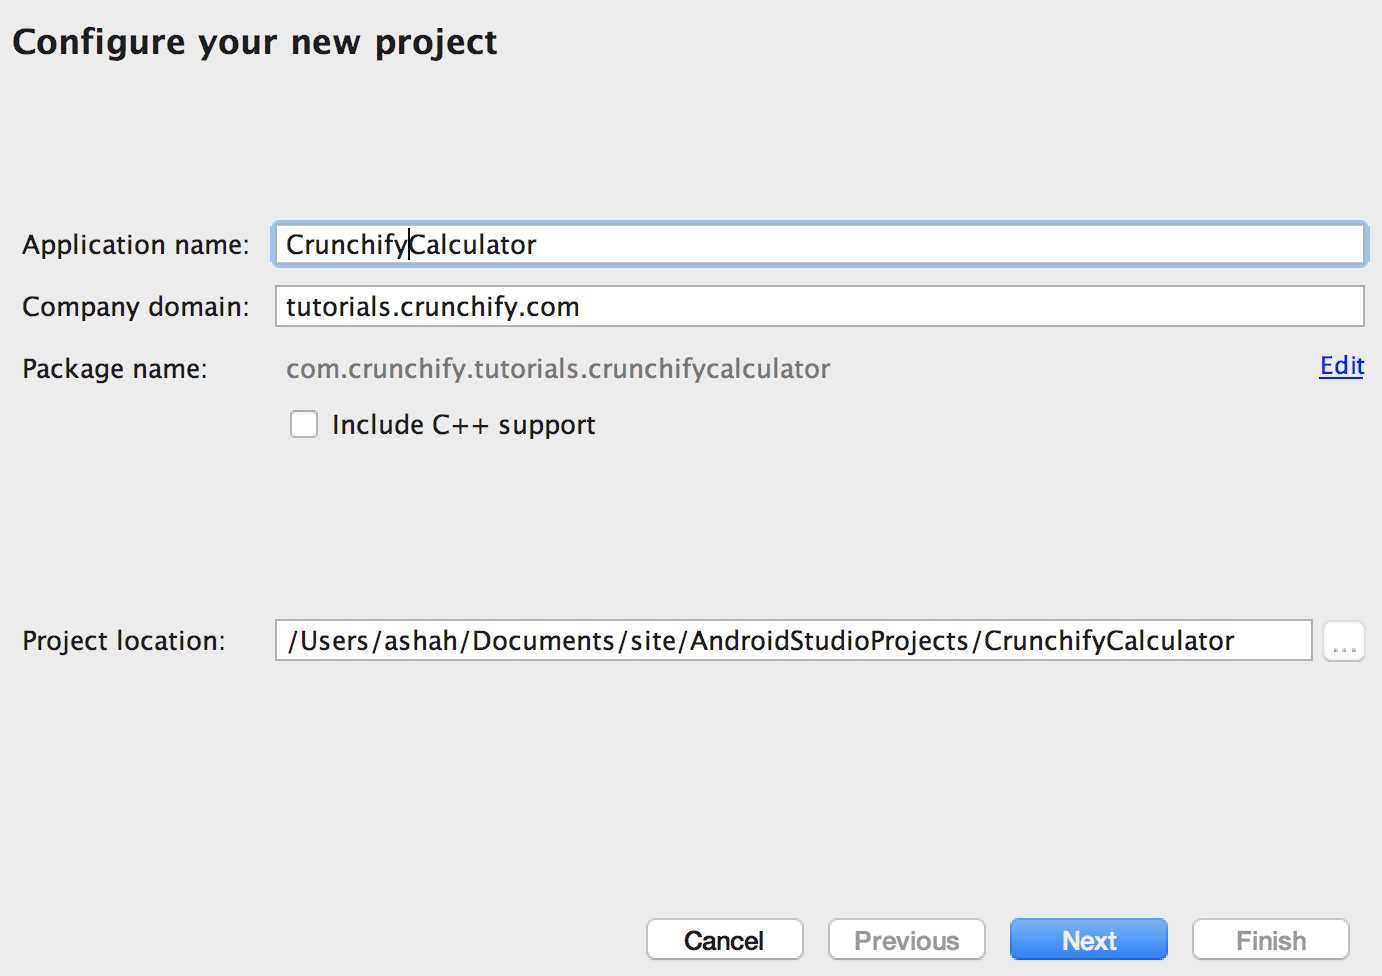
- 單擊啟動一個新的 Android Studio 項目。
- 提供您的應用程序名稱
CrunchifyCalculator並將其他字段留空,然後單擊下一步。
第2步
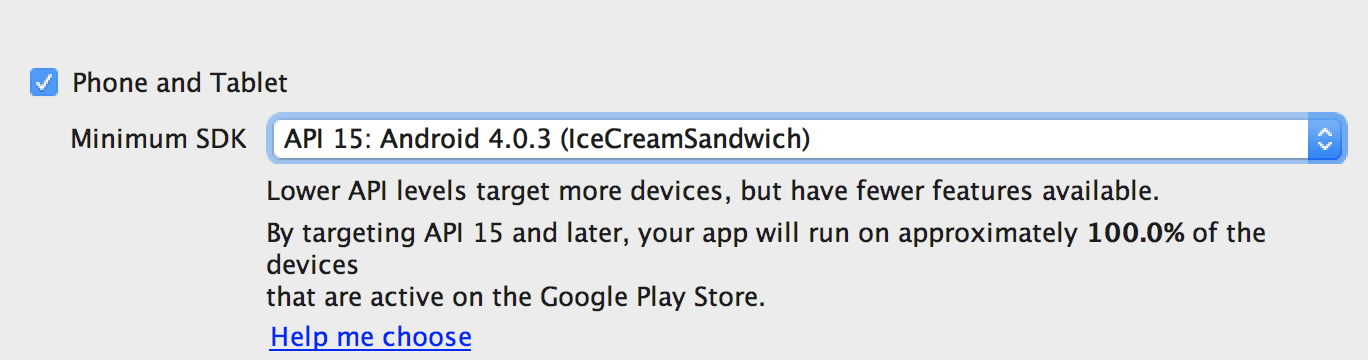
- 選擇最低 SDK
API 15: Android 4.0.3(IceCreamSandwich)。 我選擇了 API 15 (IceCreamSandwich),因為它覆蓋了幾乎 94% 的設備並且幾乎具有所有功能。 如果您想覆蓋 100% 設備,那麼您可以選擇 API 8:Android 2.2(Froyo)。
第三步
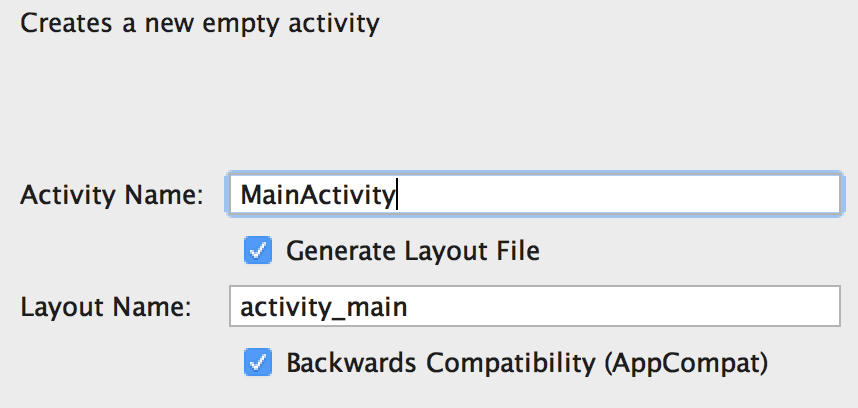
- 選擇
Empty Activity並單擊下一步。 - 保持活動名稱
MainActivity,並保持一切不變。 單擊完成。
第四步
- 單擊完成後,構建 Activity 和文件大約需要 2 分鐘。
- 這是您的應用程序的最終項目結構。
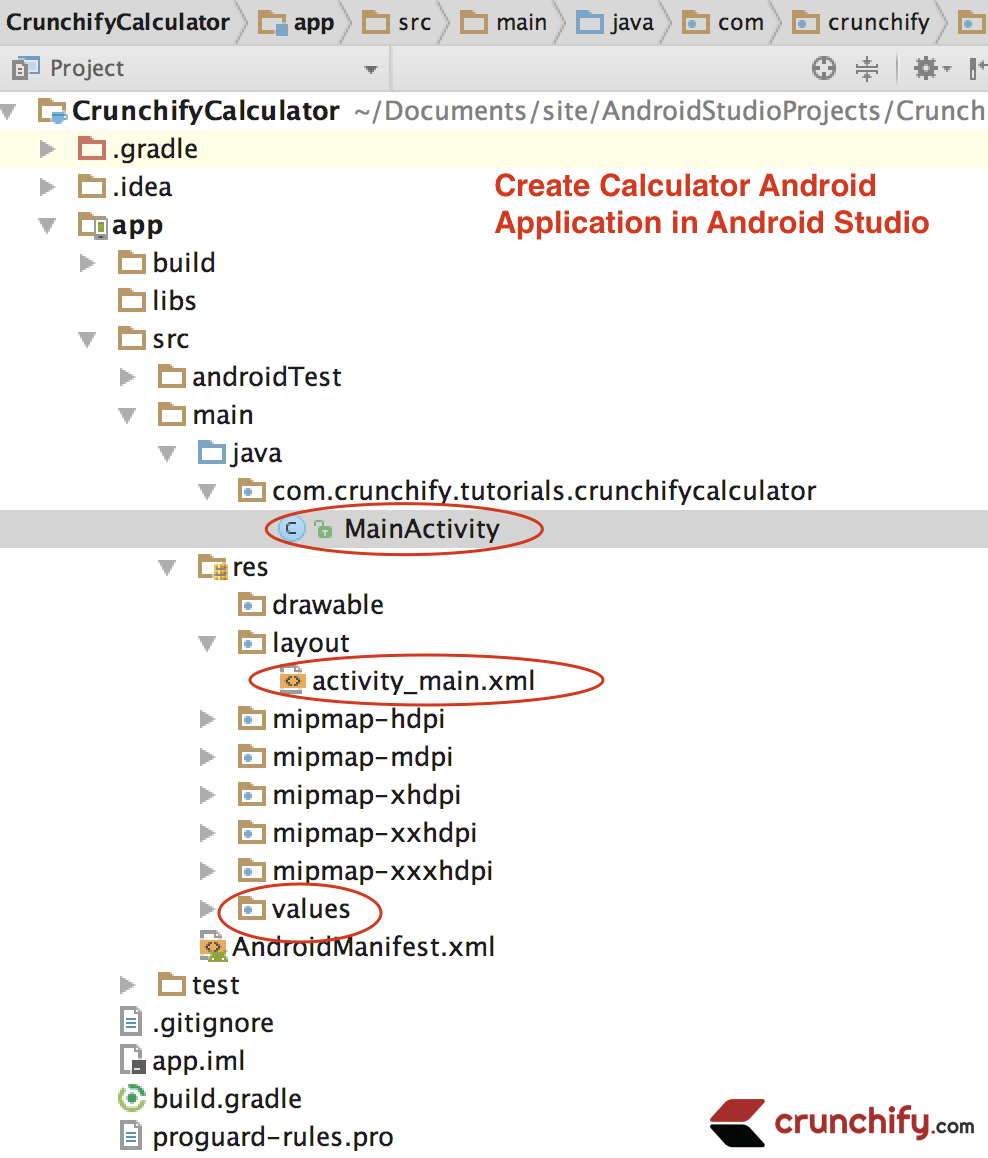
第 5 步
- 現在我們必須在 MainActivity.java 文件中添加我們的 Java 代碼。
- 因此,從 IDE 左側打開
MainActivity.java文件(app -> java -> com.crunchify.tutorials.crunchifycalculator -> MainActivity.java)
您可以在代碼下方找到突出顯示的行的說明。
|
1 2 3 4 5 6 7 8 9 10 11 12 13 14 15 16 17 18 19 20 21 22 23 24 25 26 27 28 29 30 31 32 33 34 35 36 37 38 39 40 41 42 43 44 45 46 47 48 49 50 51 52 53 54 55 56 57 58 59 60 61 62 63 64 65 66 67 68 69 70 71 72 73 74 75 76 77 78 79 80 81 82 83 84 85 86 87 88 89 90 91 92 93 94 95 96 97 98 99 100 101 102 103 104 105 106 107 108 109 110 111 112 113 114 115 116 117 118 119 120 121 122 123 124 125 126 127 128 129 130 131 132 133 134 135 136 137 138 139 140 141 142 143 144 145 146 147 148 149 150 151 152 153 154 155 156 157 158 159 160 161 162 163 164 165 166 167 168 169 170 171 172 173 174 175 176 177 178 179 180 181 182 183 184 185 186 187 188 189 190 191 192 193 194 195 196 197 |
package com . crunchify . tutorials . crunchifycalculator ; import android . os . Bundle ; import android . support . v7 . app . AppCompatActivity ; import android . view . View ; import android . widget . Button ; import android . widget . EditText ; public class MainActivity extends AppCompatActivity { Button button0 , button1 , button2 , button3 , button4 , button5 , button6 , button7 , button8 , button9 , buttonAdd , buttonSub , buttonDivision , buttonMul , button10 , buttonC , buttonEqual ; EditText crunchifyEditText ; float mValueOne , mValueTwo ; boolean crunchifyAddition , mSubtract , crunchifyMultiplication , crunchifyDivision ; @ Override protected void onCreate ( Bundle savedInstanceState ) { super . onCreate ( savedInstanceState ) ; setContentView ( R . layout . activity_main ) ; button0 = ( Button ) findViewById ( R . id . button0 ) ; button1 = ( Button ) findViewById ( R . id . button1 ) ; button2 = ( Button ) findViewById ( R . id . button2 ) ; button3 = ( Button ) findViewById ( R . id . button3 ) ; button4 = ( Button ) findViewById ( R . id . button4 ) ; button5 = ( Button ) findViewById ( R . id . button5 ) ; button6 = ( Button ) findViewById ( R . id . button6 ) ; button7 = ( Button ) findViewById ( R . id . button7 ) ; button8 = ( Button ) findViewById ( R . id . button8 ) ; button9 = ( Button ) findViewById ( R . id . button9 ) ; button10 = ( Button ) findViewById ( R . id . button10 ) ; buttonAdd = ( Button ) findViewById ( R . id . buttonadd ) ; buttonSub = ( Button ) findViewById ( R . id . buttonsub ) ; buttonMul = ( Button ) findViewById ( R . id . buttonmul ) ; buttonDivision = ( Button ) findViewById ( R . id . buttondiv ) ; buttonC = ( Button ) findViewById ( R . id . buttonC ) ; buttonEqual = ( Button ) findViewById ( R . id . buttoneql ) ; crunchifyEditText = ( EditText ) findViewById ( R . id . edt1 ) ; button1 . setOnClickListener ( new View . OnClickListener ( ) { @ Override public void onClick ( View v ) { crunchifyEditText . setText ( crunchifyEditText . getText ( ) + "1" ) ; } } ) ; button2 . setOnClickListener ( new View . OnClickListener ( ) { @ Override public void onClick ( View v ) { crunchifyEditText . setText ( crunchifyEditText . getText ( ) + "2" ) ; } } ) ; button3 . setOnClickListener ( new View . OnClickListener ( ) { @ Override public void onClick ( View v ) { crunchifyEditText . setText ( crunchifyEditText . getText ( ) + "3" ) ; } } ) ; button4 . setOnClickListener ( new View . OnClickListener ( ) { @ Override public void onClick ( View v ) { crunchifyEditText . setText ( crunchifyEditText . getText ( ) + "4" ) ; } } ) ; button5 . setOnClickListener ( new View . OnClickListener ( ) { @ Override public void onClick ( View v ) { crunchifyEditText . setText ( crunchifyEditText . getText ( ) + "5" ) ; } } ) ; button6 . setOnClickListener ( new View . OnClickListener ( ) { @ Override public void onClick ( View v ) { crunchifyEditText . setText ( crunchifyEditText . getText ( ) + "6" ) ; } } ) ; button7 . setOnClickListener ( new View . OnClickListener ( ) { @ Override public void onClick ( View v ) { crunchifyEditText . setText ( crunchifyEditText . getText ( ) + "7" ) ; } } ) ; button8 . setOnClickListener ( new View . OnClickListener ( ) { @ Override public void onClick ( View v ) { crunchifyEditText . setText ( crunchifyEditText . getText ( ) + "8" ) ; } } ) ; button9 . setOnClickListener ( new View . OnClickListener ( ) { @ Override public void onClick ( View v ) { crunchifyEditText . setText ( crunchifyEditText . getText ( ) + "9" ) ; } } ) ; button0 . setOnClickListener ( new View . OnClickListener ( ) { @ Override public void onClick ( View v ) { crunchifyEditText . setText ( crunchifyEditText . getText ( ) + "0" ) ; } } ) ; buttonAdd . setOnClickListener ( new View . OnClickListener ( ) { @ Override public void onClick ( View v ) { if ( crunchifyEditText == null ) { crunchifyEditText . setText ( "" ) ; } else { mValueOne = Float . parseFloat ( crunchifyEditText . getText ( ) + "" ) ; crunchifyAddition = true ; crunchifyEditText . setText ( null ) ; } } } ) ; buttonSub . setOnClickListener ( new View . OnClickListener ( ) { @ Override public void onClick ( View v ) { mValueOne = Float . parseFloat ( crunchifyEditText . getText ( ) + "" ) ; mSubtract = true ; crunchifyEditText . setText ( null ) ; } } ) ; buttonMul . setOnClickListener ( new View . OnClickListener ( ) { @ Override public void onClick ( View v ) { mValueOne = Float . parseFloat ( crunchifyEditText . getText ( ) + "" ) ; crunchifyMultiplication = true ; crunchifyEditText . setText ( null ) ; } } ) ; buttonDivision . setOnClickListener ( new View . OnClickListener ( ) { @ Override public void onClick ( View v ) { mValueOne = Float . parseFloat ( crunchifyEditText . getText ( ) + "" ) ; crunchifyDivision = true ; crunchifyEditText . setText ( null ) ; } } ) ; buttonEqual . setOnClickListener ( new View . OnClickListener ( ) { @ Override public void onClick ( View v ) { mValueTwo = Float . parseFloat ( crunchifyEditText . getText ( ) + "" ) ; if ( crunchifyAddition == true ) { crunchifyEditText . setText ( mValueOne + mValueTwo + "" ) ; crunchifyAddition = false ; } if ( mSubtract == true ) { crunchifyEditText . setText ( mValueOne - mValueTwo + "" ) ; mSubtract = false ; } if ( crunchifyMultiplication == true ) { crunchifyEditText . setText ( mValueOne * mValueTwo + "" ) ; crunchifyMultiplication = false ; } if ( crunchifyDivision == true ) { crunchifyEditText . setText ( mValueOne / mValueTwo + "" ) ; crunchifyDivision = false ; } } } ) ; buttonC . setOnClickListener ( new View . OnClickListener ( ) { @ Override public void onClick ( View v ) { crunchifyEditText . setText ( "" ) ; } } ) ; button10 . setOnClickListener ( new View . OnClickListener ( ) { @ Override public void onClick ( View v ) { crunchifyEditText . setText ( crunchifyEditText . getText ( ) + "." ) ; } } ) ; } } |
這裡我們有 1 個 EditText。 它定義了內容的類型。
讓我們更多地了解代碼。

- 第 11 - 14 行:這裡我們創建了 Buttons 和 EditText 的引用。
- 第 16 行:這裡我們為 value1 和 value2 創建了兩個浮點變量。
- 第 21 行:我們重寫了 onCreate() 方法,它是 Activity 類的方法。
- 第 45 – 50 行:我們在 Button1 上設置了 onClickListener。 如果我們單擊 Button1,將顯示 EditText。
- 我們為每個按鈕實現了相同的邏輯。
- 第 115 – 127 行:這裡我們在添加按鈕上設置了點擊監聽器。
- 在這裡,我們將條件設置為,如果我們 EditText 為 Null,那麼我們將 EditText 設置為空值。 否則,我們添加在單擊添加按鈕之前和單擊添加按鈕之後單擊的兩個值。
- 我們還將
crunchifyAddition布爾值設置為 True。 此 true 表示單擊了添加按鈕,並且將在用戶單擊“=”按鈕時使用。 - 我們為其他按鈕實現相同的邏輯,例如 buttonSub、ButtonMul、buttonDivision。
- 第 156 – 183 行:這裡我們在“=”按鈕上設置 clickListener。 在這裡,我們將條件設置為,如果用戶單擊添加按鈕,則
crunchifyAddition值在添加按鈕的單擊偵聽器上設置為 True。 - 據此,將針對單擊的按鈕執行相應的操作。
|
1 2 3 4 |
if ( crunchifyAddition == true ) { crunchifyEditText . setText ( mValueOne + mValueTwo + "" ) ; crunchifyAddition = false ; } |
如果在“=”按鈕之前單擊添加按鈕,則將執行添加操作,如上所示。
- 執行完動作後,我們將
crunchifyAddition的值設置為 false,這樣我們就可以再次執行 Add 動作。
下面是佈局文件,幫助設計計算器的前端:
|
1 2 3 4 5 6 7 8 9 10 11 12 13 14 15 16 17 18 19 20 21 22 23 24 25 26 27 28 29 30 31 32 33 34 35 36 37 38 39 40 41 42 43 44 45 46 47 48 49 50 51 52 53 54 55 56 57 58 59 60 61 62 63 64 65 66 67 68 69 70 71 72 73 74 75 76 77 78 79 80 81 82 83 84 85 86 87 88 89 90 91 92 93 94 95 96 97 98 99 100 101 102 103 104 105 106 107 108 109 110 111 112 113 114 115 116 117 118 119 120 121 122 123 124 125 126 127 128 129 130 131 132 133 134 135 136 137 138 139 140 141 142 143 144 145 146 147 148 149 150 151 152 153 154 155 156 157 158 159 160 161 162 163 164 165 166 167 168 169 170 171 172 173 174 175 176 177 178 179 180 181 182 183 184 185 186 187 188 189 190 191 192 193 |
<? xml version = "1.0" encoding = "utf-8" ?> < RelativeLayout xmlns : android = "http://schemas.android.com/apk/res/android" xmlns : tools = "http://schemas.android.com/tools" android : id = "@+id/relative1" android : layout_width = "match_parent" android : layout_height = "match_parent" tools : context = ".MainActivity" > < EditText android : id = "@+id/edt1" android : layout_width = "match_parent" android : layout_height = "wrap_content" / > < Button android : id = "@+id/button1" style = "?android:attr/buttonStyleSmall" android : layout_width = "wrap_content" android : layout_height = "wrap_content" android : layout_alignEnd = "@+id/button4" android : layout_alignRight = "@+id/button4" android : layout_below = "@+id/edt1" android : layout_marginTop = "94dp" android : text = "1" / > < Button android : id = "@+id/button2" style = "?android:attr/buttonStyleSmall" android : layout_width = "wrap_content" android : layout_height = "wrap_content" android : layout_alignTop = "@+id/button1" android : layout_toLeftOf = "@+id/button3" android : layout_toStartOf = "@+id/button3" android : text = "2" / > < Button android : id = "@+id/button3" style = "?android:attr/buttonStyleSmall" android : layout_width = "wrap_content" android : layout_height = "wrap_content" android : layout_alignTop = "@+id/button2" android : layout_centerHorizontal = "true" android : text = "3" / > < Button android : id = "@+id/button4" style = "?android:attr/buttonStyleSmall" android : layout_width = "wrap_content" android : layout_height = "wrap_content" android : layout_below = "@+id/button1" android : layout_toLeftOf = "@+id/button2" android : text = "4" / > < Button android : id = "@+id/button5" style = "?android:attr/buttonStyleSmall" android : layout_width = "wrap_content" android : layout_height = "wrap_content" android : layout_alignBottom = "@+id/button4" android : layout_alignLeft = "@+id/button2" android : layout_alignStart = "@+id/button2" android : text = "5" / > < Button android : id = "@+id/button6" style = "?android:attr/buttonStyleSmall" android : layout_width = "wrap_content" android : layout_height = "wrap_content" android : layout_alignLeft = "@+id/button3" android : layout_alignStart = "@+id/button3" android : layout_below = "@+id/button3" android : text = "6" / > < Button android : id = "@+id/button7" style = "?android:attr/buttonStyleSmall" android : layout_width = "wrap_content" android : layout_height = "wrap_content" android : layout_below = "@+id/button4" android : layout_toLeftOf = "@+id/button2" android : text = "7" / > < Button android : id = "@+id/button8" style = "?android:attr/buttonStyleSmall" android : layout_width = "wrap_content" android : layout_height = "wrap_content" android : layout_alignLeft = "@+id/button5" android : layout_alignStart = "@+id/button5" android : layout_below = "@+id/button5" android : text = "8" / > < Button android : id = "@+id/button9" style = "?android:attr/buttonStyleSmall" android : layout_width = "wrap_content" android : layout_height = "wrap_content" android : layout_alignLeft = "@+id/button6" android : layout_alignStart = "@+id/button6" android : layout_below = "@+id/button6" android : text = "9" / > < Button android : id = "@+id/buttonadd" style = "?android:attr/buttonStyleSmall" android : layout_width = "wrap_content" android : layout_height = "wrap_content" android : layout_alignEnd = "@+id/edt1" android : layout_alignRight = "@+id/edt1" android : layout_alignTop = "@+id/button3" android : layout_marginLeft = "46dp" android : layout_marginStart = "46dp" android : layout_toRightOf = "@+id/button3" android : text = "+" / > < Button android : id = "@+id/buttonsub" style = "?android:attr/buttonStyleSmall" android : layout_width = "wrap_content" android : layout_height = "wrap_content" android : layout_alignEnd = "@+id/buttonadd" android : layout_alignLeft = "@+id/buttonadd" android : layout_alignRight = "@+id/buttonadd" android : layout_alignStart = "@+id/buttonadd" android : layout_below = "@+id/buttonadd" android : text = "-" / > < Button android : id = "@+id/buttonmul" style = "?android:attr/buttonStyleSmall" android : layout_width = "wrap_content" android : layout_height = "wrap_content" android : layout_alignLeft = "@+id/buttonsub" android : layout_alignParentEnd = "true" android : layout_alignParentRight = "true" android : layout_alignStart = "@+id/buttonsub" android : layout_below = "@+id/buttonsub" android : text = "*" / > < Button android : id = "@+id/button10" style = "?android:attr/buttonStyleSmall" android : layout_width = "wrap_content" android : layout_height = "wrap_content" android : layout_below = "@+id/button7" android : layout_toLeftOf = "@+id/button2" android : text = "." / > < Button android : id = "@+id/button0" style = "?android:attr/buttonStyleSmall" android : layout_width = "wrap_content" android : layout_height = "wrap_content" android : layout_alignLeft = "@+id/button8" android : layout_alignStart = "@+id/button8" android : layout_below = "@+id/button8" android : text = "0" / > < Button android : id = "@+id/buttonC" style = "?android:attr/buttonStyleSmall" android : layout_width = "wrap_content" android : layout_height = "wrap_content" android : layout_alignLeft = "@+id/button9" android : layout_alignStart = "@+id/button9" android : layout_below = "@+id/button9" android : text = "C" / > < Button android : id = "@+id/buttondiv" style = "?android:attr/buttonStyleSmall" android : layout_width = "wrap_content" android : layout_height = "wrap_content" android : layout_alignEnd = "@+id/buttonmul" android : layout_alignLeft = "@+id/buttonmul" android : layout_alignRight = "@+id/buttonmul" android : layout_alignStart = "@+id/buttonmul" android : layout_below = "@+id/buttonmul" android : text = "/" / > < Button android : id = "@+id/buttoneql" android : layout_width = "wrap_content" android : layout_height = "wrap_content" android : layout_alignEnd = "@+id/buttondiv" android : layout_alignLeft = "@+id/button10" android : layout_alignRight = "@+id/buttondiv" android : layout_alignStart = "@+id/button10" android : layout_below = "@+id/button0" android : layout_marginTop = "37dp" android : text = "=" / > < / RelativeLayout > |
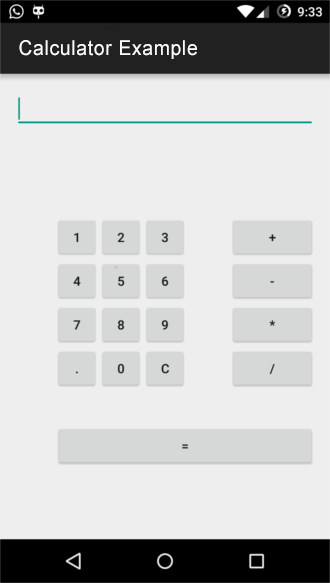
現在,一切正常,我們準備運行我們的計算器 Android 應用程序。 要運行我們的應用程序,我使用我的手機,您可以使用模擬器或您的設備。
運行我們的計算器 Android 應用
- 點擊安卓設備管理器。 在
Android device manager窗口中選擇您的自定義設備後,單擊START。 - 單擊運行按鈕。
- 選擇您的設備或模擬器,然後單擊確定。
- 現在您可以看到作為此屏幕截圖運行的計算器 android 應用程序。
恭喜!! 如果您已遵循所有步驟並達到這一點,則意味著您已正確遵循所有步驟,並且您的 Calculator android 應用程序已啟動並運行良好。