
AndroidStudioを使用して簡単な電卓Androidアプリを作成する方法
公開: 2017-07-06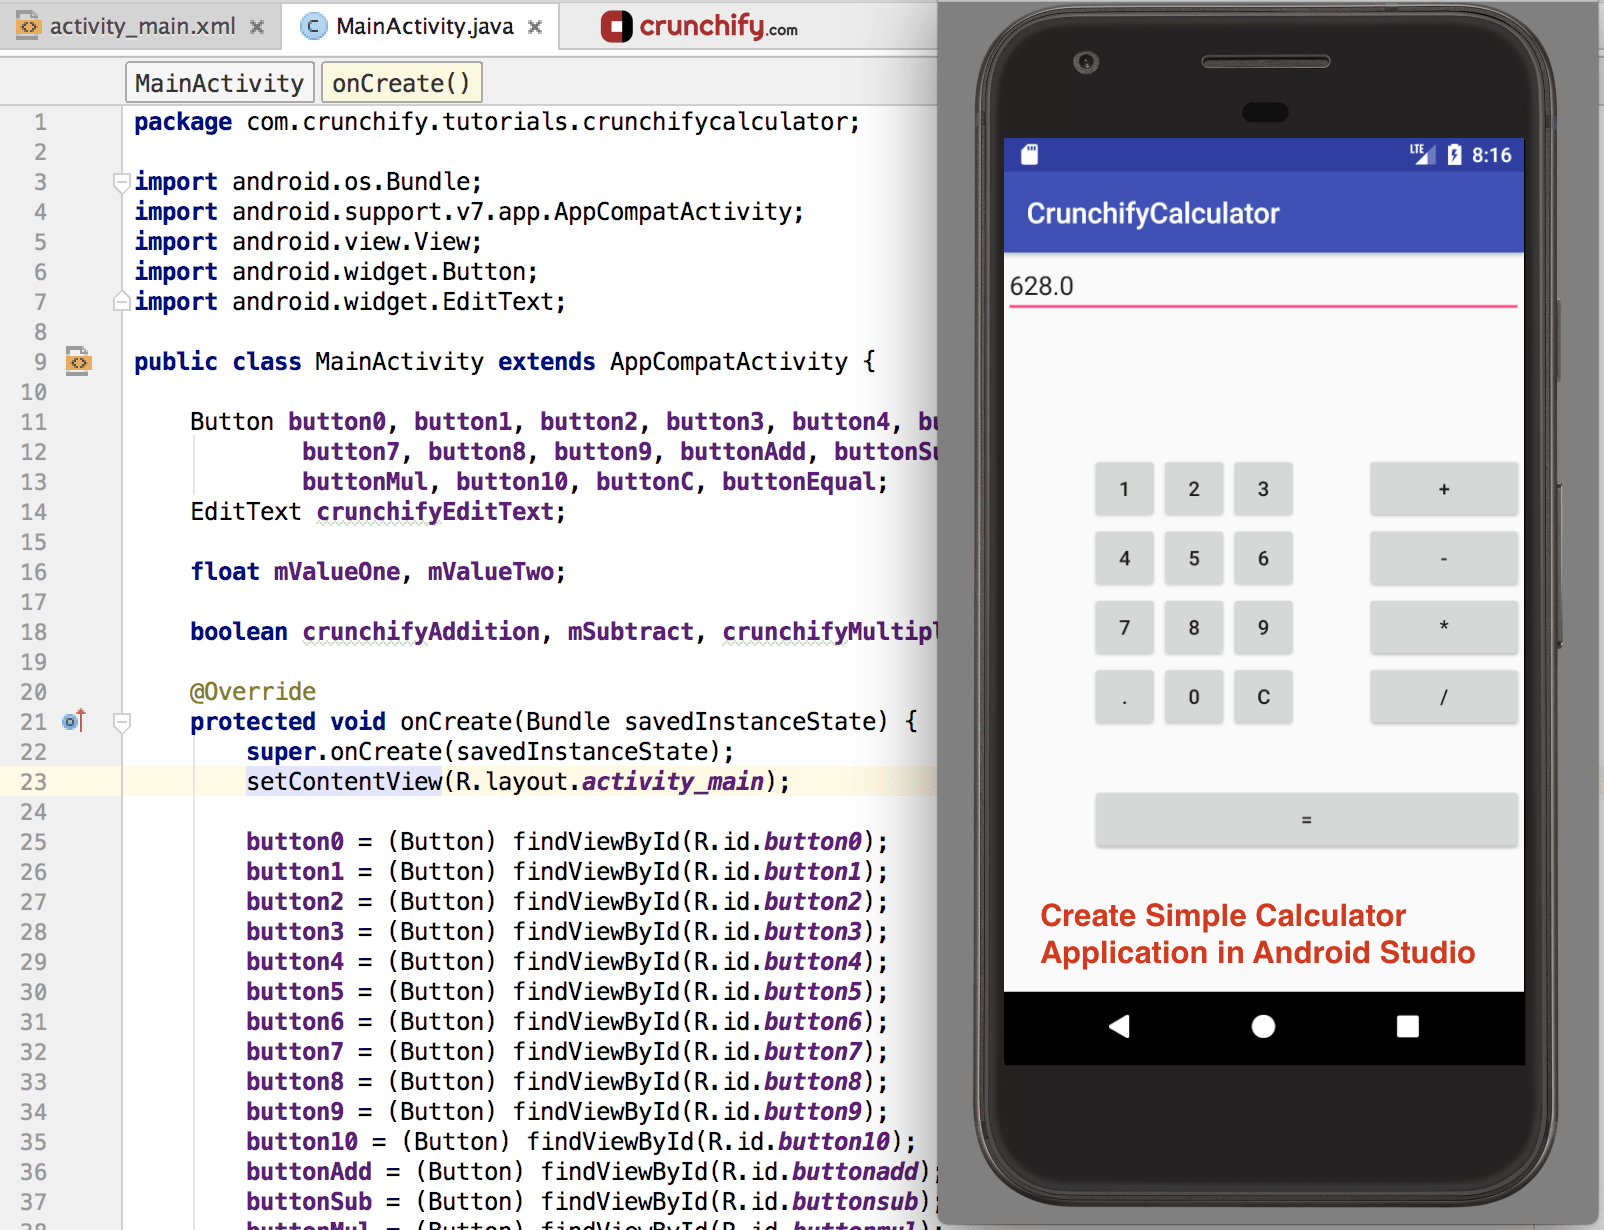
前回の記事では、簡単なAndroidアプリケーションを作成する方法について詳しく説明しました。 その特定のアプリでは、Androidボタンの概念とAndroidの基本的な概念についても説明しました。
私の他のすべての記事はAndroidセクションにあります。
この記事では、 calculator android appを作成します。 これは、機能が制限された単純な計算機です。
先に進む前に、完全なHelloWorldチュートリアルを確認しておくとよいでしょう。 ここに再びリンクがあります:私の最初のHelloWorldAndroidアプリ
- 簡単な電卓アプリの作成方法–完全なチュートリアル
- AndroidStudioを使用して簡単な電卓を作成する
- Android開発:基本的な計算機の作成
- シンプルな電卓Androidアプリを作成する
- Android用の電卓アプリを作成する方法
電卓Androidアプリを使い始めましょう:
ステップ1
- AndroidStudioを開きます
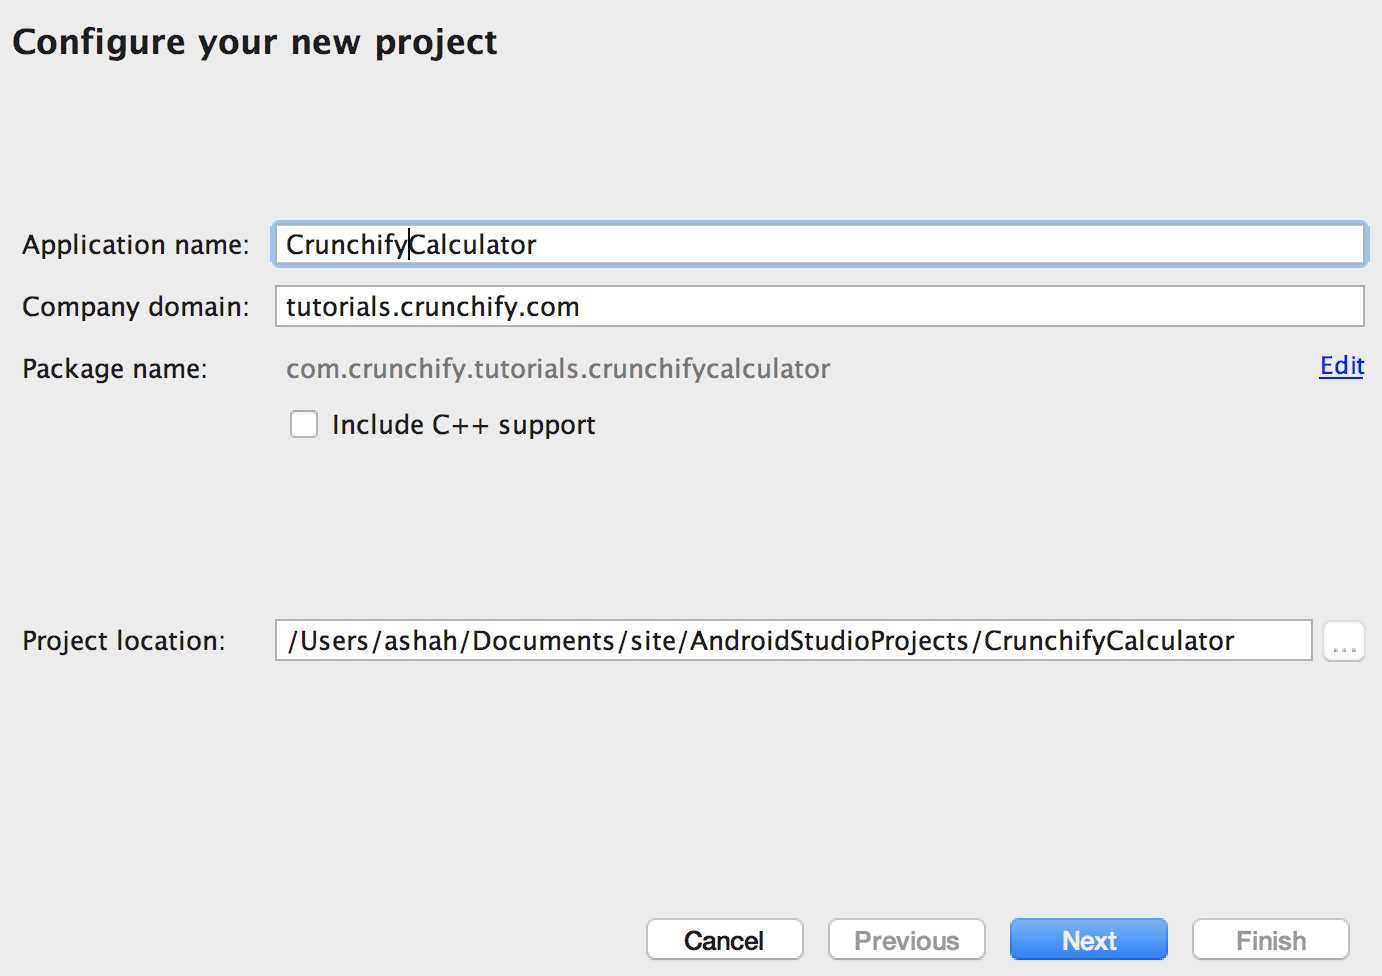
- [新しいAndroidStudioプロジェクトの開始]をクリックします。
- アプリケーション名
CrunchifyCalculatorを付け、他のフィールドはそのままにして、[次へ]をクリックします。
ステップ2
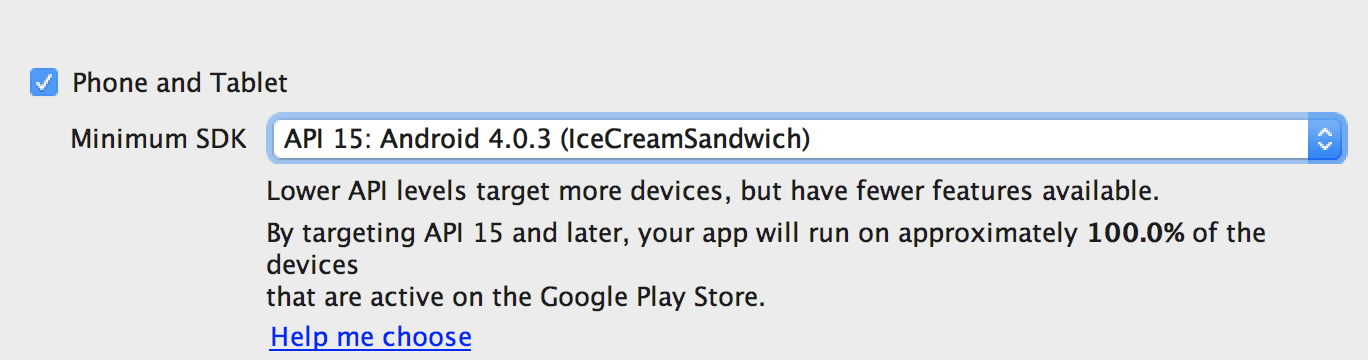
- 最小
API 15: Android 4.0.3(IceCreamSandwich)選択します。 API 15(IceCreamSandwich)を選択したのは、ほぼ94%のデバイスをカバーし、ほぼすべての機能を備えているためです。 100%デバイスをカバーしたい場合は、API 8:Android 2.2(Froyo)を選択できます。
ステップ-3
-
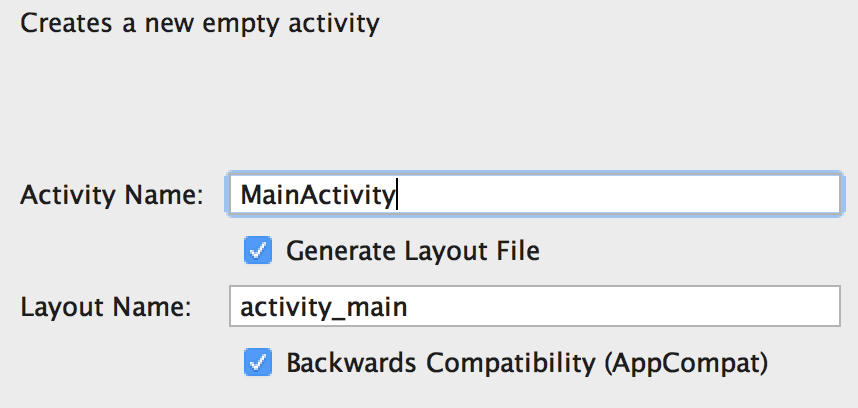
Empty Activityを選択し、[次へ]をクリックします。 - アクティビティ名
MainActivityはそのままにし、すべてをそのままにします。 [完了]をクリックします。
ステップ-4
- [完了]をクリックした後、アクティビティとファイルを作成するのに約2分かかります。
- これが、アプリケーションの最終的なプロジェクト構造です。
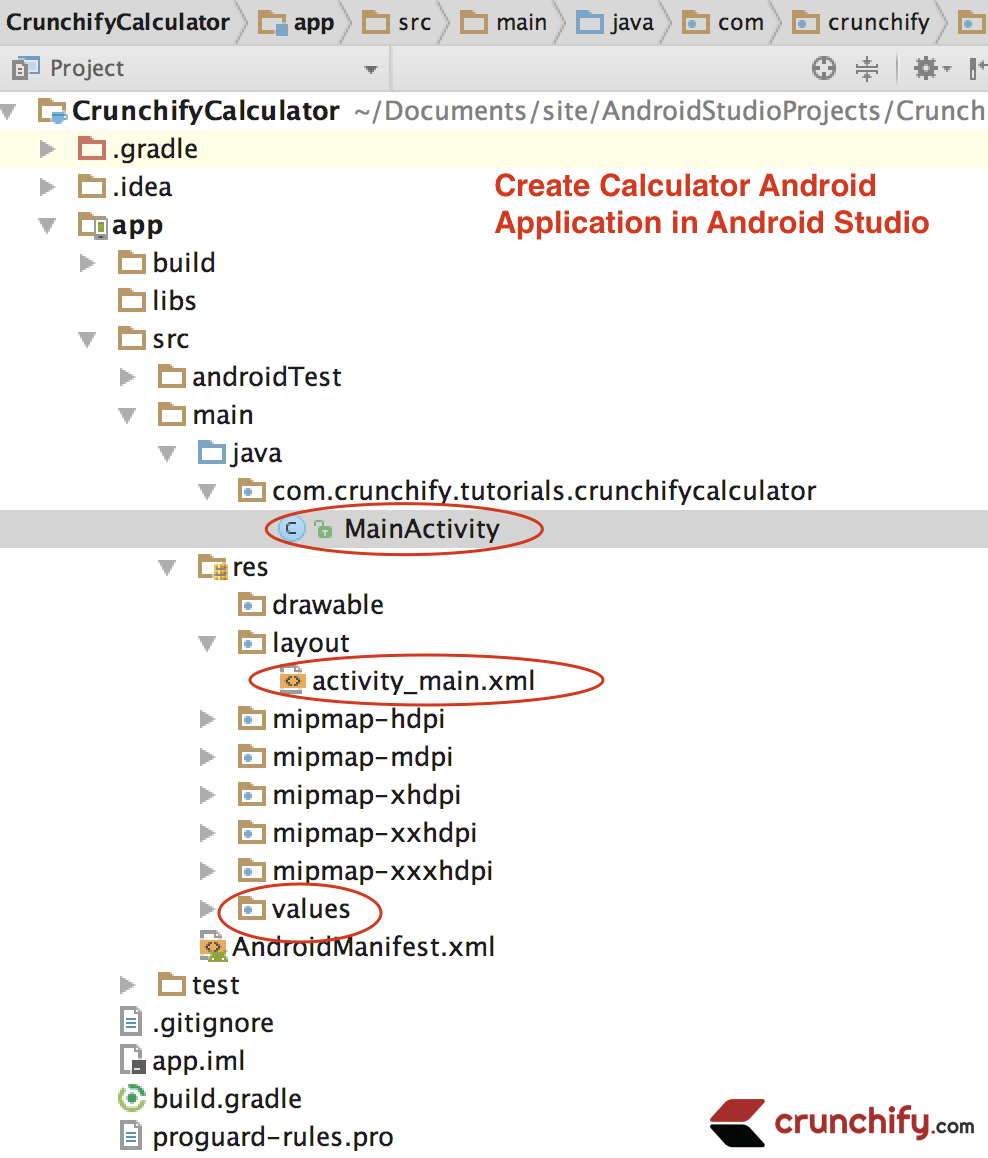
ステップ-5
- 次に、MainActivity.javaファイルにJavaコードを追加する必要があります。
- したがって、IDEの左側から
MainActivity.javaファイルを開きます(app-> java-> com.crunchify.tutorials.crunchifycalculator-> MainActivity.java)
コードの下に強調表示された行の説明があります。
|
1 2 3 4 5 6 7 8 9 10 11 12 13 14 15 16 17 18 19 20 21 22 23 24 25 26 27 28 29 30 31 32 33 34 35 36 37 38 39 40 41 42 43 44 45 46 47 48 49 50 51 52 53 54 55 56 57 58 59 60 61 62 63 64 65 66 67 68 69 70 71 72 73 74 75 76 77 78 79 80 81 82 83 84 85 86 87 88 89 90 91 92 93 94 95 96 97 98 99 100 101 102 103 104 105 106 107 108 109 110 111 112 113 114 115 116 117 118 119 120 121 122 123 124 125 126 127 128 129 130 131 132 133 134 135 136 137 138 139 140 141 142 143 144 145 146 147 148 149 150 151 152 153 154 155 156 157 158 159 160 161 162 163 164 165 166 167 168 169 170 171 172 173 174 175 176 177 178 179 180 181 182 183 184 185 186 187 188 189 190 191 192 193 194 195 196 197 |
package com . crunchify . tutorials . crunchifycalculator ; import android . os . Bundle ; import android . support . v7 . app . AppCompatActivity ; import android . view . View ; import android . widget . Button ; import android . widget . EditText ; public class MainActivity extends AppCompatActivity { Button button0 , button1 , button2 , button3 , button4 , button5 , button6 , button7 , button8 , button9 , buttonAdd , buttonSub , buttonDivision , buttonMul , button10 , buttonC , buttonEqual ; EditText crunchifyEditText ; float mValueOne , mValueTwo ; boolean crunchifyAddition , mSubtract , crunchifyMultiplication , crunchifyDivision ; @ Override protected void onCreate ( Bundle savedInstanceState ) { super . onCreate ( savedInstanceState ) ; setContentView ( R . layout . activity_main ) ; button0 = ( Button ) findViewById ( R . id . button0 ) ; button1 = ( Button ) findViewById ( R . id . button1 ) ; button2 = ( Button ) findViewById ( R . id . button2 ) ; button3 = ( Button ) findViewById ( R . id . button3 ) ; button4 = ( Button ) findViewById ( R . id . button4 ) ; button5 = ( Button ) findViewById ( R . id . button5 ) ; button6 = ( Button ) findViewById ( R . id . button6 ) ; button7 = ( Button ) findViewById ( R . id . button7 ) ; button8 = ( Button ) findViewById ( R . id . button8 ) ; button9 = ( Button ) findViewById ( R . id . button9 ) ; button10 = ( Button ) findViewById ( R . id . button10 ) ; buttonAdd = ( Button ) findViewById ( R . id . buttonadd ) ; buttonSub = ( Button ) findViewById ( R . id . buttonsub ) ; buttonMul = ( Button ) findViewById ( R . id . buttonmul ) ; buttonDivision = ( Button ) findViewById ( R . id . buttondiv ) ; buttonC = ( Button ) findViewById ( R . id . buttonC ) ; buttonEqual = ( Button ) findViewById ( R . id . buttoneql ) ; crunchifyEditText = ( EditText ) findViewById ( R . id . edt1 ) ; button1 . setOnClickListener ( new View . OnClickListener ( ) { @ Override public void onClick ( View v ) { crunchifyEditText . setText ( crunchifyEditText . getText ( ) + "1" ) ; } } ) ; button2 . setOnClickListener ( new View . OnClickListener ( ) { @ Override public void onClick ( View v ) { crunchifyEditText . setText ( crunchifyEditText . getText ( ) + "2" ) ; } } ) ; button3 . setOnClickListener ( new View . OnClickListener ( ) { @ Override public void onClick ( View v ) { crunchifyEditText . setText ( crunchifyEditText . getText ( ) + "3" ) ; } } ) ; button4 . setOnClickListener ( new View . OnClickListener ( ) { @ Override public void onClick ( View v ) { crunchifyEditText . setText ( crunchifyEditText . getText ( ) + "4" ) ; } } ) ; button5 . setOnClickListener ( new View . OnClickListener ( ) { @ Override public void onClick ( View v ) { crunchifyEditText . setText ( crunchifyEditText . getText ( ) + "5" ) ; } } ) ; button6 . setOnClickListener ( new View . OnClickListener ( ) { @ Override public void onClick ( View v ) { crunchifyEditText . setText ( crunchifyEditText . getText ( ) + "6" ) ; } } ) ; button7 . setOnClickListener ( new View . OnClickListener ( ) { @ Override public void onClick ( View v ) { crunchifyEditText . setText ( crunchifyEditText . getText ( ) + "7" ) ; } } ) ; button8 . setOnClickListener ( new View . OnClickListener ( ) { @ Override public void onClick ( View v ) { crunchifyEditText . setText ( crunchifyEditText . getText ( ) + "8" ) ; } } ) ; button9 . setOnClickListener ( new View . OnClickListener ( ) { @ Override public void onClick ( View v ) { crunchifyEditText . setText ( crunchifyEditText . getText ( ) + "9" ) ; } } ) ; button0 . setOnClickListener ( new View . OnClickListener ( ) { @ Override public void onClick ( View v ) { crunchifyEditText . setText ( crunchifyEditText . getText ( ) + "0" ) ; } } ) ; buttonAdd . setOnClickListener ( new View . OnClickListener ( ) { @ Override public void onClick ( View v ) { if ( crunchifyEditText == null ) { crunchifyEditText . setText ( "" ) ; } else { mValueOne = Float . parseFloat ( crunchifyEditText . getText ( ) + "" ) ; crunchifyAddition = true ; crunchifyEditText . setText ( null ) ; } } } ) ; buttonSub . setOnClickListener ( new View . OnClickListener ( ) { @ Override public void onClick ( View v ) { mValueOne = Float . parseFloat ( crunchifyEditText . getText ( ) + "" ) ; mSubtract = true ; crunchifyEditText . setText ( null ) ; } } ) ; buttonMul . setOnClickListener ( new View . OnClickListener ( ) { @ Override public void onClick ( View v ) { mValueOne = Float . parseFloat ( crunchifyEditText . getText ( ) + "" ) ; crunchifyMultiplication = true ; crunchifyEditText . setText ( null ) ; } } ) ; buttonDivision . setOnClickListener ( new View . OnClickListener ( ) { @ Override public void onClick ( View v ) { mValueOne = Float . parseFloat ( crunchifyEditText . getText ( ) + "" ) ; crunchifyDivision = true ; crunchifyEditText . setText ( null ) ; } } ) ; buttonEqual . setOnClickListener ( new View . OnClickListener ( ) { @ Override public void onClick ( View v ) { mValueTwo = Float . parseFloat ( crunchifyEditText . getText ( ) + "" ) ; if ( crunchifyAddition == true ) { crunchifyEditText . setText ( mValueOne + mValueTwo + "" ) ; crunchifyAddition = false ; } if ( mSubtract == true ) { crunchifyEditText . setText ( mValueOne - mValueTwo + "" ) ; mSubtract = false ; } if ( crunchifyMultiplication == true ) { crunchifyEditText . setText ( mValueOne * mValueTwo + "" ) ; crunchifyMultiplication = false ; } if ( crunchifyDivision == true ) { crunchifyEditText . setText ( mValueOne / mValueTwo + "" ) ; crunchifyDivision = false ; } } } ) ; buttonC . setOnClickListener ( new View . OnClickListener ( ) { @ Override public void onClick ( View v ) { crunchifyEditText . setText ( "" ) ; } } ) ; button10 . setOnClickListener ( new View . OnClickListener ( ) { @ Override public void onClick ( View v ) { crunchifyEditText . setText ( crunchifyEditText . getText ( ) + "." ) ; } } ) ; } } |
ここに1つのEditTextがあります。 コンテンツの種類を定義します。
コードをもう少し理解しましょう。

- 11〜14行目:ここでは、ButtonsとEditTextの参照を作成しました。
- 16行目:ここでは、value1とvalue2として2つのfloat変数を作成しました。
- 21行目:ActivityクラスのメソッドであるonCreate()メソッドをオーバーライドします。
- 45〜50行目:Button1にonClickListenerを設定します。 Button1をクリックすると、EditTextが表示されます。
- すべてのボタンに同じロジックを実装しました。
- 115〜127行目:ここでは、[追加]ボタンにクリックリスナーを設定しました。
- ここでは、条件を次のように設定します。EditTextがNullの場合、EditTextを空の値として設定します。 それ以外の場合は、追加ボタンがクリックされる前と追加ボタンがクリックされた後にクリックされた2つの値を追加します。
- また、
crunchifyAdditionブール値をTrueに設定します。 これは、追加ボタンがクリックされたことを表し、ユーザーが「=」ボタンをクリックしたときに使用されます。 - buttonSub、ButtonMul、buttonDivisionなどの他のボタンにも同じロジックを実装します。
- 156〜183行目:ここでは、「=」ボタンにclickListenerを設定します。 ここでは、ユーザーが[追加]ボタンをクリックした場合の条件を、[追加]ボタンのクリックリスナーで
crunchifyAddition値がTrueに設定されているように設定します。 - それに応じて、クリックされたボタンに対応するアクションが実行されます。
|
1 2 3 4 |
if ( crunchifyAddition == true ) { crunchifyEditText . setText ( mValueOne + mValueTwo + "" ) ; crunchifyAddition = false ; } |
「=」ボタンの前に「追加」ボタンをクリックすると、上記のように追加アクションが実行されます。
- アクションが実行された後、
crunchifyAddition値をfalseに設定して、アクションの追加を再度実行できるようにします。
以下は、計算機のフロントエンドを設計するのに役立つレイアウトファイルです。
|
1 2 3 4 5 6 7 8 9 10 11 12 13 14 15 16 17 18 19 20 21 22 23 24 25 26 27 28 29 30 31 32 33 34 35 36 37 38 39 40 41 42 43 44 45 46 47 48 49 50 51 52 53 54 55 56 57 58 59 60 61 62 63 64 65 66 67 68 69 70 71 72 73 74 75 76 77 78 79 80 81 82 83 84 85 86 87 88 89 90 91 92 93 94 95 96 97 98 99 100 101 102 103 104 105 106 107 108 109 110 111 112 113 114 115 116 117 118 119 120 121 122 123 124 125 126 127 128 129 130 131 132 133 134 135 136 137 138 139 140 141 142 143 144 145 146 147 148 149 150 151 152 153 154 155 156 157 158 159 160 161 162 163 164 165 166 167 168 169 170 171 172 173 174 175 176 177 178 179 180 181 182 183 184 185 186 187 188 189 190 191 192 193 |
<? xml version = "1.0" encoding = "utf-8" ?> < RelativeLayout xmlns : android = "http://schemas.android.com/apk/res/android" xmlns : tools = "http://schemas.android.com/tools" android : id = "@+id/relative1" android : layout_width = "match_parent" android : layout_height = "match_parent" tools : context = ".MainActivity" > < EditText android : id = "@+id/edt1" android : layout_width = "match_parent" android : layout_height = "wrap_content" / > < Button android : id = "@+id/button1" style = "?android:attr/buttonStyleSmall" android : layout_width = "wrap_content" android : layout_height = "wrap_content" android : layout_alignEnd = "@+id/button4" android : layout_alignRight = "@+id/button4" android : layout_below = "@+id/edt1" android : layout_marginTop = "94dp" android : text = "1" / > < Button android : id = "@+id/button2" style = "?android:attr/buttonStyleSmall" android : layout_width = "wrap_content" android : layout_height = "wrap_content" android : layout_alignTop = "@+id/button1" android : layout_toLeftOf = "@+id/button3" android : layout_toStartOf = "@+id/button3" android : text = "2" / > < Button android : id = "@+id/button3" style = "?android:attr/buttonStyleSmall" android : layout_width = "wrap_content" android : layout_height = "wrap_content" android : layout_alignTop = "@+id/button2" android : layout_centerHorizontal = "true" android : text = "3" / > < Button android : id = "@+id/button4" style = "?android:attr/buttonStyleSmall" android : layout_width = "wrap_content" android : layout_height = "wrap_content" android : layout_below = "@+id/button1" android : layout_toLeftOf = "@+id/button2" android : text = "4" / > < Button android : id = "@+id/button5" style = "?android:attr/buttonStyleSmall" android : layout_width = "wrap_content" android : layout_height = "wrap_content" android : layout_alignBottom = "@+id/button4" android : layout_alignLeft = "@+id/button2" android : layout_alignStart = "@+id/button2" android : text = "5" / > < Button android : id = "@+id/button6" style = "?android:attr/buttonStyleSmall" android : layout_width = "wrap_content" android : layout_height = "wrap_content" android : layout_alignLeft = "@+id/button3" android : layout_alignStart = "@+id/button3" android : layout_below = "@+id/button3" android : text = "6" / > < Button android : id = "@+id/button7" style = "?android:attr/buttonStyleSmall" android : layout_width = "wrap_content" android : layout_height = "wrap_content" android : layout_below = "@+id/button4" android : layout_toLeftOf = "@+id/button2" android : text = "7" / > < Button android : id = "@+id/button8" style = "?android:attr/buttonStyleSmall" android : layout_width = "wrap_content" android : layout_height = "wrap_content" android : layout_alignLeft = "@+id/button5" android : layout_alignStart = "@+id/button5" android : layout_below = "@+id/button5" android : text = "8" / > < Button android : id = "@+id/button9" style = "?android:attr/buttonStyleSmall" android : layout_width = "wrap_content" android : layout_height = "wrap_content" android : layout_alignLeft = "@+id/button6" android : layout_alignStart = "@+id/button6" android : layout_below = "@+id/button6" android : text = "9" / > < Button android : id = "@+id/buttonadd" style = "?android:attr/buttonStyleSmall" android : layout_width = "wrap_content" android : layout_height = "wrap_content" android : layout_alignEnd = "@+id/edt1" android : layout_alignRight = "@+id/edt1" android : layout_alignTop = "@+id/button3" android : layout_marginLeft = "46dp" android : layout_marginStart = "46dp" android : layout_toRightOf = "@+id/button3" android : text = "+" / > < Button android : id = "@+id/buttonsub" style = "?android:attr/buttonStyleSmall" android : layout_width = "wrap_content" android : layout_height = "wrap_content" android : layout_alignEnd = "@+id/buttonadd" android : layout_alignLeft = "@+id/buttonadd" android : layout_alignRight = "@+id/buttonadd" android : layout_alignStart = "@+id/buttonadd" android : layout_below = "@+id/buttonadd" android : text = "-" / > < Button android : id = "@+id/buttonmul" style = "?android:attr/buttonStyleSmall" android : layout_width = "wrap_content" android : layout_height = "wrap_content" android : layout_alignLeft = "@+id/buttonsub" android : layout_alignParentEnd = "true" android : layout_alignParentRight = "true" android : layout_alignStart = "@+id/buttonsub" android : layout_below = "@+id/buttonsub" android : text = "*" / > < Button android : id = "@+id/button10" style = "?android:attr/buttonStyleSmall" android : layout_width = "wrap_content" android : layout_height = "wrap_content" android : layout_below = "@+id/button7" android : layout_toLeftOf = "@+id/button2" android : text = "." / > < Button android : id = "@+id/button0" style = "?android:attr/buttonStyleSmall" android : layout_width = "wrap_content" android : layout_height = "wrap_content" android : layout_alignLeft = "@+id/button8" android : layout_alignStart = "@+id/button8" android : layout_below = "@+id/button8" android : text = "0" / > < Button android : id = "@+id/buttonC" style = "?android:attr/buttonStyleSmall" android : layout_width = "wrap_content" android : layout_height = "wrap_content" android : layout_alignLeft = "@+id/button9" android : layout_alignStart = "@+id/button9" android : layout_below = "@+id/button9" android : text = "C" / > < Button android : id = "@+id/buttondiv" style = "?android:attr/buttonStyleSmall" android : layout_width = "wrap_content" android : layout_height = "wrap_content" android : layout_alignEnd = "@+id/buttonmul" android : layout_alignLeft = "@+id/buttonmul" android : layout_alignRight = "@+id/buttonmul" android : layout_alignStart = "@+id/buttonmul" android : layout_below = "@+id/buttonmul" android : text = "/" / > < Button android : id = "@+id/buttoneql" android : layout_width = "wrap_content" android : layout_height = "wrap_content" android : layout_alignEnd = "@+id/buttondiv" android : layout_alignLeft = "@+id/button10" android : layout_alignRight = "@+id/buttondiv" android : layout_alignStart = "@+id/button10" android : layout_below = "@+id/button0" android : layout_marginTop = "37dp" android : text = "=" / > < / RelativeLayout > |
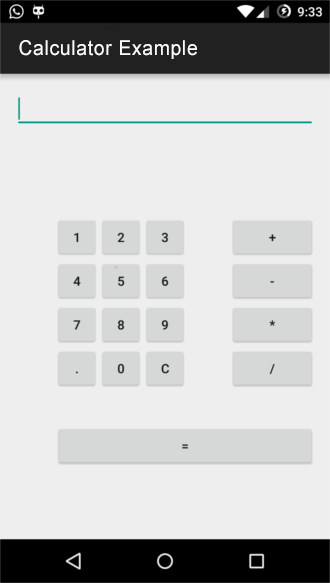
これで、すべてが正常に機能するはずで、電卓androidアプリを実行する準備が整いました。 私がモバイルを使用したアプリを実行するには、エミュレーターまたはデバイスを使用できます。
電卓Androidアプリの実行
- Androidデバイスマネージャーをクリックします。
Android device managerウィンドウでカスタムデバイスを選択したら、[START]をクリックします。 - [実行]ボタンをクリックします。
- デバイスまたはエミュレータを選択し、[OK]をクリックします。
- これで、このスクリーンショットのように実行されている電卓Androidアプリを見ることができます。
おめでとう!! すべての手順を実行してこのポイントに到達した場合は、すべての手順を正しく実行し、電卓androidアプリが正常に動作していることを意味します。