
วิธีสร้าง WordPress Custom Post Type (CPT) และอนุกรมวิธาน – Hello World Tutorial, Tips and Tricks
เผยแพร่แล้ว: 2016-03-11
สุดยอด. มาคุยกันเรื่อง Custom Post Type (CPT) สิ่งนี้จะช่วยคุณได้หากมีคำถามด้านล่าง:
- วิธีสร้างประเภทโพสต์ที่กำหนดเองใน WordPress?
- สร้างประเภทโพสต์ WordPress
- สร้าง WordPress Custom Post Type แรกของคุณ
- อนุกรมวิธาน WordPress CPT
- คู่มือฉบับสมบูรณ์สำหรับ WordPress Custom Post Types
WordPress เป็นหนึ่งในแพลตฟอร์มบล็อกที่ใช้กันอย่างแพร่หลายมากที่สุด โดยมีคุณสมบัติที่ทรงพลังมากมาย และ Custom Post Type ก็เป็นหนึ่งในนั้น ฉันไม่เคยดู Custom Post Type (CPT) ใน WordPress มาก่อน แต่เมื่อเร็ว ๆ นี้ฉันต้องการสร้างส่วนใหม่สำหรับ "ดีล"
มีสองวิธีที่คุณสามารถบรรลุสิ่งนั้น:
- สร้างโดเมนย่อยใหม่:
http://deals.crunchify.com/ - สร้างประเภทโพสต์ที่กำหนดเองใหม่:
https://crunchify.com/deals/
เพื่อให้บรรลุ point 1 คุณสามารถสร้างโดเมนย่อยและติดตั้งการติดตั้ง WordPress ใหม่และเริ่มต้นบล็อกใหม่ แต่ฉันเชื่อว่าไม่มีใครอยากทำอย่างนั้นเพื่อสร้างส่วนง่ายๆ เพียงส่วนเดียว ดังนั้น เราจะมาดู point 2 ในบทช่วยสอนนี้
WordPress มีประเภทโพสต์มากมายซึ่งเป็นค่าเริ่มต้น เช่น:
- เอกสารแนบ (ประเภทโพสต์: 'สิ่งที่แนบมา')
- โพสต์ (ประเภทโพสต์: 'โพสต์')
- เมนูการนำทาง (ประเภทโพสต์: 'nav_menu_item')
- แก้ไข (ประเภทโพสต์: 'แก้ไข')
- หน้า (ประเภทโพสต์: 'หน้า')
ตอนนี้ ปตท. คืออะไร?
Custom post types (CPT) คือประเภทโพสต์ใหม่ที่คุณสามารถสร้างได้ คุณสามารถเพิ่มประเภทโพสต์ที่กำหนดเองใน WordPress ผ่านฟังก์ชัน register_post_type() ฟังก์ชันนี้ช่วยให้คุณกำหนดประเภทโพสต์ใหม่ตามป้ายกำกับ คุณสมบัติที่รองรับ ความพร้อมใช้งาน และข้อมูลเฉพาะอื่นๆ
มาเริ่มกันเลย.
ขั้นตอนที่ 1
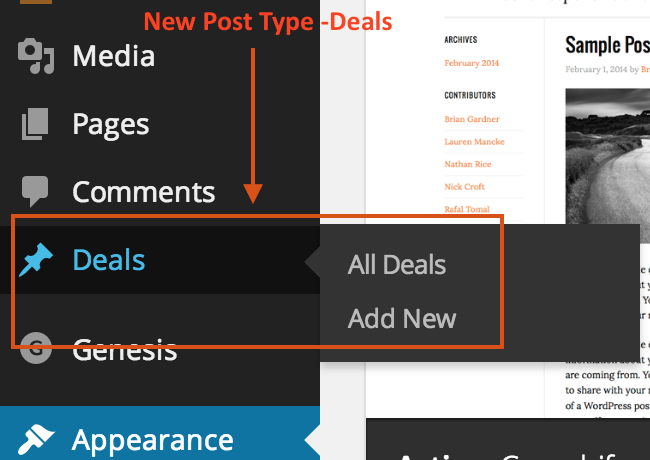
นี่คือสิ่งที่เราต้องสร้าง Custom Post Type ใหม่ที่เรียกว่า "ดี Deals "
|
1 2 3 4 5 6 7 8 9 10 11 12 13 14 15 16 17 18 19 20 21 22 23 24 25 26 27 28 29 30 31 32 33 34 35 36 37 38 39 |
// Creating a Deals Custom Post Type function crunchify_deals_custom_post_type ( ) { $labels = array ( 'name' = > __ ( 'Deals' ) , 'singular_name' = > __ ( 'Deal' ) , 'menu_name' = > __ ( 'Deals' ) , 'parent_item_colon' = > __ ( 'Parent Deal' ) , 'all_items' = > __ ( 'All Deals' ) , 'view_item' = > __ ( 'View Deal' ) , 'add_new_item' = > __ ( 'Add New Deal' ) , 'add_new' = > __ ( 'Add New' ) , 'edit_item' = > __ ( 'Edit Deal' ) , 'update_item' = > __ ( 'Update Deal' ) , 'search_items' = > __ ( 'Search Deal' ) , 'not_found' = > __ ( 'Not Found' ) , 'not_found_in_trash' = > __ ( 'Not found in Trash' ) ) ; $args = array ( 'label' = > __ ( 'deals' ) , 'description' = > __ ( 'Best Crunchify Deals' ) , 'labels' = > $labels , 'supports' = > array ( 'title' , 'editor' , 'excerpt' , 'author' , 'thumbnail' , 'revisions' , 'custom-fields' ) , 'public' = > true , 'hierarchical' = > false , 'show_ui' = > true , 'show_in_menu' = > true , 'show_in_nav_menus' = > true , 'show_in_admin_bar' = > true , 'has_archive' = > true , 'can_export' = > true , 'exclude_from_search' = > false , 'yarpp_support' = > true , 'taxonomies' = > array ( 'post_tag' ) , 'publicly_queryable' = > true , 'capability_type' = > 'page' ) ; register_post_type ( 'deals' , $args ) ; } add_action ( 'init' , 'crunchify_deals_custom_post_type' , 0 ) ; |
โค้ดด้านบนจะสร้างส่วนใหม่ที่เรียกว่า Deals ซึ่งเราเรียกว่า Custom Post Type

จะเพิ่มแท็กในประเภทโพสต์ที่กำหนดเองได้อย่างไร
'taxonomies' => array('post_tag')บรรทัดในตัวอย่างด้านบนจะเพิ่มแท็ก WordPress มาตรฐานให้กับประเภทโพสต์ที่กำหนดเองของคุณ
ขั้นตอนที่ 2
ทีนี้ ถ้าคุณต้องการสร้าง Custom Taxonomy ชื่อ Type ด้วยฟังก์ชัน register_taxonomy คุณสามารถสร้างอนุกรมวิธานได้ง่ายๆ
|
1 2 3 4 5 6 7 8 9 10 11 12 13 14 15 16 17 18 19 20 21 22 23 24 25 26 27 28 29 |
// Let us create Taxonomy for Custom Post Type add_action ( 'init' , 'crunchify_create_deals_custom_taxonomy' , 0 ) ; //create a custom taxonomy name it "type" for your posts function crunchify_create_deals_custom_taxonomy ( ) { $labels = array ( 'name' = > _x ( 'Types' , 'taxonomy general name' ) , 'singular_name' = > _x ( 'Type' , 'taxonomy singular name' ) , 'search_items' = > __ ( 'Search Types' ) , 'all_items' = > __ ( 'All Types' ) , 'parent_item' = > __ ( 'Parent Type' ) , 'parent_item_colon' = > __ ( 'Parent Type:' ) , 'edit_item' = > __ ( 'Edit Type' ) , 'update_item' = > __ ( 'Update Type' ) , 'add_new_item' = > __ ( 'Add New Type' ) , 'new_item_name' = > __ ( 'New Type Name' ) , 'menu_name' = > __ ( 'Types' ) , ) ; register_taxonomy ( 'types' , array ( 'deals' ) , array ( 'hierarchical' = > true , 'labels' = > $labels , 'show_ui' = > true , 'show_admin_column' = > true , 'query_var' = > true , 'rewrite' = > array ( 'slug' = > 'type' ) , ) ) ; } |

ขั้นตอนที่ 3
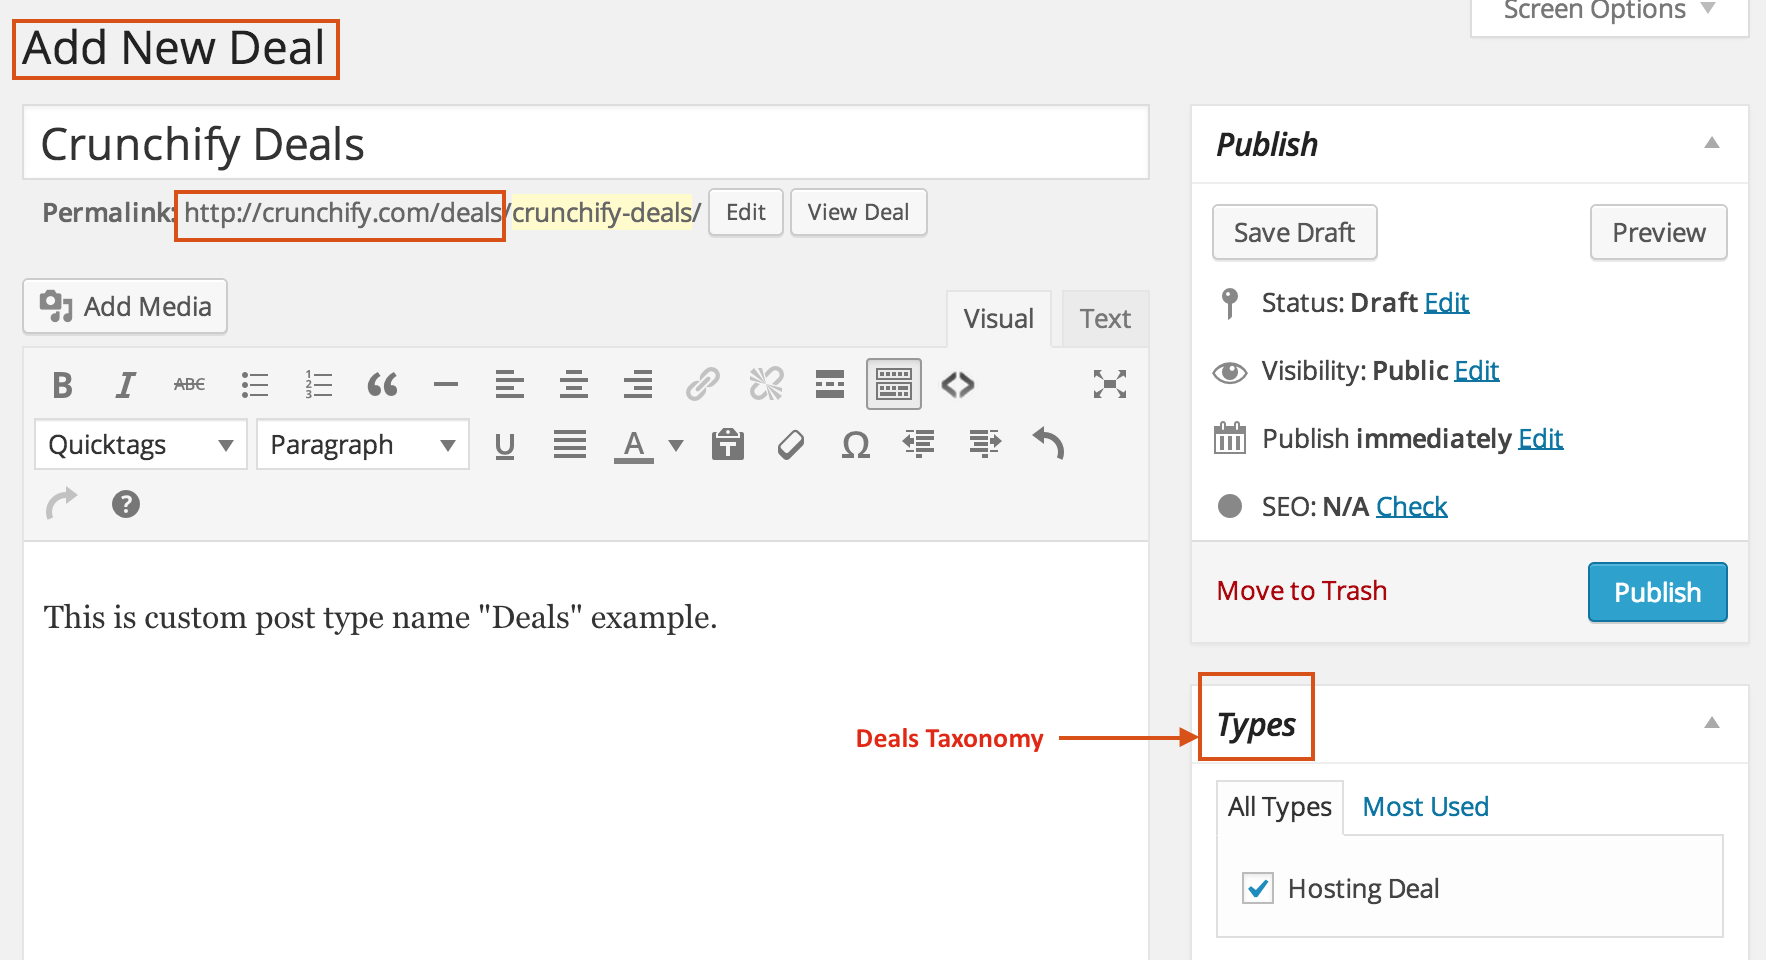
ตอนนี้สร้างโพสต์ข้อเสนอแรกของคุณ นี่คือภาพหน้าจอ Add New Deal
ขั้นตอนที่ 4
สร้างอนุกรมวิธานประเภทแรกของคุณ นี่คือหน้า Add New Type

เราได้สร้าง WordPress Custom Post Type - Deals และ Custom Taxonomy - Types โดยใช้บทช่วยสอนนี้ ในบทช่วยสอนถัดไปจะครอบคลุมการปรับแต่งเพิ่มเติมบางส่วนในเรื่องนี้
อะไรต่อไป? รับคำแนะนำและเคล็ดลับ WordPress Custom Post Type (CPT) สำหรับ RSS, YARPP, Post Meta, Footer, HomePage
ตรวจสอบบทช่วยสอนอื่นเกี่ยวกับ CPT
วิธีเพิ่มอนุกรมวิธานที่กำหนดเองในลิงก์ถาวรประเภทโพสต์ที่กำหนดเอง