
使用“maven-shade-plugin”為您的 Java 或 Spring 項目僅創建 1 個可執行 jar,其中包含所有必需的依賴項?
已發表: 2016-11-16
只需創建一個包含所有依賴項的
Crunchify.jar文件
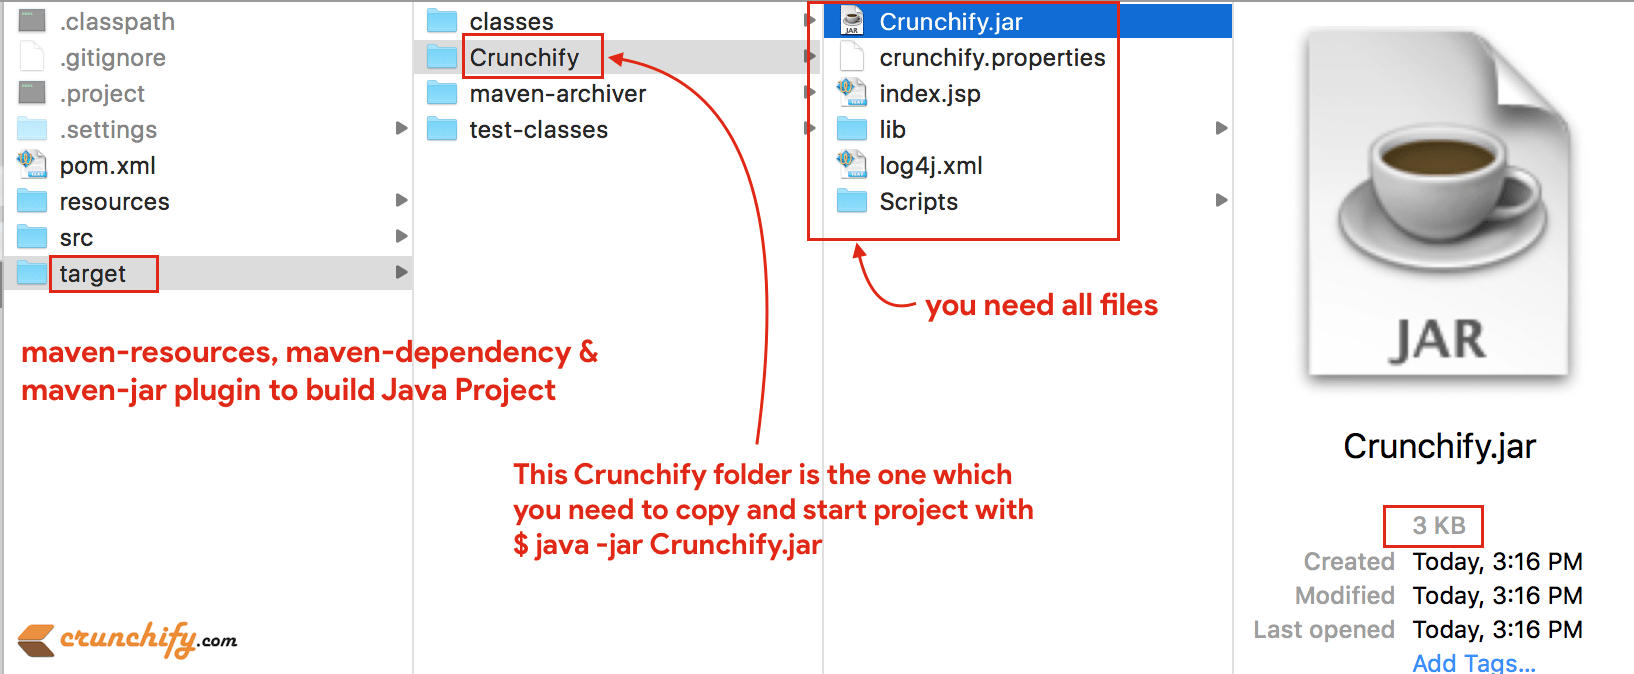
上週我寫了一篇關於如何使用maven-resources-plugin 、 maven-dependency-plugin和maven-jar-plugin生成完整可執行 Jar 項目的教程? 結果,它創建/複製所有需要的文件到/target/Crunchify文件夾。
Before:使用 maven-resource、maven-dependency、maven-jar 插件:
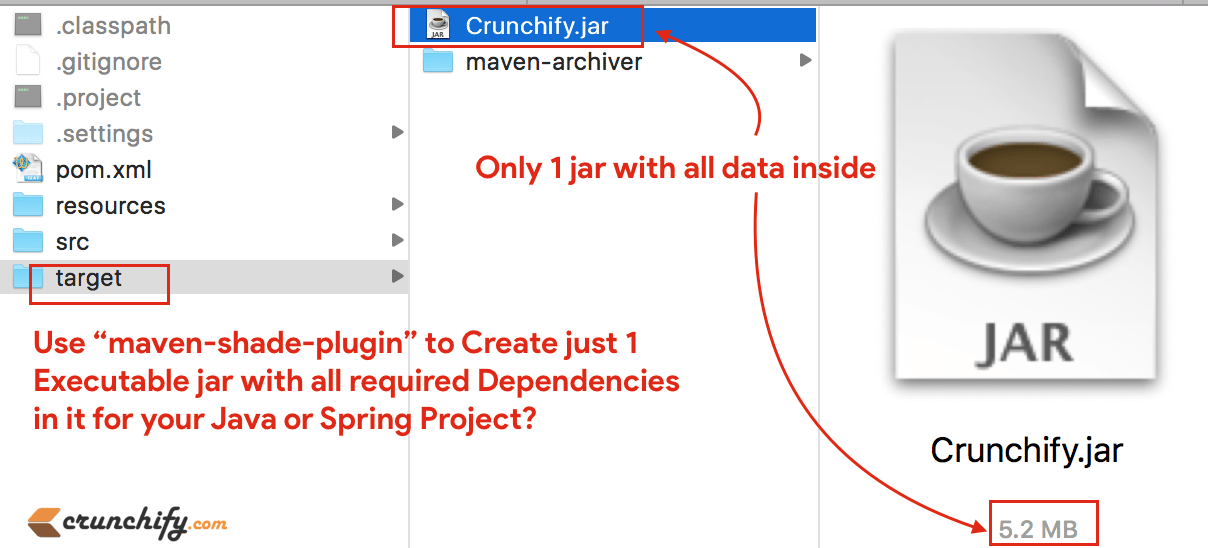
After:使用 maven-shade 插件:
讓我們開始了解如何實現上述結果:
如您所見,我們將 Java Project 中的所有內容都捆綁到just one file中,並命名為Crunchify.jar (其中包含所有文件)。
幾天前,我不知道如何實現這一點,因為我想使用 Maven 創建runnable binary distribution of a standalone Java application 。 換一種說法:
- 如何使用 maven 創建基於 spring 的可執行 jar?
- 使用 Maven 為 Java + Spring + 其他依賴項創建可運行的二進制分發
- 如何使用 Maven 構建 Java + Spring 項目?
通常在 Maven 中,我們依賴於依賴管理。 工件僅包含其自身的類/資源。 Maven 將負責在編譯和運行等時找出項目所依賴的所有工件(JAR 等)。
在maven -shade- plugin的幫助下,我能夠實現這個目標。 它提供了將工件打包到uber-jar (One major file jar)中的能力,包括它的依賴項和隱藏(即重命名)一些依賴項的包。
在我的項目中,我有很多其他依賴項,即 Spring Framework、JSON、3rd Party 工具等。下面只是一個示例項目,但我的生產 .jar 文件~5.2MB big 。
uber-jar是一種獲取所有依賴項的東西,並提取依賴項的內容並將其與項目本身的類/資源一起放入一個 JAR 中。 通過擁有這樣的 uber-jar,easy for execution,因為您只需要一個大 JAR 而不是大量的小 JAR 來運行您的應用程序。 在某些情況下,它還簡化了分發。
為了實現這一點,您需要更新您的 pom.xml 文件。
第1步
查看完整的pom.xml文件。 主要是你會對<build>標籤感興趣。
|
1 2 3 4 5 6 7 8 9 10 11 12 13 14 15 16 17 18 19 20 21 22 23 24 25 26 27 28 29 30 31 32 33 34 35 36 37 38 39 40 41 42 43 44 45 46 47 48 49 50 51 52 53 54 55 56 57 58 59 60 61 62 63 64 65 66 67 68 69 70 71 72 73 74 75 76 77 78 79 80 81 82 83 84 85 86 87 88 89 90 91 92 93 94 95 96 97 98 99 100 101 102 103 104 105 106 107 108 109 110 111 112 113 114 115 116 117 118 119 120 121 122 123 124 125 126 127 128 129 130 131 132 133 134 |
< project xmlns = "http://maven.apache.org/POM/4.0.0" xmlns : xsi = "http://www.w3.org/2001/XMLSchema-instance" xsi : schemaLocation = "http://maven.apache.org/POM/4.0.0 http://maven.apache.org/xsd/maven-4.0.0.xsd" > < modelVersion > 4.0.0 < / modelVersion > < groupId > CrunchifyMavenBuildPlugins < / groupId > < artifactId > CrunchifyMavenBuildPlugins < / artifactId > < version > 0.0.1 - SNAPSHOT < / version > < name > CrunchifyMavenBuildPlugins < / name > < properties > < project . build . sourceEncoding > UTF - 8 < / project . build . sourceEncoding > < / properties > < dependencies > < dependency > < groupId > log4j < / groupId > < artifactId > log4j < / artifactId > < version > 1.2.17 < / version > < / dependency > < dependency > < groupId > com . googlecode . json - simple < / groupId > < artifactId > json - simple < / artifactId > < version > 1.1 < / version > < / dependency > < dependency > < groupId > axis < / groupId > < artifactId > axis < / artifactId > < version > 1.4 < / version > < / dependency > < dependency > < groupId > commons - beanutils < / groupId > < artifactId > commons - beanutils < / artifactId > < version > 1.8.3 < / version > < / dependency > < dependency > < groupId > commons - collections < / groupId > < artifactId > commons - collections < / artifactId > < version > 3.2.1 < / version > < / dependency > < dependency > < groupId > commons - configuration < / groupId > < artifactId > commons - configuration < / artifactId > < version > 1.10 < / version > < / dependency > < dependency > < groupId > commons - io < / groupId > < artifactId > commons - io < / artifactId > < version > 2.4 < / version > < / dependency > < dependency > < groupId > javax . mail < / groupId > < artifactId > mail < / artifactId > < version > 1.4.7 < / version > < / dependency > < dependency > < groupId > javax . servlet < / groupId > < artifactId > servlet - api < / artifactId > < version > 2.5 < / version > < / dependency > < dependency > < groupId > org . json < / groupId > < artifactId > json < / artifactId > < version > 20140107 < / version > < / dependency > < dependency > < groupId > axis < / groupId > < artifactId > axis - saaj < / artifactId > < version > 1.4 < / version > < / dependency > < dependency > < groupId > wsdl4j < / groupId > < artifactId > wsdl4j < / artifactId > < version > 1.6.3 < / version > < / dependency > < dependency > < groupId > com . google . zxing < / groupId > < artifactId > core < / artifactId > < version > 2.0 < / version > < / dependency > < / dependencies > < build > < pluginManagement > < plugins > < plugin > < groupId > org . apache . maven . plugins < / groupId > < artifactId > maven - compiler - plugin < / artifactId > < version > 2.3.1 < / version > < configuration > < source > 1.7 < / source > < target > 1.7 < / target > < / configuration > < / plugin > < / plugins > < / pluginManagement > < plugins > < plugin > < groupId > org . apache . maven . plugins < / groupId > < artifactId > maven - shade - plugin < / artifactId > < version > 1.7 < / version > < executions > < execution > < phase > package < / phase > < goals > < goal > shade < / goal > < / goals > < configuration > < ! -- Optional Start -- > < finalName > Crunchify < / finalName > < shadedArtifactAttached > true < / shadedArtifactAttached > < shadedClassifierName > jar - with - dependencies < / shadedClassifierName > < ! -- Optional End -- > < transformers > < transformer implementation = "org.apache.maven.plugins.shade.resource.ManifestResourceTransformer" > < mainClass > com . crunchify . tutorial . CrunchifyMain < / mainClass > < / transformer > < transformer implementation = "org.apache.maven.plugins.shade.resource.AppendingTransformer" > < resource > META - INF / spring . handlers < / resource > < / transformer > < transformer implementation = "org.apache.maven.plugins.shade.resource.AppendingTransformer" > < resource > META - INF / spring . schemas < / resource > < / transformer > < transformer implementation = "org.apache.maven.plugins.shade.resource.AppendingTransformer" > < resource > META - INF / spring . tooling < / resource > < / transformer > < / transformers > < / configuration > < / execution > < / executions > < / plugin > < / plugins > < / build > < / project > |
正如您在此處看到的,我在 pom.xml 文件中使用Resource Transformers器。 只要沒有重疊,將來自多個工件的classes/resources聚合到一個Crunchify JAR中是直接的。 否則,需要某種邏輯來合併來自多個 JAR 的資源。 這就是資源轉換器發揮作用的地方。

第2步
將maven-shade-plugin添加到pom.xml文件後,只需使用以下命令來構建您的項目。
|
1 |
mvn clean install |
您應該會看到一個Crunchify.jar (uber-jar) 文件,其中all dependencies mentioned in pom.xml file項。
第三步
轉到項目的目標文件夾,您將看到創建的 Crunchify.jar 文件。 只需使用命令
$bash> java -jar Crunchify.jar來執行你的項目。
你有什麼要補充的嗎? 將其添加到下面的評論部分。 享受,祝您有美好的一天,快樂的編碼。