
使用“maven-shade-plugin”为您的 Java 或 Spring 项目创建 1 个可执行 jar,其中包含所有必需的依赖项?
已发表: 2016-11-16
只需创建一个包含所有依赖项的
Crunchify.jar文件
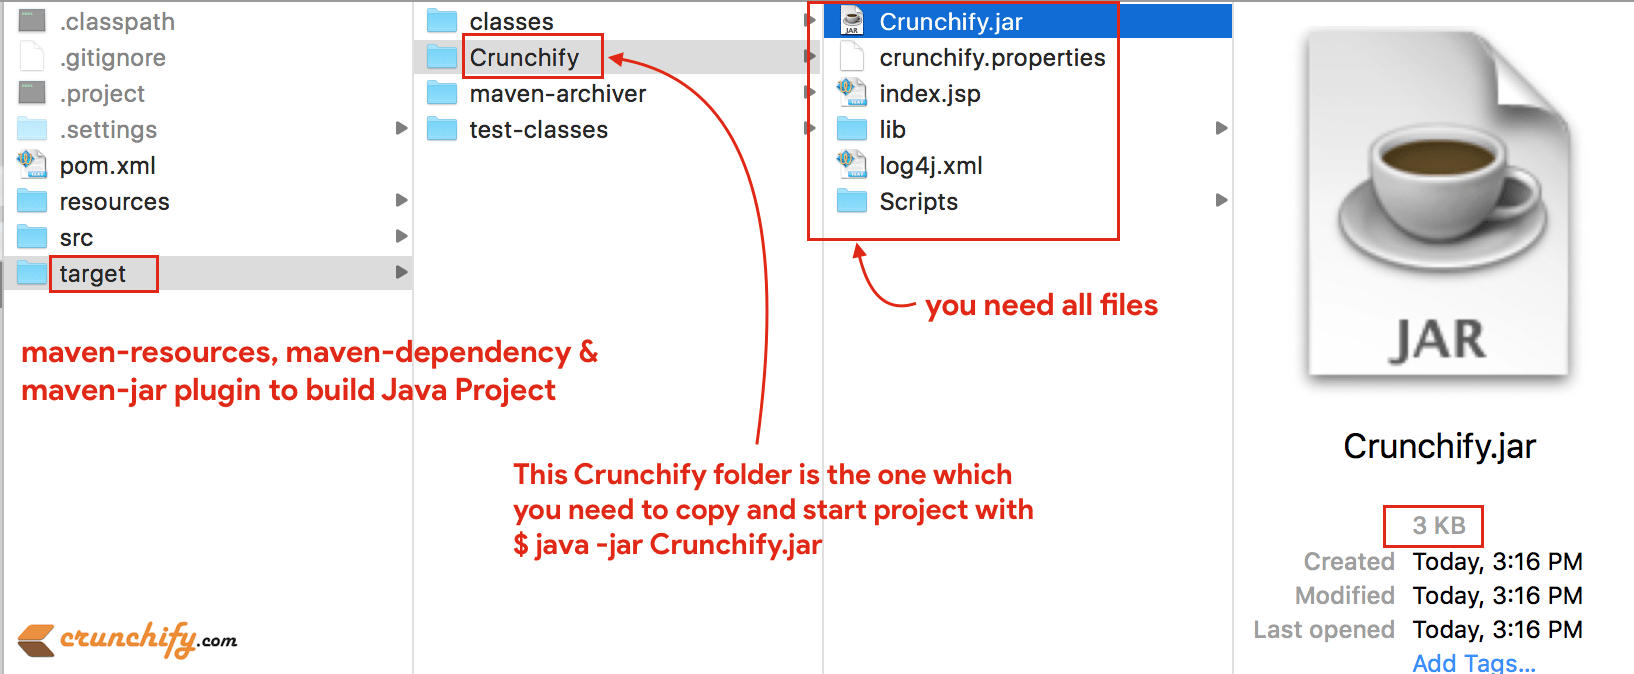
上周我写了一篇关于如何使用maven-resources-plugin 、 maven-dependency-plugin和maven-jar-plugin生成完整可执行 Jar 项目的教程? 结果,它创建/复制所有需要的文件到/target/Crunchify文件夹。
Before:使用 maven-resource、maven-dependency、maven-jar 插件:
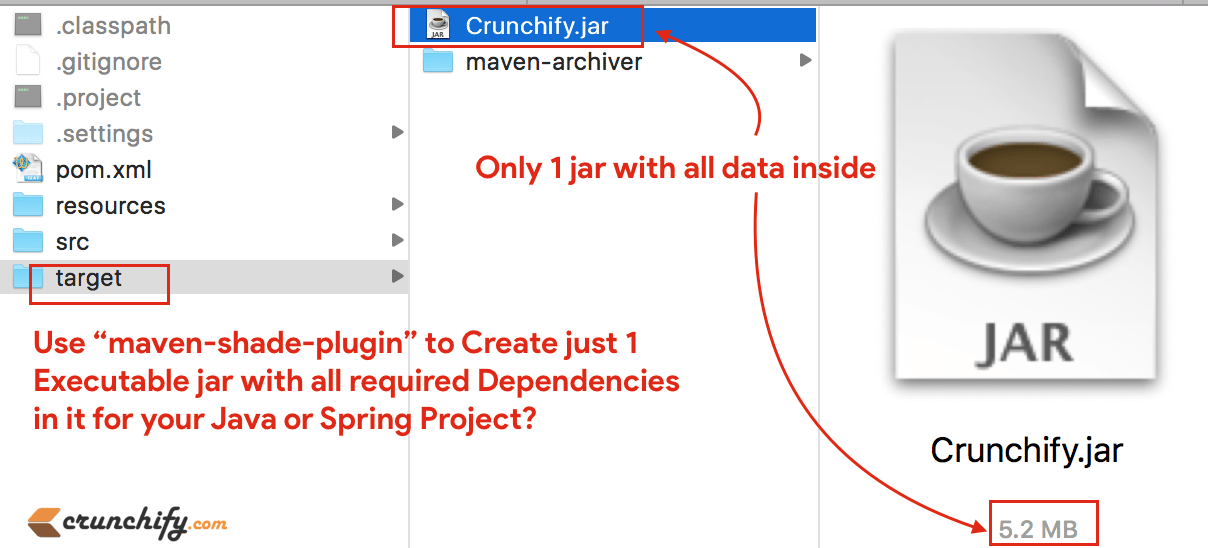
After:使用 maven-shade 插件:
让我们开始了解如何实现上述结果:
如您所见,我们将 Java Project 中的所有内容都捆绑到just one file中,并命名为Crunchify.jar (其中包含所有文件)。
几天前,我不知道如何实现这一点,因为我想使用 Maven 创建runnable binary distribution of a standalone Java application 。 换一种说法:
- 如何使用 maven 创建基于 spring 的可执行 jar?
- 使用 Maven 为 Java + Spring + 其他依赖项创建可运行的二进制分发
- 如何使用 Maven 构建 Java + Spring 项目?
通常在 Maven 中,我们依赖于依赖管理。 工件仅包含其自身的类/资源。 Maven 将负责在编译和运行等时找出项目所依赖的所有工件(JAR 等)。
在maven -shade- plugin的帮助下,我能够实现这个目标。 它提供了将工件打包到uber-jar (One major file jar)中的能力,包括它的依赖项和遮蔽(即重命名)一些依赖项的包。
在我的项目中,我有很多其他依赖项,即 Spring Framework、JSON、3rd Party 工具等。下面只是一个示例项目,但我的生产 .jar 文件~5.2MB big 。
一个
uber-jar是一种获取所有依赖项的东西,并提取依赖项的内容并将其与项目本身的类/资源一起放入一个 JAR 中。 通过拥有这样的 uber-jar,easy for execution,因为您只需要一个大 JAR 而不是大量的小 JAR 来运行您的应用程序。 在某些情况下,它还可以简化分发。
为了实现这一点,您需要更新您的 pom.xml 文件。
第1步
查看完整的pom.xml文件。 主要是你会对<build>标签感兴趣。
|
1 2 3 4 5 6 7 8 9 10 11 12 13 14 15 16 17 18 19 20 21 22 23 24 25 26 27 28 29 30 31 32 33 34 35 36 37 38 39 40 41 42 43 44 45 46 47 48 49 50 51 52 53 54 55 56 57 58 59 60 61 62 63 64 65 66 67 68 69 70 71 72 73 74 75 76 77 78 79 80 81 82 83 84 85 86 87 88 89 90 91 92 93 94 95 96 97 98 99 100 101 102 103 104 105 106 107 108 109 110 111 112 113 114 115 116 117 118 119 120 121 122 123 124 125 126 127 128 129 130 131 132 133 134 |
< project xmlns = "http://maven.apache.org/POM/4.0.0" xmlns : xsi = "http://www.w3.org/2001/XMLSchema-instance" xsi : schemaLocation = "http://maven.apache.org/POM/4.0.0 http://maven.apache.org/xsd/maven-4.0.0.xsd" > < modelVersion > 4.0.0 < / modelVersion > < groupId > CrunchifyMavenBuildPlugins < / groupId > < artifactId > CrunchifyMavenBuildPlugins < / artifactId > < version > 0.0.1 - SNAPSHOT < / version > < name > CrunchifyMavenBuildPlugins < / name > < properties > < project . build . sourceEncoding > UTF - 8 < / project . build . sourceEncoding > < / properties > < dependencies > < dependency > < groupId > log4j < / groupId > < artifactId > log4j < / artifactId > < version > 1.2.17 < / version > < / dependency > < dependency > < groupId > com . googlecode . json - simple < / groupId > < artifactId > json - simple < / artifactId > < version > 1.1 < / version > < / dependency > < dependency > < groupId > axis < / groupId > < artifactId > axis < / artifactId > < version > 1.4 < / version > < / dependency > < dependency > < groupId > commons - beanutils < / groupId > < artifactId > commons - beanutils < / artifactId > < version > 1.8.3 < / version > < / dependency > < dependency > < groupId > commons - collections < / groupId > < artifactId > commons - collections < / artifactId > < version > 3.2.1 < / version > < / dependency > < dependency > < groupId > commons - configuration < / groupId > < artifactId > commons - configuration < / artifactId > < version > 1.10 < / version > < / dependency > < dependency > < groupId > commons - io < / groupId > < artifactId > commons - io < / artifactId > < version > 2.4 < / version > < / dependency > < dependency > < groupId > javax . mail < / groupId > < artifactId > mail < / artifactId > < version > 1.4.7 < / version > < / dependency > < dependency > < groupId > javax . servlet < / groupId > < artifactId > servlet - api < / artifactId > < version > 2.5 < / version > < / dependency > < dependency > < groupId > org . json < / groupId > < artifactId > json < / artifactId > < version > 20140107 < / version > < / dependency > < dependency > < groupId > axis < / groupId > < artifactId > axis - saaj < / artifactId > < version > 1.4 < / version > < / dependency > < dependency > < groupId > wsdl4j < / groupId > < artifactId > wsdl4j < / artifactId > < version > 1.6.3 < / version > < / dependency > < dependency > < groupId > com . google . zxing < / groupId > < artifactId > core < / artifactId > < version > 2.0 < / version > < / dependency > < / dependencies > < build > < pluginManagement > < plugins > < plugin > < groupId > org . apache . maven . plugins < / groupId > < artifactId > maven - compiler - plugin < / artifactId > < version > 2.3.1 < / version > < configuration > < source > 1.7 < / source > < target > 1.7 < / target > < / configuration > < / plugin > < / plugins > < / pluginManagement > < plugins > < plugin > < groupId > org . apache . maven . plugins < / groupId > < artifactId > maven - shade - plugin < / artifactId > < version > 1.7 < / version > < executions > < execution > < phase > package < / phase > < goals > < goal > shade < / goal > < / goals > < configuration > < ! -- Optional Start -- > < finalName > Crunchify < / finalName > < shadedArtifactAttached > true < / shadedArtifactAttached > < shadedClassifierName > jar - with - dependencies < / shadedClassifierName > < ! -- Optional End -- > < transformers > < transformer implementation = "org.apache.maven.plugins.shade.resource.ManifestResourceTransformer" > < mainClass > com . crunchify . tutorial . CrunchifyMain < / mainClass > < / transformer > < transformer implementation = "org.apache.maven.plugins.shade.resource.AppendingTransformer" > < resource > META - INF / spring . handlers < / resource > < / transformer > < transformer implementation = "org.apache.maven.plugins.shade.resource.AppendingTransformer" > < resource > META - INF / spring . schemas < / resource > < / transformer > < transformer implementation = "org.apache.maven.plugins.shade.resource.AppendingTransformer" > < resource > META - INF / spring . tooling < / resource > < / transformer > < / transformers > < / configuration > < / execution > < / executions > < / plugin > < / plugins > < / build > < / project > |
正如您在此处看到的,我在 pom.xml 文件中使用Resource Transformers器。 只要没有重叠,将多个工件中的classes/resources聚合到一个Crunchify JAR中是直接的。 否则,需要某种逻辑来合并来自多个 JAR 的资源。 这就是资源转换器发挥作用的地方。

第2步
将maven-shade-plugin添加到pom.xml文件后,只需使用以下命令来构建您的项目。
|
1 |
mvn clean install |
您应该会看到一个Crunchify.jar (uber-jar) 文件,其中all dependencies mentioned in pom.xml file项。
第三步
转到项目的目标文件夹,您将看到创建的 Crunchify.jar 文件。 只需使用命令
$bash> java -jar Crunchify.jar来执行你的项目。
你有什么要补充的吗? 将其添加到下面的评论部分。 享受,祝您有美好的一天,快乐的编码。