Spring Framework 4.3.4 @Order 주석 튜토리얼 – 주석이 달린 Bean 컴포넌트의 정렬 순서
게시 됨: 2017-03-04
웹 MVC 프레임워크 – Spring은 Java 기반 프로그래밍 엔터프라이즈 애플리케이션을 위한 최고의 웹 컨트롤러 프레임워크 및 구성 모델입니다.
지금까지 Crunchify에 대한 40개 이상의 Spring MVC 튜토리얼이 있습니다. 이 튜토리얼에서는 @Order Annotation 을 다룰 것입니다. 봄에 @Order를 사용하는 것은 무엇입니까? Spring AOP 와 MVC 로 측면을 주문하기.
다음은 짧은 단계입니다.
- Dynamic Web Project를 만들 것입니다.
- Spring 설정 파일
crunchify-bean.xml - Maven 프로젝트로 변환
- 주문 주석으로 Bean 생성
- 테스트 케이스 생성 및 실행
세부 단계: 시작하겠습니다
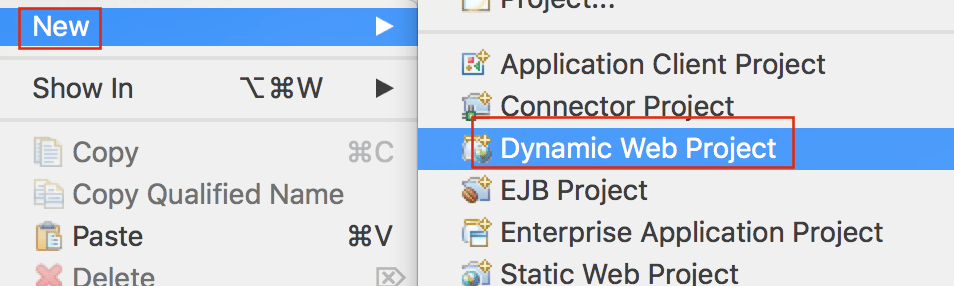
1 단계
- 이클립스로 이동
-
File클릭 -
New만들기를 클릭하십시오 -
Dynamic Web Project를 클릭하십시오.
2 단계
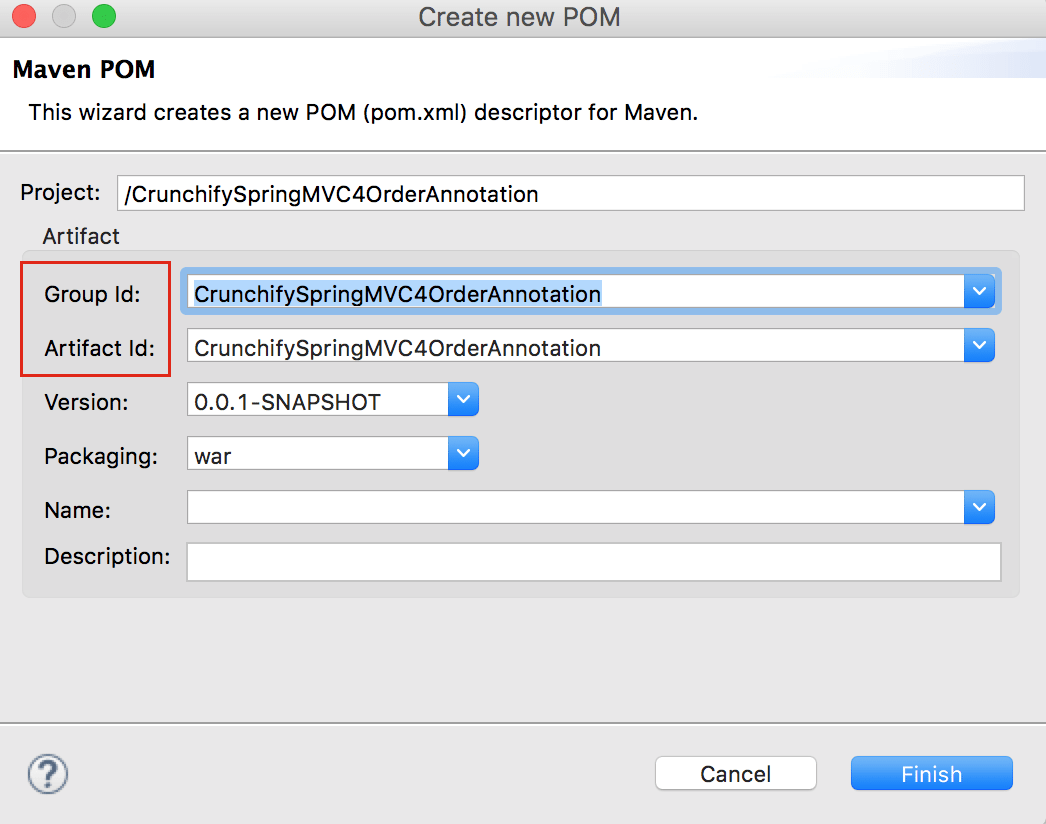
- 프로젝트 이름 제공:
CrunchifySpringMVC4OrderAnnotation - 대상 런타임을 제공합니다. 주로 Eclipse의 Apache Tomcat 위치입니다.
- 동적 웹 모듈 버전 선택:
3.1

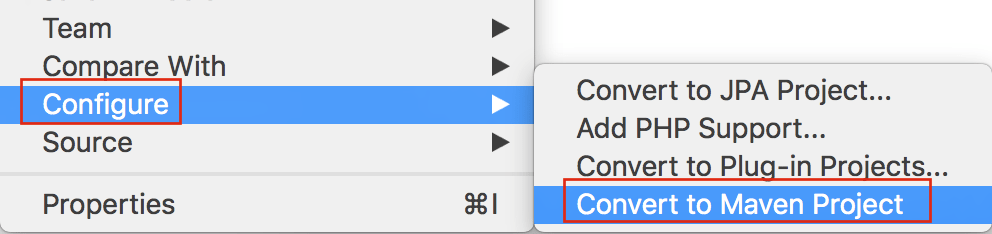
3단계
- 프로젝트를 마우스 오른쪽 버튼으로 클릭
- 구성을 클릭하십시오
- 프로젝트를 Maven 프로젝트로 변환
4단계
기본 설정을 선택하고 Finish 을 클릭합니다.
5단계
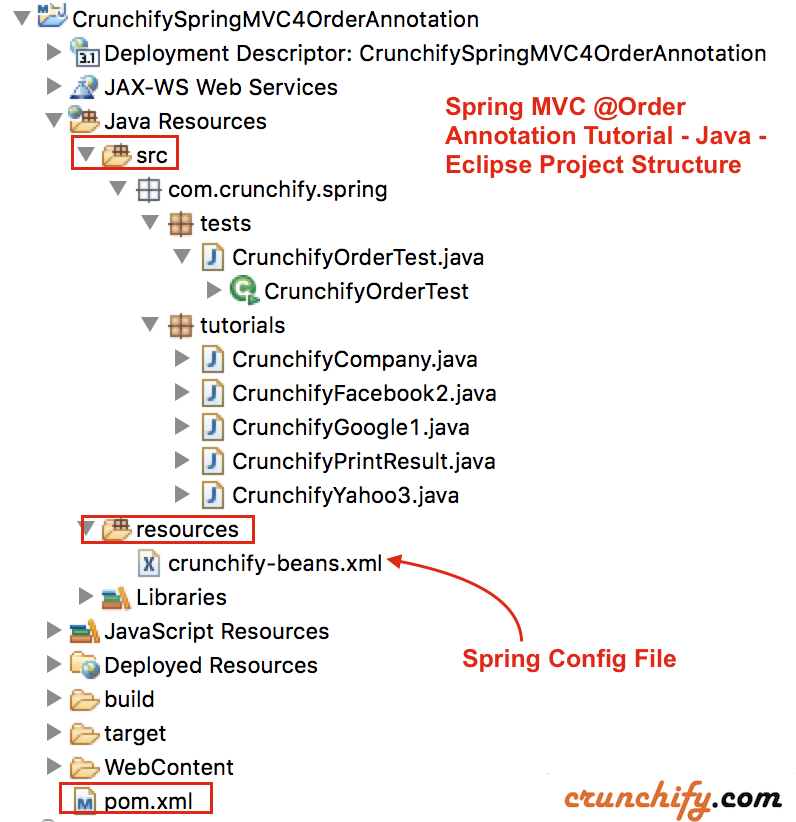
다음은 시작하기 전에 프로젝트 구조입니다.
pom.xml 파일을 열고 Spring MVC 4.3.4 종속성을 추가하십시오.
|
1 2 3 4 5 |
< dependency > < groupId > org . springframework < / groupId > < artifactId > spring - context < / artifactId > < version > 4.3.4.RELEASE < / version > < / dependency > |
여기 내 완전한 pom.xml 파일이 있습니다
|
1 2 3 4 5 6 7 8 9 10 11 12 13 14 15 16 17 18 19 20 21 22 23 24 25 26 27 28 29 30 31 32 33 34 35 |
< project xmlns = "http://maven.apache.org/POM/4.0.0" xmlns : xsi = "http://www.w3.org/2001/XMLSchema-instance" xsi : schemaLocation = "http://maven.apache.org/POM/4.0.0 http://maven.apache.org/xsd/maven-4.0.0.xsd" > < modelVersion > 4.0.0 < / modelVersion > < groupId > CrunchifySpringMVC4OrderAnnotation < / groupId > < artifactId > CrunchifySpringMVC4OrderAnnotation < / artifactId > < version > 0.0.1 - SNAPSHOT < / version > < packaging > war < / packaging > < build > < sourceDirectory > src < / sourceDirectory > < plugins > < plugin > < artifactId > maven - compiler - plugin < / artifactId > < version > 3.3 < / version > < configuration > < source > 1.8 < / source > < target > 1.8 < / target > < / configuration > < / plugin > < plugin > < artifactId > maven - war - plugin < / artifactId > < version > 2.6 < / version > < configuration > < warSourceDirectory > WebContent < / warSourceDirectory > < failOnMissingWebXml > false < / failOnMissingWebXml > < / configuration > < / plugin > < / plugins > < / build > < dependencies > < dependency > < groupId > org . springframework < / groupId > < artifactId > spring - context < / artifactId > < version > 4.3.4.RELEASE < / version > < / dependency > < / dependencies > < / project > |
6단계
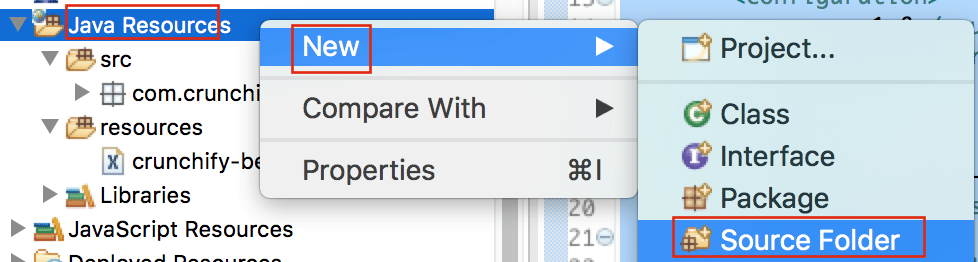
- Java 리소스를 마우스 오른쪽 버튼으로 클릭
- 새로 만들기를 클릭하십시오
- 소스 폴더를 클릭하고 이름 제공:
resources
7단계
리소스 폴더 아래에 crunchify-bean.xml 파일을 생성합니다. 다음은 전체 파일 내용입니다.
|
1 2 3 4 5 6 7 8 9 10 11 12 13 14 15 16 17 |
<? xml version = "1.0" encoding = "UTF-8" ?> < beans xmlns = "http://www.springframework.org/schema/beans" xmlns : xsi = "http://www.w3.org/2001/XMLSchema-instance" xmlns : p = "http://www.springframework.org/schema/p" xmlns : context = "http://www.springframework.org/schema/context" xsi : schemaLocation = "http://www.springframework.org/schema/beans http://www.springframework.org/schema/beans/spring-beans-4.0.xsd http://www.springframework.org/schema/context http://www.springframework.org/schema/context/spring-context-4.0.xsd" > < context : annotation - config / > < ! -- Specify Bean ID "orders" -- > < bean id = "orders" class = "com.crunchify.spring.tutorials.CrunchifyPrintResult" / > < ! -- This is required and loads each class under below package -- > < context : component - scan base - package = "com.crunchify.spring.tutorials" / > < / beans > |
8단계
이제 @Order 주석이 있는 5개의 파일을 생성합니다.
- CrunchifyCompany.java 인터페이스
- CrunchifyGoogle1.java ==>
@Order(1)사용 - CrunchifyFacebook2.java ==>
@Order(2)사용 - CrunchifyYahoo3.java ==>
@Order(3)사용 - CrunchifyPrintResult.java
CrunchifyCompany.java
|
1 2 3 4 5 6 7 8 9 10 |
package com . crunchify . spring . tutorials ; /** * @author Crunchify.com * */ public interface CrunchifyCompany { // do nothing here } |
CrunchifyGoogle1.java
|
1 2 3 4 5 6 7 8 9 10 11 12 13 14 15 16 17 18 19 20 21 22 |
package com . crunchify . spring . tutorials ; import org . springframework . core . annotation . Order ; import org . springframework . stereotype . Component ; /** * @author Crunchify.com * */ @Component @Order ( 1 ) // @Order defines the sort order for an annotated component. The value() is optional and represents an order value as // defined in the Ordered interface. Lower values have higher priority. The default value is // Ordered.LOWEST_PRECEDENCE, indicating lowest priority (losing to any other specified order value). public class CrunchifyGoogle1 implements CrunchifyCompany { private String order = "Crunchify Google with Order-1" ; public String toString ( ) { return "Class Name: " + this . getClass ( ) . getSimpleName ( ) + " - Result: " + this . order ; } } |

CrunchifyFacebook2.java
|
1 2 3 4 5 6 7 8 9 10 11 12 13 14 15 |
package com . crunchify . spring . tutorials ; import org . springframework . core . annotation . Order ; import org . springframework . stereotype . Component ; @Component @Order ( 2 ) public class CrunchifyFacebook2 implements CrunchifyCompany { private String order = "Crunchify Facebook with Order-2" ; public String toString ( ) { return "Class Name: " + this . getClass ( ) . getSimpleName ( ) + " - Result: " + this . order ; } } |
CrunchifyYahoo3.java
|
1 2 3 4 5 6 7 8 9 10 11 12 13 14 15 |
package com . crunchify . spring . tutorials ; import org . springframework . core . annotation . Order ; import org . springframework . stereotype . Component ; @Component @Order ( 3 ) public class CrunchifyYahoo3 implements CrunchifyCompany { private String order = "Crunchify Yahoo with Order-3" ; public String toString ( ) { return "Class Name: " + this . getClass ( ) . getSimpleName ( ) + " - Result: " + this . order ; } } |
CrunchifyPrintResult.java
|
1 2 3 4 5 6 7 8 9 10 11 12 13 14 15 16 17 18 19 20 21 22 23 24 25 |
package com . crunchify . spring . tutorials ; import java . util . List ; import org . springframework . beans . factory . annotation . Autowired ; import org . springframework . stereotype . Component ; /** * @author Crunchify.com * */ @Component public class CrunchifyPrintResult { @Autowired private List <CrunchifyCompany> order ; private String result = "" ; public String toString ( ) { order . stream ( ) . forEach ( ( temp ) - > { this . result = result + temp + "\n" ; // print result and add new line } ) ; return this . result ; } } |
9단계
이제 테스트 케이스 CrunchifyOrderTest.java 를 생성해 보겠습니다.
|
1 2 3 4 5 6 7 8 9 10 11 12 13 14 15 16 17 18 19 20 21 22 23 24 25 26 27 |
package com . crunchify . spring . tests ; import org . springframework . context . ApplicationContext ; import org . springframework . context . support . ClassPathXmlApplicationContext ; import com . crunchify . spring . tutorials . CrunchifyPrintResult ; /** * @author Crunchify.com * */ public class CrunchifyOrderTest { @SuppressWarnings ( "resource" ) public static void main ( String [ ] args ) { // Load Spring ApplicationContext file crunchify-beans.xml ApplicationContext context = new ClassPathXmlApplicationContext ( "crunchify-beans.xml" ) ; // get the bean which we specified in file crunchify-beans.xml file CrunchifyPrintResult results = ( CrunchifyPrintResult ) context . getBean ( "orders" ) ; // After loading each class - just print result System . out . println ( results ) ; } } |
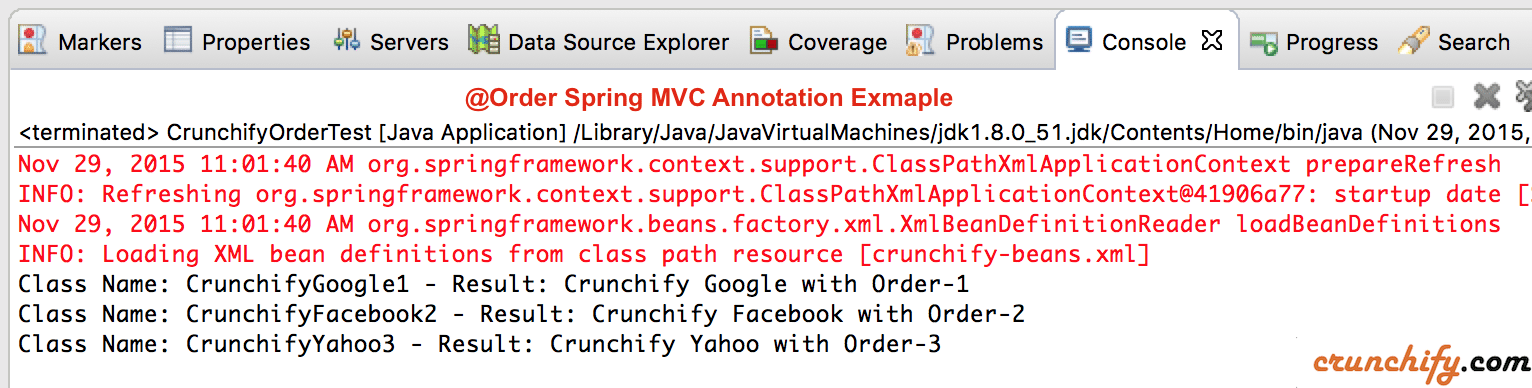
10단계
이제 CrunchifyOrderTest.java 파일을 마우스 오른쪽 버튼으로 클릭하고 Run As -> Java Application 을 실행합니다. Order를 지정한 순서대로 인쇄된 결과를 볼 수 있습니다.
|
1 2 3 |
Class Name : CrunchifyGoogle1 - Result : Crunchify Google with Order - 1 Class Name : CrunchifyFacebook2 - Result : Crunchify Facebook with Order - 2 Class Name : CrunchifyYahoo3 - Result : Crunchify Yahoo with Order - 3 |