Spring Framework 4.3.4 @Orderアノテーションチュートリアル–アノテーション付きBeanコンポーネントのソート順
公開: 2017-03-04
Web MVCフレームワーク– Springは、Javaベースのプログラミングエンタープライズアプリケーションに最適なWebコントローラーフレームワークおよび構成モデルです。
これまでに、Crunchifyに関する40を超えるSpringMVCチュートリアルがあります。 このチュートリアルでは、 @Order Annotationについて説明します。 春の@Orderの使用は何ですか? Spring AOP & MVCでアスペクトを注文します。
簡単な手順は次のとおりです。
- 動的Webプロジェクトを作成します
- SpringConfigファイル
crunchify-bean.xml作成します - Mavenプロジェクトに変換する
- 順序アノテーションを使用してBeanを作成する
- テストケースを作成して実行する
詳細な手順:始めましょう
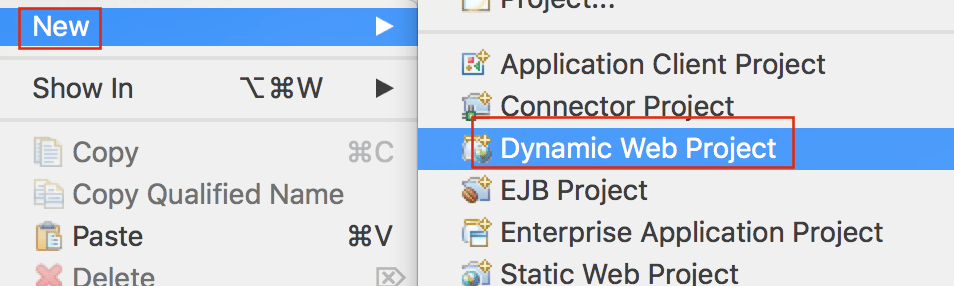
ステップ1
- Eclipseに移動します
FileをクリックしますNewをクリックしますDynamic Web Projectをクリックします
ステップ2
- プロジェクト名を入力してください:
CrunchifySpringMVC4OrderAnnotation - ターゲットランタイムを提供します。 主にEclipseのApacheTomcatの場所。
- 動的Webモジュールのバージョンを選択します:
3.1

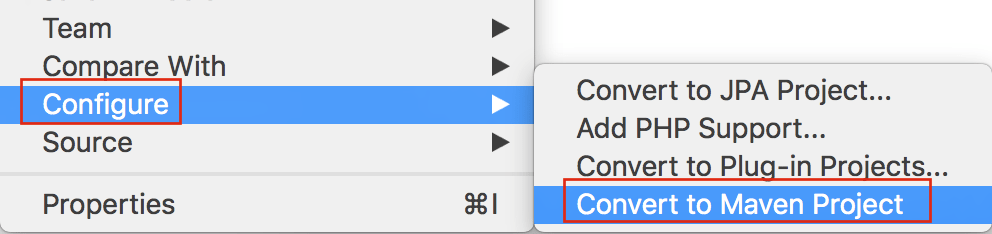
ステップ-3
- プロジェクトを右クリック
- [構成]をクリックします
- プロジェクトをMavenプロジェクトに変換する
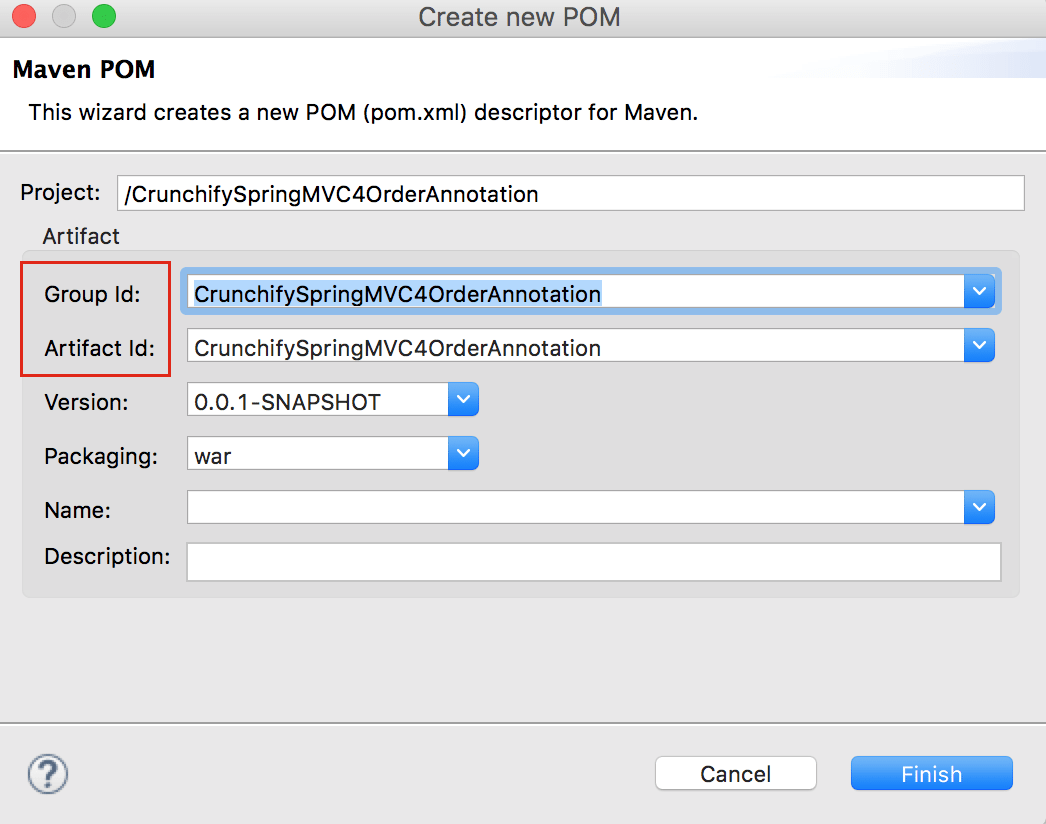
ステップ-4
デフォルト設定を選択し、[ Finish ]をクリックします。
ステップ-5
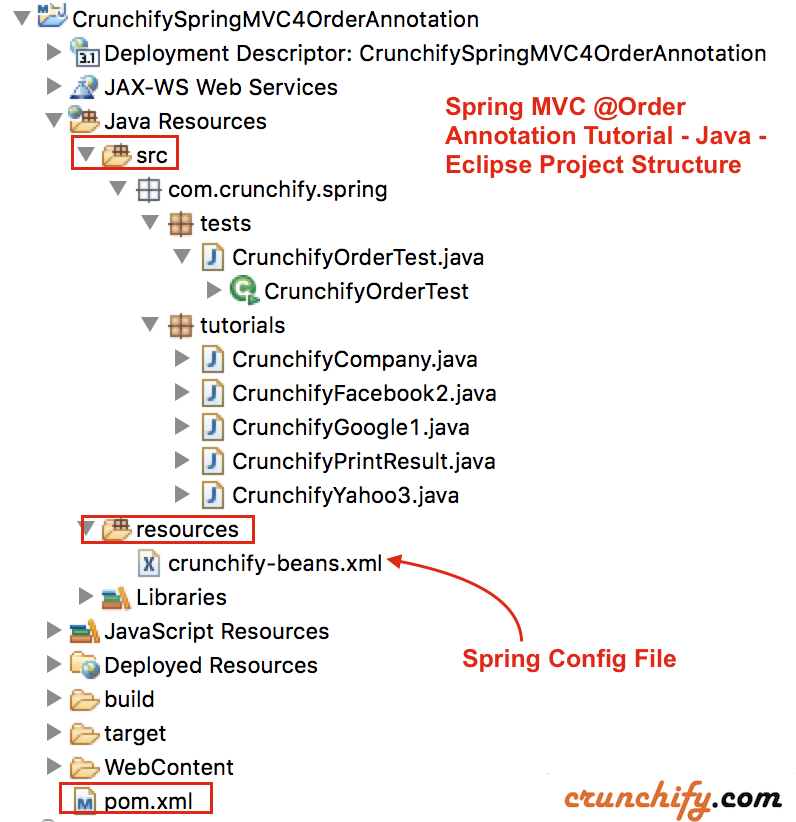
始める前のプロジェクト構造は次のとおりです。
pom.xmlファイルを開き、Spring MVC4.3.4の依存関係を追加します。
|
1 2 3 4 5 |
< dependency > < groupId > org . springframework < / groupId > < artifactId > spring - context < / artifactId > < version > 4.3.4.RELEASE < / version > < / dependency > |
これが私の完全なpom.xmlファイルです
|
1 2 3 4 5 6 7 8 9 10 11 12 13 14 15 16 17 18 19 20 21 22 23 24 25 26 27 28 29 30 31 32 33 34 35 |
< project xmlns = "http://maven.apache.org/POM/4.0.0" xmlns : xsi = "http://www.w3.org/2001/XMLSchema-instance" xsi : schemaLocation = "http://maven.apache.org/POM/4.0.0 http://maven.apache.org/xsd/maven-4.0.0.xsd" > < modelVersion > 4.0.0 < / modelVersion > < groupId > CrunchifySpringMVC4OrderAnnotation < / groupId > < artifactId > CrunchifySpringMVC4OrderAnnotation < / artifactId > < version > 0.0.1 - SNAPSHOT < / version > < packaging > war < / packaging > < build > < sourceDirectory > src < / sourceDirectory > < plugins > < plugin > < artifactId > maven - compiler - plugin < / artifactId > < version > 3.3 < / version > < configuration > < source > 1.8 < / source > < target > 1.8 < / target > < / configuration > < / plugin > < plugin > < artifactId > maven - war - plugin < / artifactId > < version > 2.6 < / version > < configuration > < warSourceDirectory > WebContent < / warSourceDirectory > < failOnMissingWebXml > false < / failOnMissingWebXml > < / configuration > < / plugin > < / plugins > < / build > < dependencies > < dependency > < groupId > org . springframework < / groupId > < artifactId > spring - context < / artifactId > < version > 4.3.4.RELEASE < / version > < / dependency > < / dependencies > < / project > |
ステップ-6
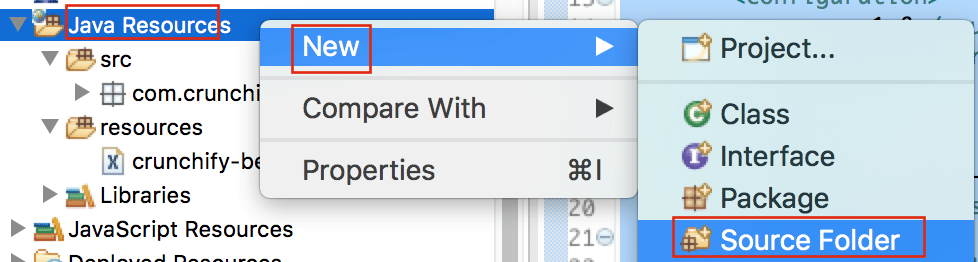
- Javaリソースを右クリックします
- 新規をクリックします
- ソースフォルダをクリックして、名前を入力します:
resources
ステップ-7
リソースフォルダの下にファイルcrunchify-bean.xmlファイルを作成します。 これが完全なファイルコンテンツです。
|
1 2 3 4 5 6 7 8 9 10 11 12 13 14 15 16 17 |
<? xml version = "1.0" encoding = "UTF-8" ?> < beans xmlns = "http://www.springframework.org/schema/beans" xmlns : xsi = "http://www.w3.org/2001/XMLSchema-instance" xmlns : p = "http://www.springframework.org/schema/p" xmlns : context = "http://www.springframework.org/schema/context" xsi : schemaLocation = "http://www.springframework.org/schema/beans http://www.springframework.org/schema/beans/spring-beans-4.0.xsd http://www.springframework.org/schema/context http://www.springframework.org/schema/context/spring-context-4.0.xsd" > < context : annotation - config / > < ! -- Specify Bean ID "orders" -- > < bean id = "orders" class = "com.crunchify.spring.tutorials.CrunchifyPrintResult" / > < ! -- This is required and loads each class under below package -- > < context : component - scan base - package = "com.crunchify.spring.tutorials" / > < / beans > |
ステップ-8
次に、 @Orderアノテーションを使用して5つのファイルを作成します。
- CrunchifyCompany.javaインターフェース
- CrunchifyGoogle1.java ==>
@Order(1)を使用 - CrunchifyFacebook2.java ==>
@Order(2)を使用 - CrunchifyYahoo3.java ==>
@Order(3)を使用 - CrunchifyPrintResult.java
CrunchifyCompany.java
|
1 2 3 4 5 6 7 8 9 10 |
package com . crunchify . spring . tutorials ; /** * @author Crunchify.com * */ public interface CrunchifyCompany { // do nothing here } |
CrunchifyGoogle1.java
|
1 2 3 4 5 6 7 8 9 10 11 12 13 14 15 16 17 18 19 20 21 22 |
package com . crunchify . spring . tutorials ; import org . springframework . core . annotation . Order ; import org . springframework . stereotype . Component ; /** * @author Crunchify.com * */ @Component @Order ( 1 ) // @Order defines the sort order for an annotated component. The value() is optional and represents an order value as // defined in the Ordered interface. Lower values have higher priority. The default value is // Ordered.LOWEST_PRECEDENCE, indicating lowest priority (losing to any other specified order value). public class CrunchifyGoogle1 implements CrunchifyCompany { private String order = "Crunchify Google with Order-1" ; public String toString ( ) { return "Class Name: " + this . getClass ( ) . getSimpleName ( ) + " - Result: " + this . order ; } } |

CrunchifyFacebook2.java
|
1 2 3 4 5 6 7 8 9 10 11 12 13 14 15 |
package com . crunchify . spring . tutorials ; import org . springframework . core . annotation . Order ; import org . springframework . stereotype . Component ; @Component @Order ( 2 ) public class CrunchifyFacebook2 implements CrunchifyCompany { private String order = "Crunchify Facebook with Order-2" ; public String toString ( ) { return "Class Name: " + this . getClass ( ) . getSimpleName ( ) + " - Result: " + this . order ; } } |
CrunchifyYahoo3.java
|
1 2 3 4 5 6 7 8 9 10 11 12 13 14 15 |
package com . crunchify . spring . tutorials ; import org . springframework . core . annotation . Order ; import org . springframework . stereotype . Component ; @Component @Order ( 3 ) public class CrunchifyYahoo3 implements CrunchifyCompany { private String order = "Crunchify Yahoo with Order-3" ; public String toString ( ) { return "Class Name: " + this . getClass ( ) . getSimpleName ( ) + " - Result: " + this . order ; } } |
CrunchifyPrintResult.java
|
1 2 3 4 5 6 7 8 9 10 11 12 13 14 15 16 17 18 19 20 21 22 23 24 25 |
package com . crunchify . spring . tutorials ; import java . util . List ; import org . springframework . beans . factory . annotation . Autowired ; import org . springframework . stereotype . Component ; /** * @author Crunchify.com * */ @Component public class CrunchifyPrintResult { @Autowired private List <CrunchifyCompany> order ; private String result = "" ; public String toString ( ) { order . stream ( ) . forEach ( ( temp ) - > { this . result = result + temp + "\n" ; // print result and add new line } ) ; return this . result ; } } |
ステップ-9
それでは、テストケースCrunchifyOrderTest.javaを作成しましょう。
|
1 2 3 4 5 6 7 8 9 10 11 12 13 14 15 16 17 18 19 20 21 22 23 24 25 26 27 |
package com . crunchify . spring . tests ; import org . springframework . context . ApplicationContext ; import org . springframework . context . support . ClassPathXmlApplicationContext ; import com . crunchify . spring . tutorials . CrunchifyPrintResult ; /** * @author Crunchify.com * */ public class CrunchifyOrderTest { @SuppressWarnings ( "resource" ) public static void main ( String [ ] args ) { // Load Spring ApplicationContext file crunchify-beans.xml ApplicationContext context = new ClassPathXmlApplicationContext ( "crunchify-beans.xml" ) ; // get the bean which we specified in file crunchify-beans.xml file CrunchifyPrintResult results = ( CrunchifyPrintResult ) context . getBean ( "orders" ) ; // After loading each class - just print result System . out . println ( results ) ; } } |
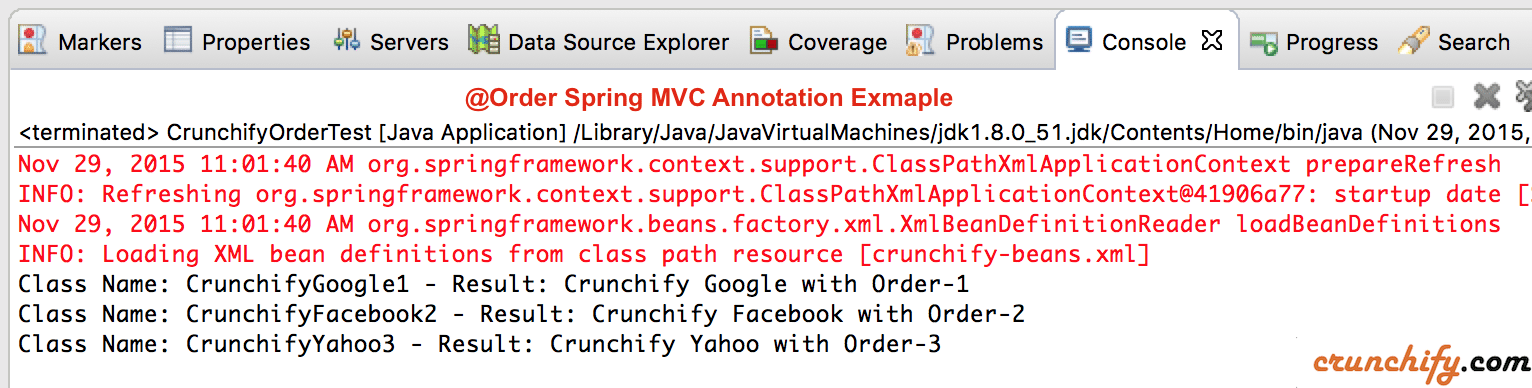
ステップ-10
次に、ファイルCrunchifyOrderTest.javaを右クリックして、[ Run As ]-> [ Java Application ]を選択します。 Orderを指定した順序で結果が印刷されます。
|
1 2 3 |
Class Name : CrunchifyGoogle1 - Result : Crunchify Google with Order - 1 Class Name : CrunchifyFacebook2 - Result : Crunchify Facebook with Order - 2 Class Name : CrunchifyYahoo3 - Result : Crunchify Yahoo with Order - 3 |