
WordPressサイトリンク検索ボックスのJSON-LDスキーマを検証する方法は? 検索ページのURLのヒントを変更する
公開: 2020-04-25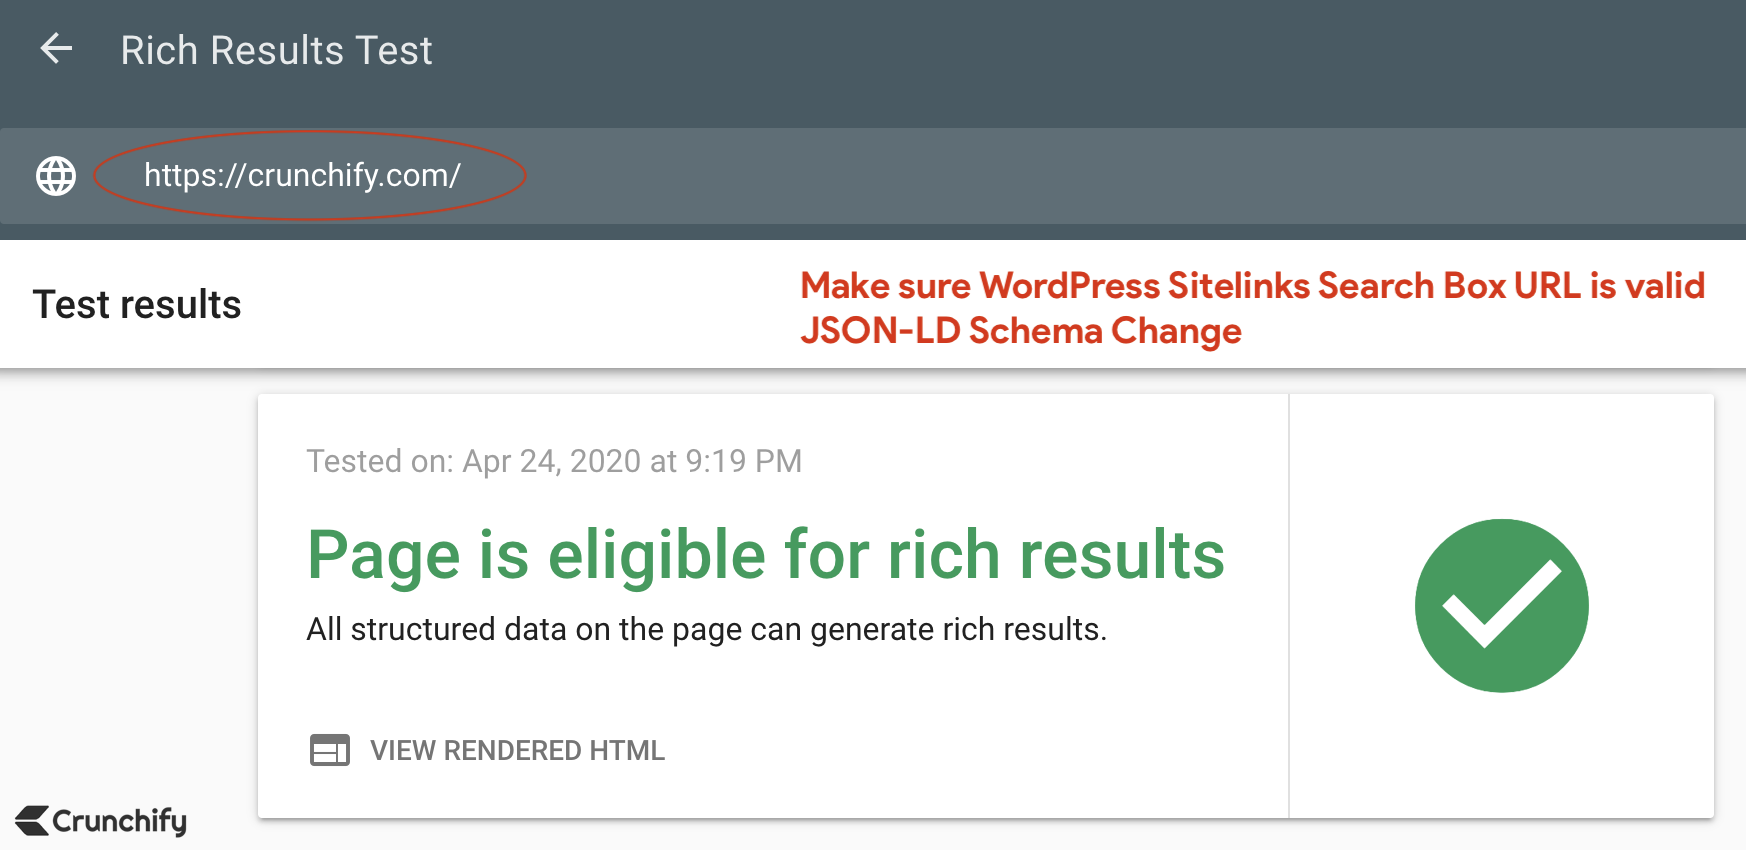
GoogleはデフォルトでSitelinks search boxをサポートしています。 ただし、WordPressサイトで正しく設定されていることを確認する必要があります。
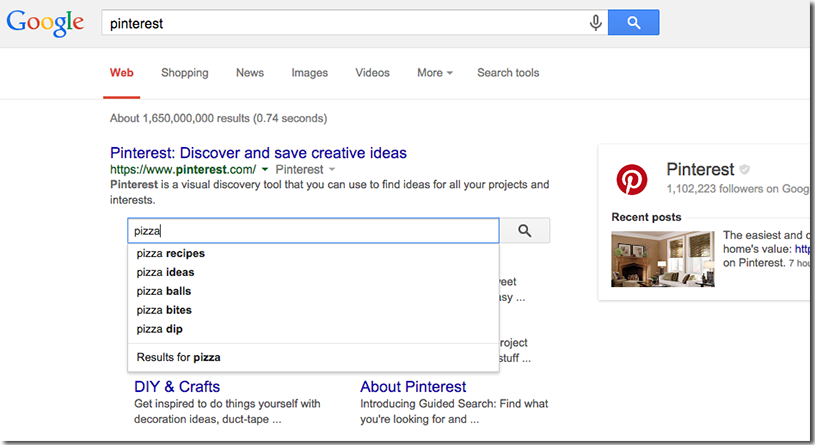
サイトリンク検索ボックスとは何ですか?
以下に示すように、Sitelink検索ボックスは、ユーザーが任意の用語を非常にすばやく検索するのに役立つ検索ボックスです。
彼らは検索するためにあなたのサイトに行く必要はありません。 結果はGoogle検索結果ページ(SERP)自体に表示されます。
それはユーザーにリアルタイムの検索提案を提供します。
今日のCrunchifyで、他のいくつかの問題を調べていると、サイトリンクの検索ボックスがbrokenていることがわかりました。
少し時間がかかりましたが、Crunchifyのサイトリンク検索ボックスのURLを修正しました。 Crunchifyのすべての読者と同じヒントを共有したいと思います。
ステップ1。 SEOWordPressプラグインをインストールする
Yoast SEOWordPressプラグインがインストールされていることを確認してください。 オールインワンSEOパックは、デフォルトでJSON-LDとサイトリンク検索ボックスのサポートもサポートしています。
ここ数年から同じものを使っていますが、今のところ良いです。 デフォルトでは、YoastSEOプラグインは各ページにJSON-LD schema markupを追加します。 プラグインをアクティブ化するだけで、カスタム検索ページを期待するように設定されます。
JSON-LDとは何ですか?
JSON-LDは、
JavaScript Object Notation for Linked Data略で、多次元配列で構成されています。
Crunchify home pageのJSON-lDの例を次に示します。
|
1 2 3 4 5 6 7 8 9 10 11 12 13 14 15 16 17 18 19 20 21 22 23 24 25 26 |
{ "@context" : "https://schema.org" , "@graph" : [ { "@type" : "WebSite" , "@id" : "https://crunchify.com/#website" , "url" : "https://crunchify.com/" , "name" : "Crunchify" , "inLanguage" : "en-US" , "description" : "Largest free Technical and Blogging resource site for Beginner. We help clients transform their great ideas into reality!" , "potentialAction" : [ { "@type" : "SearchAction" , "target" : "https://crunchify.com/search/?q={search_term_string}" , "query-input" : "required name=search_term_string" } ] } , { "@type" : "CollectionPage" , "@id" : "https://crunchify.com/#webpage" , "url" : "https://crunchify.com/" , "name" : "Crunchify \u2022 Largest free Technical and Blogging resource site for Beginner. We help clients transform their great ideas into reality!" , "isPartOf" : { "@id" : "https://crunchify.com/#website" } , "inLanguage" : "en-US" , "description" : "Largest free Technical, Blogging resource site for Beginners. We help clients transform their great ideas into reality!" } ] } |
サンプルのblog postにあるJSON-LDの例を次に示します。
|
1 2 3 4 5 6 7 8 9 10 11 12 13 14 15 16 17 18 19 20 21 22 23 24 25 26 27 28 29 30 31 32 33 34 35 36 37 38 39 40 41 42 43 44 45 46 47 48 49 50 51 52 53 54 55 56 57 58 59 |
{ "@context" : "https://schema.org" , "@graph" : [ { "@type" : "WebSite" , "@id" : "https://crunchify.com/#website" , "url" : "https://crunchify.com/" , "name" : "Crunchify" , "inLanguage" : "en-US" , "description" : "Largest free Technical and Blogging resource site for Beginner. We help clients transform their great ideas into reality!" , "potentialAction" : [ { "@type" : "SearchAction" , "target" : "https://crunchify.com/search/?q={search_term_string}" , "query-input" : "required name=search_term_string" } ] } , { "@type" : "ImageObject" , "@id" : "https://crunchify.com/step-by-step-guide-to-enable-https-or-ssl-correct-way-on-apache-tomcat-server-port-8443/#primaryimage" , "inLanguage" : "en-US" , "url" : "https://cdn.crunchify.com/wp-content/uploads/2020/04/Apache-tomcat-running-on-port-8443-over-HTTPS.png" , "width" : 1261 , "height" : 451 , "caption" : "Apache tomcat running on port 8443 over HTTPS" } , { "@type" : "WebPage" , "@id" : "https://crunchify.com/step-by-step-guide-to-enable-https-or-ssl-correct-way-on-apache-tomcat-server-port-8443/#webpage" , "url" : "https://crunchify.com/step-by-step-guide-to-enable-https-or-ssl-correct-way-on-apache-tomcat-server-port-8443/" , "name" : "Step by Step guide to Enable HTTPS or SSL correct way on Apache Tomcat Server - Port 8443 \u2022 Crunchify" , "isPartOf" : { "@id" : "https://crunchify.com/#website" } , "inLanguage" : "en-US" , "primaryImageOfPage" : { "@id" : "https://crunchify.com/step-by-step-guide-to-enable-https-or-ssl-correct-way-on-apache-tomcat-server-port-8443/#primaryimage" } , "datePublished" : "2020-04-24T06:08:30+00:00" , "dateModified" : "2020-04-24T17:44:01+00:00" , "author" : { "@id" : "https://crunchify.com/#/schema/person/b40f3806c0a1ef3372253a9198e0562f" } , "description" : "It's been almost 12 years I started using Apache Tomcat. I believe when I did my 1st under grade project, it was on Tomcat version 1.x. Now it's already" , "potentialAction" : [ { "@type" : "ReadAction" , "target" : [ "https://crunchify.com/step-by-step-guide-to-enable-https-or-ssl-correct-way-on-apache-tomcat-server-port-8443/" ] } ] } , { "@type" : [ "Person" ] , "@id" : "https://crunchify.com/#/schema/person/b40f3806c0a1ef3372253a9198e0562f" , "name" : "App Shah" , "image" : { "@type" : "ImageObject" , "@id" : "https://crunchify.com/#authorlogo" , "inLanguage" : "en-US" , "url" : "https://secure.gravatar.com/avatar/d8c1b220ca438566d5e5d0e70be7ef5e?s=96&d=mm&r=g" , "caption" : "App Shah" } , "description" : "I'm an Engineer by profession, Blogger by passion & Founder of Crunchify, LLC, the largest free blogging & technical resource site for beginners. Love SEO, SaaS, #webperf, WordPress, Java. With over <a href=\"https://crunchify.com/advertise/\" target=\"_blank\" rel=\"noopener noreferrer\">16 millions+</a> pageviews/month, Crunchify has changed the life of over thousands of individual around the globe teaching Java & Web Tech for FREE. Get latest update on <a target=\"_blank\" href=\"https://www.facebook.com/Crunchify\" class=\"crunchify-social-icon-facebook\" rel=\"noopener noreferrer\"><i class=\"fab fa-facebook\" style=\"margin: 0px 5px\"></i></a> and <a target=\"_blank\" href=\"https://twitter.com/Crunchify\" class=\"crunchify-social-icon-twitter\" rel=\"noopener noreferrer\"><i class=\"fab fa-twitter\" style=\"margin: 0px 0px 0px 5px;\"></i></a>.\r\n\r\n<div style=\"clear:both\"></div>" , "sameAs" : [ "https://facebook.com/Crunchify" , "https://twitter.com/Crunchify" ] } ] } |

ステップ2。 サイトリンクの検索URLを検証する
correct Sitelinks search URLが指定されていることを確認してください。 上記のコードでは、10行目から14行目が強調表示されています。 再確認してください。
デフォルトでは、YoastSEOは以下のURLを追加します。
-
"target": "https://crunchify.com/?s={search_term_string}"
Note:Googleカスタム検索を設定していない場合は、問題ありません。 何も変更する必要はありません。 ただし、過去6年間の経験に基づいて、Googleカスタム検索結果の設定を使用することをお勧めします。 ユーザーエクスペリエンスと検索結果の品質は、デフォルトのGoogle検索よりもはるかに優れています。
ステップ-3。 ターゲット検索URLを変更する
Crunchifyでは、Googleカスタム検索設定を使用しています。 したがって、デフォルトのターゲットURLは機能しません。
カスタム検索URLは次のとおりです。
-
https://crunchify.com/search/?q=java
Yoast SEOのスキーママークアップでURLを変更するにはどうすればよいですか?
以下のコードスニペットをテーマのfunctions.phpファイルに追加し、変更を保存します。
|
1 2 3 4 5 |
// Yoast - change ld+json search url function crunchify_change_json_ld_search_url ( ) { return trailingslashit ( home_url ( ) ) . 'search/?q={search_term_string}' ; } add_filter ( 'wpseo_json_ld_search_url' , 'crunchify_change_json_ld_search_url' ) ; |
このコードスニペットは、正しい検索URLを置き換えて更新します。
更新されたURLは次のとおりです。
-
"target": "https://crunchify.com/search/?q={search_term_string}"
ステップ-4。 数週間待つ
それでは、数週間待ってから、Google検索結果ページで結果をもう一度確認してください。 ライブ結果をチェックアウトします。 2020年4月24日に変更を加え、その直後にGoogleがURLの変更を認識し始めました。
URLは次のとおりです: https://search.google.com/search-console/sitelinks-searchbox。 プロパティを選択すると、結果が表示されます。
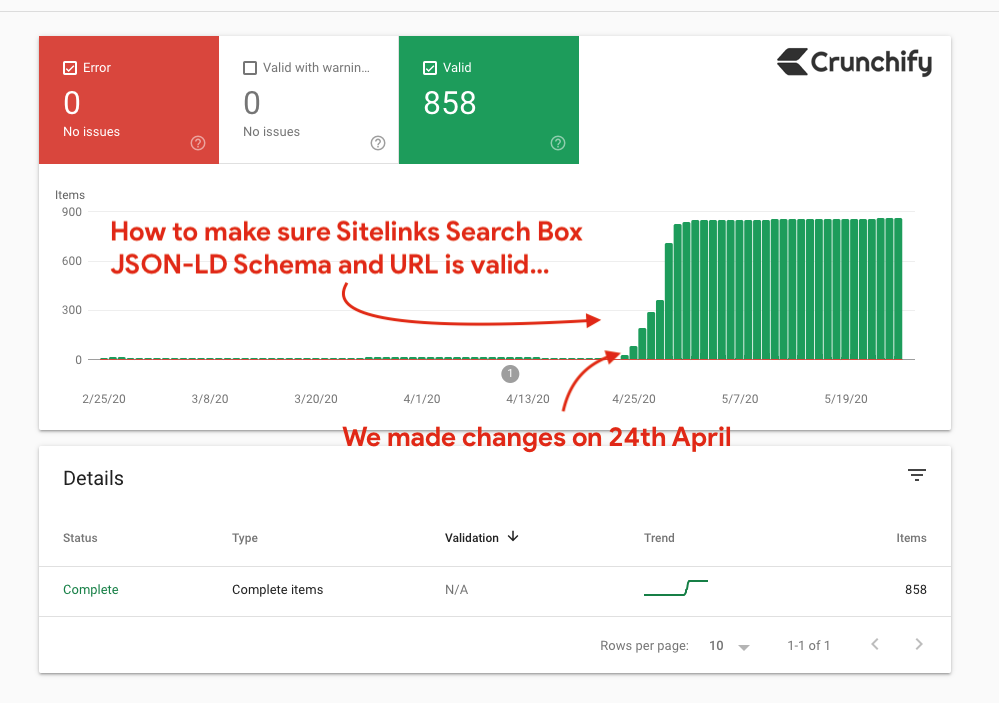
CrunchifySitelinkの検索結果の例を次に示します。
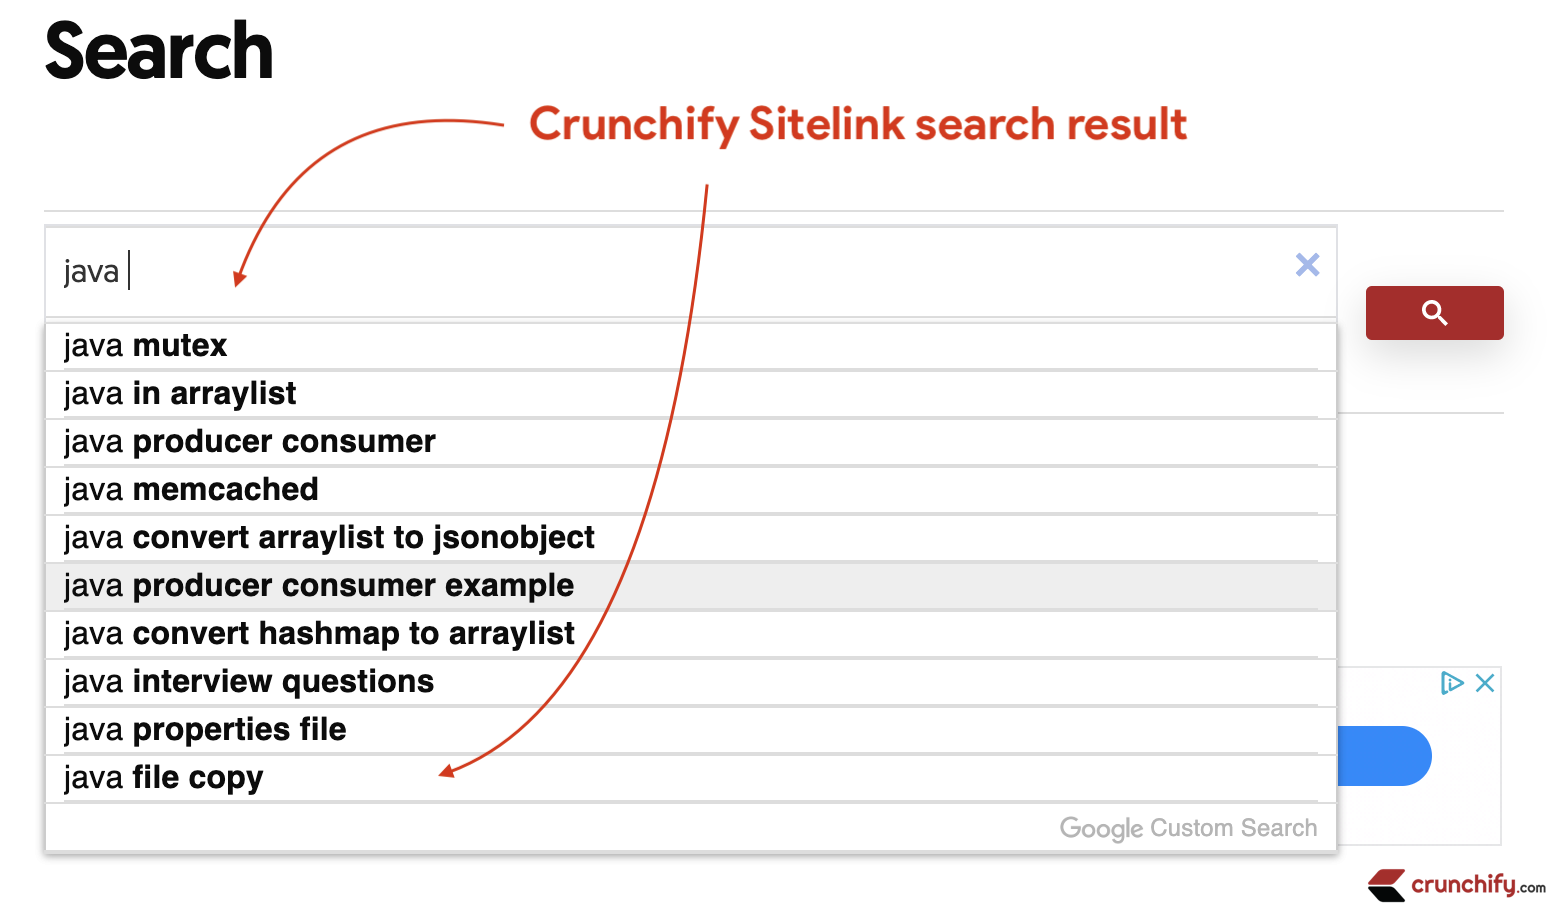
詳細は次のとおりです。
構造化データについてもっと知りたいですか?
ページのどこに挿入しますか?
JSON-LD?@JohnMuは、今週の#AskGoogleWebmastersで取り上げました。チェックしてください→https://t.co/b7utqUQf0m pic.twitter.com/iYxgtZGRrr
— Googleウェブマスター(@googlewmc)2019年9月11日
このチュートリアルが、JSON-LD GoogleSitelinks検索ボックススキーママークアップで発生する可能性のある問題の修正に役立つことを願っています。 幸せなブログ。