
Come creare il primo plugin per WordPress? Visita guidata passo passo con codice di esempio
Pubblicato: 2017-04-27
Come creare un plugin per WordPress e iniziare con lo sviluppo di plugin per WordPress?
Sei un nuovo sviluppatore WordPress? Hai iniziato a lavorare su WordPress di recente? Stai cercando di creare un nuovo plugin per WordPress?
Come creare un plugin per wordpress da zero? Bene, sei nel posto giusto.
In questo tutorial analizzeremo come creare il tuo Hello World WordPress Plugin da zero. Questa è una guida passo passo sul tutorial per lo sviluppo di plugin di WordPress.
Prima di iniziare, ecco un progetto di plugin per WordPress e cosa faremo:
- Creeremo un semplice plugin per WordPress Hello World
- Crea il file
crunchify-hello-world.phpche contiene tutto il codice del plug-in - Crea il file
readme.txtcon le informazioni di base- Metadati del plug-in
- Descrizione
- Passaggi di installazione
- Sezione FAQ
- Schermate
- Registro modifiche
- Il plug-in avrà le seguenti funzionalità
- Nuovo menu
Crunchify Pluginnel menuSettings - Nuova
admin pagedel plugin - L'utente avrà la possibilità di
add valuea un campo diTextfield -
Save buttonper salvare l'impostazione - Il plug-in
append saved textin fondo aevery post
- Nuovo menu
Iniziamo:
Passaggio 1: crea metadati del plug-in.
Crea il file crunchify-hello-world.php e inserisci prima il codice sotto.
|
1 2 3 4 5 6 7 8 9 10 11 12 13 14 15 16 17 18 19 20 21 22 23 |
< ? php /** * Crunchify Hello World Plugin is the simplest WordPress plugin for beginner. * Take this as a base plugin and modify as per your need. * * @package Crunchify Hello World Plugin * @author Crunchify * @license GPL-2.0+ * @link https://crunchify.com/tag/wordpress-beginner/ * @copyright 2017 Crunchify, LLC. All rights reserved. * * @wordpress-plugin * Plugin Name: Crunchify Hello World Plugin * Plugin URI: https://crunchify.com/tag/wordpress-beginner/ * Description: Crunchify Hello World Plugin is the simplest WordPress plugin for beginner. Take this as a base plugin and modify as per your need. * Version: 3.0 * Author: Crunchify * Author URI: https://crunchify.com/ * Text Domain: crunchify-hello-world * Contributors: Crunchify * License: GPL-2.0+ * License URI: http://www.gnu.org/licenses/gpl-2.0.txt */ |
I campi qui sotto sono assolutamente obbligatori e dovrebbero essere univoci per il tuo plugin:
- Nome del plug-in
- Plugin URI
- Descrizione
- Versione
- Autore
- URI dell'autore
- Dominio di testo
- Contributori
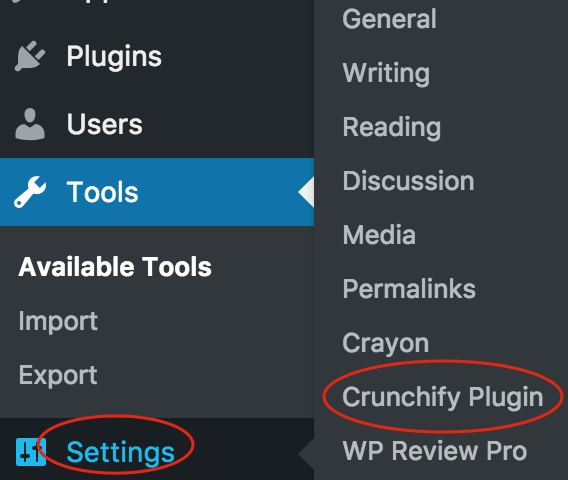
Passaggio 2 Aggiungi la sezione del sottomenu
|
1 2 3 4 |
function crunchify_add_menu ( ) { add_submenu_page ( "options-general.php" , "Crunchify Plugin" , "Crunchify Plugin" , "manage_options" , "crunchify-hello-world" , "crunchify_hello_world_page" ) ; } add_action ( "admin_menu" , "crunchify_add_menu" ) ; |
Stiamo usando add_action WordPress hook per aggiungere un sottomenu per il nostro plugin.
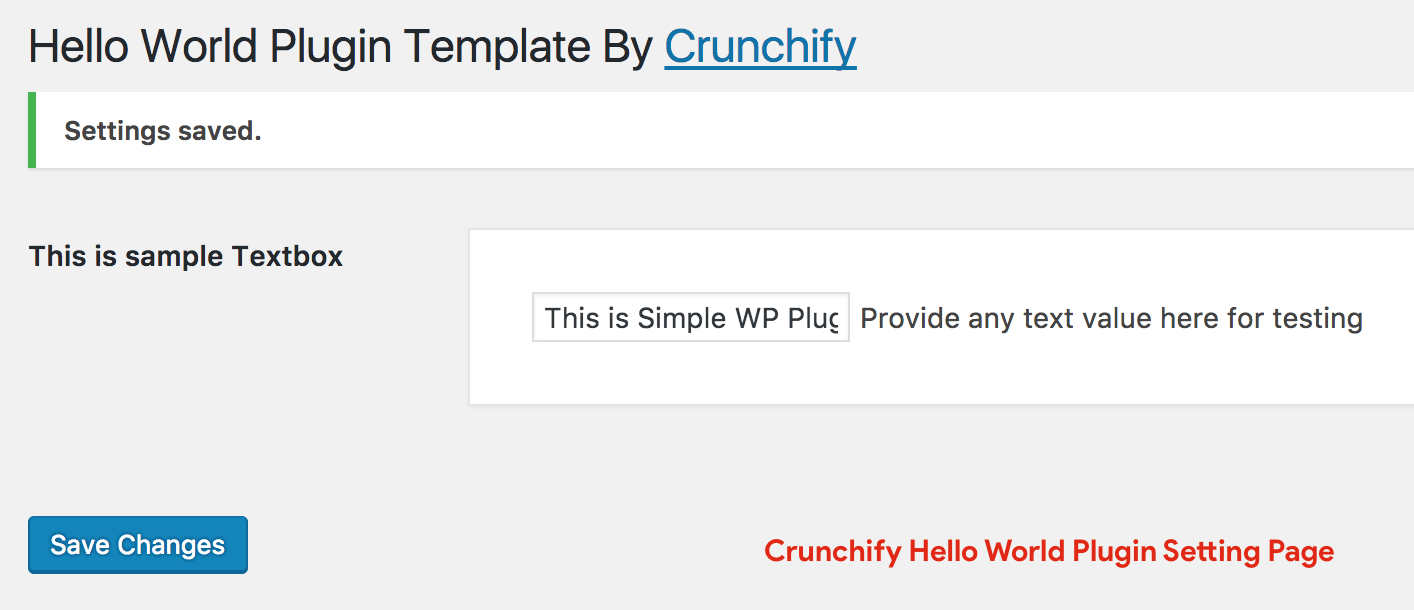
Passaggio 3 Crea la pagina delle impostazioni del plug-in
Nel nostro caso Settings -> Crunchify Plugin .
|
1 2 3 4 5 6 7 8 9 10 11 12 13 14 15 16 17 18 19 20 21 22 23 24 25 26 27 28 29 30 31 32 33 34 35 36 37 38 |
function crunchify_hello_world_page ( ) { ? > < div class = "wrap" > < h1 > Hello World Plugin Template By < a href = "https://crunchify.com/optimized-sharing-premium/" target = "_blank" > Crunchify < / a > < / h1 > < form method = "post" action = "options.php" > <?php settings_fields ( "crunchify_hello_world_config" ) ; do_settings_sections ( "crunchify-hello-world" ) ; submit_button ( ) ; ?> < / form > < / div > <?php } function crunchify_hello_world_settings ( ) { add_settings_section ( "crunchify_hello_world_config" , "" , null , "crunchify-hello-world" ) ; add_settings_field ( "crunchify-hello-world-text" , "This is sample Textbox" , "crunchify_hello_world_options" , "crunchify-hello-world" , "crunchify_hello_world_config" ) ; register_setting ( "crunchify_hello_world_config" , "crunchify-hello-world-text" ) ; } add_action ( "admin_init" , "crunchify_hello_world_settings" ) ; function crunchify_hello_world_options ( ) { ?> < div class = "postbox" style = "width: 65%; padding: 30px;" > < input type = "text" name = "crunchify-hello-world-text" value = " <?php echo stripslashes_deep ( esc_attr ( get_option ( 'crunchify-hello-world-text' ) ) ) ; ?> " / > Provide any text value here for testing < br / > < / div > < ? php } |
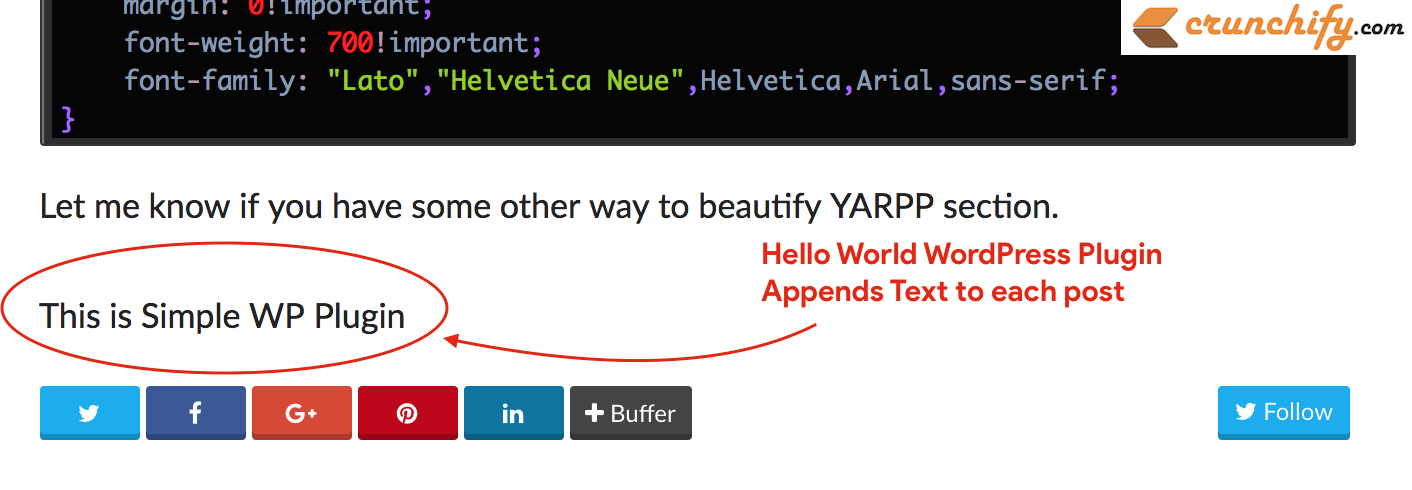
Passaggio 4 Aggiungi il valore del campo di testo salvato a ciascun post
|
1 2 3 4 |
add_filter ( 'the_content' , 'crunchify_com_content' ) ; function crunchify_com_content ( $ content ) { return $ content . stripslashes_deep ( esc_attr ( get_option ( 'crunchify-hello-world-text' ) ) ) ; } |
Codice completo:
Ecco un codice completo Hello World WordPress Plugin . Basta copiarlo di seguito e salvarlo nel file crunchify-hello-world.php .
|
1 2 3 4 5 6 7 8 9 10 11 12 13 14 15 16 17 18 19 20 21 22 23 24 25 26 27 28 29 30 31 32 33 34 35 36 37 38 39 40 41 42 43 44 45 46 47 48 49 50 51 52 53 54 55 56 57 58 59 60 61 62 63 64 65 66 67 68 69 70 71 72 73 74 75 76 77 78 79 80 81 82 83 84 85 86 87 88 89 90 91 92 93 94 95 96 97 98 |
<?php /** * Crunchify Hello World Plugin is the simplest WordPress plugin for beginner. * Take this as a base plugin and modify as per your need. * * @package Crunchify Hello World Plugin * @author Crunchify * @license GPL-2.0+ * @link https://crunchify.com/tag/wordpress-beginner/ * @copyright 2017 Crunchify, LLC. All rights reserved. * * @wordpress-plugin * Plugin Name: Crunchify Hello World Plugin * Plugin URI: https://crunchify.com/tag/wordpress-beginner/ * Description: Crunchify Hello World Plugin is the simplest WordPress plugin for beginner. Take this as a base plugin and modify as per your need. * Version: 3.0 * Author: Crunchify * Author URI: https://crunchify.com/ * Text Domain: crunchify-hello-world * Contributors: Crunchify * License: GPL-2.0+ * License URI: http://www.gnu.org/licenses/gpl-2.0.txt */ /** * Adding Submenu under Settings Tab * * @since 1.0 */ function crunchify_add_menu ( ) { add_submenu_page ( "options-general.php" , "Crunchify Plugin" , "Crunchify Plugin" , "manage_options" , "crunchify-hello-world" , "crunchify_hello_world_page" ) ; } add_action ( "admin_menu" , "crunchify_add_menu" ) ; /** * Setting Page Options * - add setting page * - save setting page * * @since 1.0 */ function crunchify_hello_world_page ( ) { ?> < div class = "wrap" > < h1 > Hello World Plugin Template By < a href = "https://crunchify.com/optimized-sharing-premium/" target = "_blank" > Crunchify < / a > < / h1 > < form method = "post" action = "options.php" > <?php settings_fields ( "crunchify_hello_world_config" ) ; do_settings_sections ( "crunchify-hello-world" ) ; submit_button ( ) ; ?> < / form > < / div > <?php } /** * Init setting section, Init setting field and register settings page * * @since 1.0 */ function crunchify_hello_world_settings ( ) { add_settings_section ( "crunchify_hello_world_config" , "" , null , "crunchify-hello-world" ) ; add_settings_field ( "crunchify-hello-world-text" , "This is sample Textbox" , "crunchify_hello_world_options" , "crunchify-hello-world" , "crunchify_hello_world_config" ) ; register_setting ( "crunchify_hello_world_config" , "crunchify-hello-world-text" ) ; } add_action ( "admin_init" , "crunchify_hello_world_settings" ) ; /** * Add simple textfield value to setting page * * @since 1.0 */ function crunchify_hello_world_options ( ) { ?> < div class = "postbox" style = "width: 65%; padding: 30px;" > < input type = "text" name = "crunchify-hello-world-text" value = " <?php echo stripslashes_deep ( esc_attr ( get_option ( 'crunchify-hello-world-text' ) ) ) ; ?> " / > Provide any text value here for testing < br / > < / div > <?php } /** * Append saved textfield value to each post * * @since 1.0 */ add_filter ( 'the_content' , 'crunchify_com_content' ) ; function crunchify_com_content ( $content ) { return $content . stripslashes_deep ( esc_attr ( get_option ( 'crunchify-hello-world-text' ) ) ) ; } |
Passaggio 5 Crea il file readme.txt
Ecco un esempio di file readme.txt plugin di WordPress.

|
1 2 3 4 5 6 7 8 9 10 11 12 13 14 15 16 17 18 19 20 21 22 23 24 25 26 27 28 29 30 31 32 33 34 35 |
=== Crunchify Hello World Plugin === Contributors : Crunchify Donate link : https : //www.paypal.com/cgi-bin/webscr?cmd=_s-xclick&hosted_button_id=8ZF6WATLYFELQ Tags : Hello World Plugin , Crunchify Plugins , Beginner WordPress , WordPress Plugin Requires at least : 4.5 Tested up to : 4.7.4 Stable tag : 3.0 License : GPLv2 or later License URI : http : //www.gnu.org/licenses/gpl-2.0.html Create your fist plugin . Crunchify Hello World Plugin is the simplest WordPress plugin for beginner . Take this as a base plugin and modify as per your need . == Description == Crunchify Hello World Plugin is the simplest WordPress plugin for beginner if you want to start creating fresh new plugin . Take this as a base plugin and modify as per your need . == Installation == 1. Unpack the ` download - package ` . 2. Upload the file to the ` / wp - content / plugins / ` directory . 3. Activate the plugin through the ` Plugins ` menu in WordPress . 4. Done and Ready . == Frequently Asked Questions == = How to add FAQ question = * just add your FAQ questions here == Screenshots == 1. This is a text label for your first screenshot 2. Add more screenshot labels as new line == Changelog == = 3.0 = * Initial release |
E adesso?
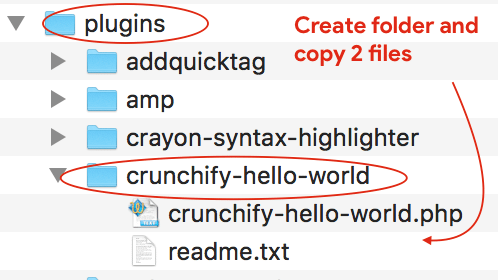
- Basta creare la cartella
crunchify-hello-worldnella/plugins foldere aggiungere la copia di entrambi i file lì.
- Vai su Admin Console -> Plugin
- Attiva plug-in
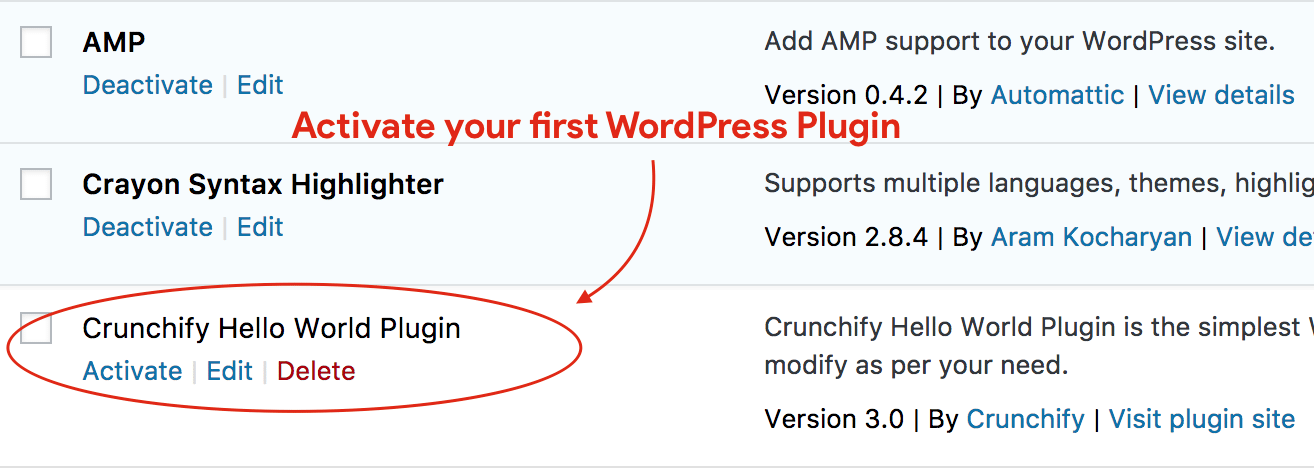
Questo è tutto.
Inizia a scrivere il tuo primo plugin per WordPress
Prendi questo codice as a sample della tua prima base di plugin per WordPress e modificalo secondo le tue necessità. Nel prossimo tutorial esamineremo alcuni campi di array più complessi per alcune funzionalità in più.
Si prega di rimanere sintonizzati e buon blog.