
Bagaimana Cara Membuat Plugin WordPress Pertama? Tur Berpemandu Selangkah demi Selangkah dengan Kode Contoh
Diterbitkan: 2017-04-27
Bagaimana Cara Membuat Plugin WordPress dan Memulai Pengembangan Plugin WordPress?
Apakah Anda seorang pengembang WordPress baru? Sudahkah Anda mulai bekerja di WordPress baru-baru ini? Apakah Anda ingin membuat Plugin WordPress baru?
Bagaimana cara membuat plugin wordpress dari awal? Nah, Anda berada di tempat yang tepat.
Dalam tutorial ini kita akan membahas cara membuat Hello World WordPress Plugin Anda dari awal. Ini adalah panduan langkah demi langkah tentang tutorial pengembangan plugin WordPress.
Sebelum kita mulai di sini adalah desain plugin WordPress dan apa yang akan kita lakukan:
- Kami akan membuat Plugin Hello World WordPress sederhana
- Buat file
crunchify-hello-world.phpyang memiliki semua kode Plugin - Buat file
readme.txtdengan informasi dasar- Metadata Plugin
- Keterangan
- Langkah-langkah Instalasi
- bagian FAQ
- Tangkapan layar
- Ubah log
- Plugin akan memiliki fungsi di bawah ini
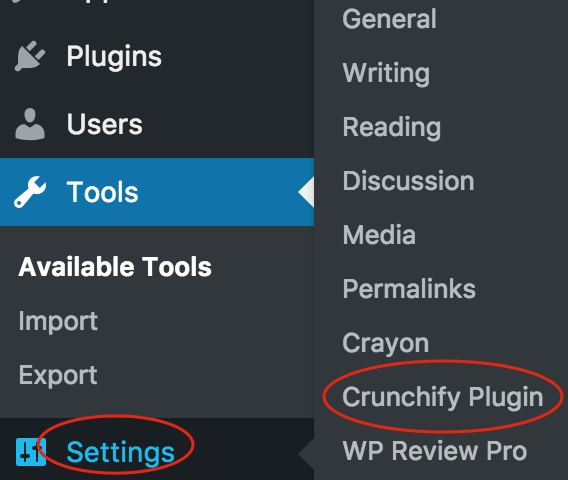
- Menu
Crunchify Plugindi bawah menuSettings -
admin pagePlugin baru - Pengguna akan memiliki opsi untuk
add valueke satuTextfield -
Save buttonuntuk menyimpan pengaturan - Plugin akan
append saved textke bagian bawahevery post
- Menu
Mari kita mulai:
Langkah-1 Buat Metadata Plugin.
Buat file crunchify-hello-world.php dan letakkan kode di bawah ini terlebih dahulu.
|
1 2 3 4 5 6 7 8 9 10 11 12 13 14 15 16 17 18 19 20 21 22 23 |
< ? php /** * Crunchify Hello World Plugin is the simplest WordPress plugin for beginner. * Take this as a base plugin and modify as per your need. * * @package Crunchify Hello World Plugin * @author Crunchify * @license GPL-2.0+ * @link https://crunchify.com/tag/wordpress-beginner/ * @copyright 2017 Crunchify, LLC. All rights reserved. * * @wordpress-plugin * Plugin Name: Crunchify Hello World Plugin * Plugin URI: https://crunchify.com/tag/wordpress-beginner/ * Description: Crunchify Hello World Plugin is the simplest WordPress plugin for beginner. Take this as a base plugin and modify as per your need. * Version: 3.0 * Author: Crunchify * Author URI: https://crunchify.com/ * Text Domain: crunchify-hello-world * Contributors: Crunchify * License: GPL-2.0+ * License URI: http://www.gnu.org/licenses/gpl-2.0.txt */ |
Di sini, bidang di bawah ini mutlak diperlukan dan harus unik untuk plugin Anda:
- Nama Plugin
- URI plugin
- Keterangan
- Versi: kapan
- Pengarang
- Penulis URI
- Domain Teks
- Kontributor
Langkah-2 Tambahkan bagian submenu
|
1 2 3 4 |
function crunchify_add_menu ( ) { add_submenu_page ( "options-general.php" , "Crunchify Plugin" , "Crunchify Plugin" , "manage_options" , "crunchify-hello-world" , "crunchify_hello_world_page" ) ; } add_action ( "admin_menu" , "crunchify_add_menu" ) ; |
Kami menggunakan add_action WordPress hook untuk menambahkan submenu untuk plugin kami.
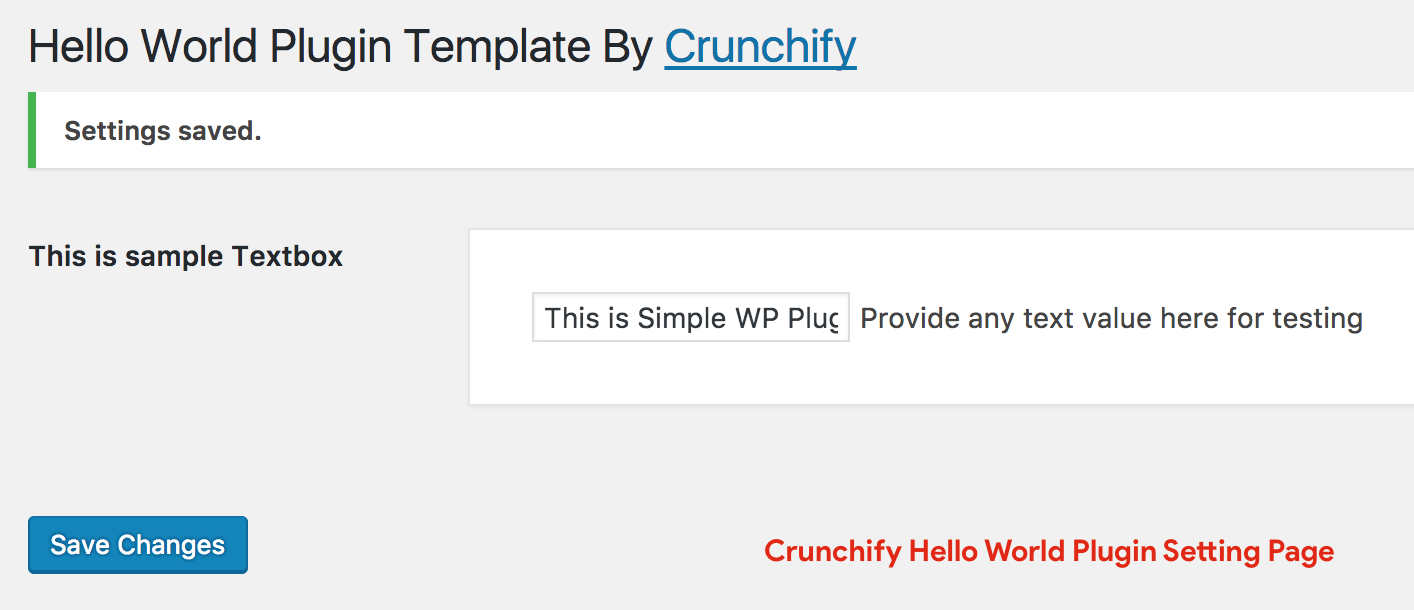
Langkah-3 Buat halaman pengaturan plugin
Dalam kasus kami, Settings -> Crunchify Plugin .
|
1 2 3 4 5 6 7 8 9 10 11 12 13 14 15 16 17 18 19 20 21 22 23 24 25 26 27 28 29 30 31 32 33 34 35 36 37 38 |
function crunchify_hello_world_page ( ) { ? > < div class = "wrap" > < h1 > Hello World Plugin Template By < a href = "https://crunchify.com/optimized-sharing-premium/" target = "_blank" > Crunchify < / a > < / h1 > < form method = "post" action = "options.php" > <?php settings_fields ( "crunchify_hello_world_config" ) ; do_settings_sections ( "crunchify-hello-world" ) ; submit_button ( ) ; ?> < / form > < / div > <?php } function crunchify_hello_world_settings ( ) { add_settings_section ( "crunchify_hello_world_config" , "" , null , "crunchify-hello-world" ) ; add_settings_field ( "crunchify-hello-world-text" , "This is sample Textbox" , "crunchify_hello_world_options" , "crunchify-hello-world" , "crunchify_hello_world_config" ) ; register_setting ( "crunchify_hello_world_config" , "crunchify-hello-world-text" ) ; } add_action ( "admin_init" , "crunchify_hello_world_settings" ) ; function crunchify_hello_world_options ( ) { ?> < div class = "postbox" style = "width: 65%; padding: 30px;" > < input type = "text" name = "crunchify-hello-world-text" value = " <?php echo stripslashes_deep ( esc_attr ( get_option ( 'crunchify-hello-world-text' ) ) ) ; ?> " / > Provide any text value here for testing < br / > < / div > < ? php } |
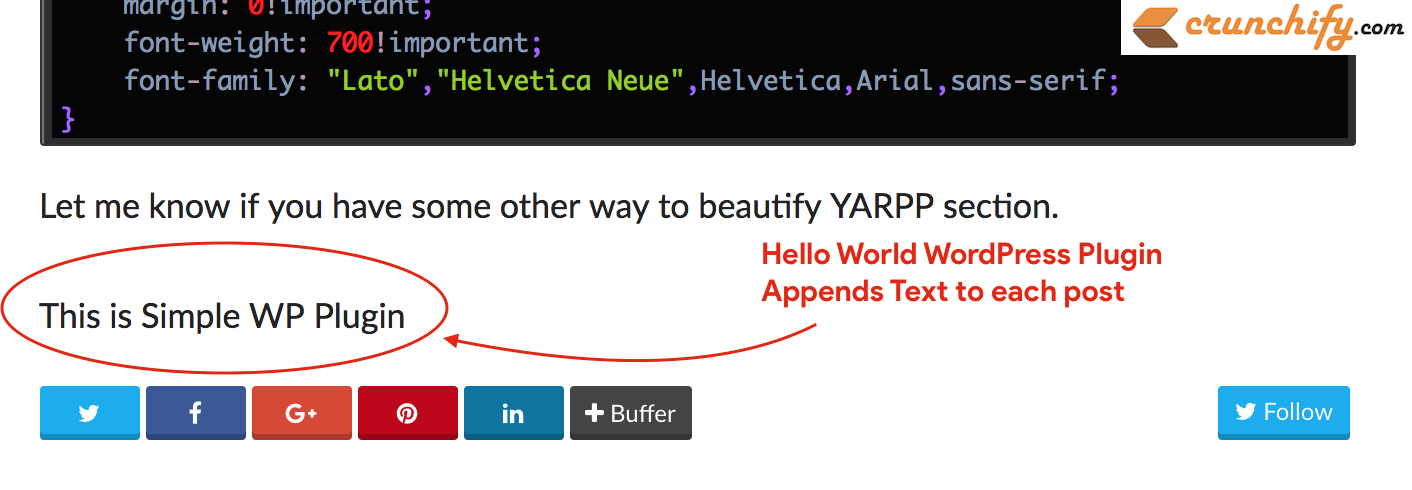
Langkah-4 Tambahkan nilai Saved Textfield ke setiap posting
|
1 2 3 4 |
add_filter ( 'the_content' , 'crunchify_com_content' ) ; function crunchify_com_content ( $ content ) { return $ content . stripslashes_deep ( esc_attr ( get_option ( 'crunchify-hello-world-text' ) ) ) ; } |
Kode lengkap:
Berikut ini adalah kode Hello World WordPress Plugin lengkap. Cukup salin di bawah dan simpan ke file crunchify-hello-world.php file.
|
1 2 3 4 5 6 7 8 9 10 11 12 13 14 15 16 17 18 19 20 21 22 23 24 25 26 27 28 29 30 31 32 33 34 35 36 37 38 39 40 41 42 43 44 45 46 47 48 49 50 51 52 53 54 55 56 57 58 59 60 61 62 63 64 65 66 67 68 69 70 71 72 73 74 75 76 77 78 79 80 81 82 83 84 85 86 87 88 89 90 91 92 93 94 95 96 97 98 |
<?php /** * Crunchify Hello World Plugin is the simplest WordPress plugin for beginner. * Take this as a base plugin and modify as per your need. * * @package Crunchify Hello World Plugin * @author Crunchify * @license GPL-2.0+ * @link https://crunchify.com/tag/wordpress-beginner/ * @copyright 2017 Crunchify, LLC. All rights reserved. * * @wordpress-plugin * Plugin Name: Crunchify Hello World Plugin * Plugin URI: https://crunchify.com/tag/wordpress-beginner/ * Description: Crunchify Hello World Plugin is the simplest WordPress plugin for beginner. Take this as a base plugin and modify as per your need. * Version: 3.0 * Author: Crunchify * Author URI: https://crunchify.com/ * Text Domain: crunchify-hello-world * Contributors: Crunchify * License: GPL-2.0+ * License URI: http://www.gnu.org/licenses/gpl-2.0.txt */ /** * Adding Submenu under Settings Tab * * @since 1.0 */ function crunchify_add_menu ( ) { add_submenu_page ( "options-general.php" , "Crunchify Plugin" , "Crunchify Plugin" , "manage_options" , "crunchify-hello-world" , "crunchify_hello_world_page" ) ; } add_action ( "admin_menu" , "crunchify_add_menu" ) ; /** * Setting Page Options * - add setting page * - save setting page * * @since 1.0 */ function crunchify_hello_world_page ( ) { ?> < div class = "wrap" > < h1 > Hello World Plugin Template By < a href = "https://crunchify.com/optimized-sharing-premium/" target = "_blank" > Crunchify < / a > < / h1 > < form method = "post" action = "options.php" > <?php settings_fields ( "crunchify_hello_world_config" ) ; do_settings_sections ( "crunchify-hello-world" ) ; submit_button ( ) ; ?> < / form > < / div > <?php } /** * Init setting section, Init setting field and register settings page * * @since 1.0 */ function crunchify_hello_world_settings ( ) { add_settings_section ( "crunchify_hello_world_config" , "" , null , "crunchify-hello-world" ) ; add_settings_field ( "crunchify-hello-world-text" , "This is sample Textbox" , "crunchify_hello_world_options" , "crunchify-hello-world" , "crunchify_hello_world_config" ) ; register_setting ( "crunchify_hello_world_config" , "crunchify-hello-world-text" ) ; } add_action ( "admin_init" , "crunchify_hello_world_settings" ) ; /** * Add simple textfield value to setting page * * @since 1.0 */ function crunchify_hello_world_options ( ) { ?> < div class = "postbox" style = "width: 65%; padding: 30px;" > < input type = "text" name = "crunchify-hello-world-text" value = " <?php echo stripslashes_deep ( esc_attr ( get_option ( 'crunchify-hello-world-text' ) ) ) ; ?> " / > Provide any text value here for testing < br / > < / div > <?php } /** * Append saved textfield value to each post * * @since 1.0 */ add_filter ( 'the_content' , 'crunchify_com_content' ) ; function crunchify_com_content ( $content ) { return $content . stripslashes_deep ( esc_attr ( get_option ( 'crunchify-hello-world-text' ) ) ) ; } |
Langkah-5 Buat file readme.txt
Berikut adalah contoh file readme.txt plugin WordPress.

|
1 2 3 4 5 6 7 8 9 10 11 12 13 14 15 16 17 18 19 20 21 22 23 24 25 26 27 28 29 30 31 32 33 34 35 |
=== Crunchify Hello World Plugin === Contributors : Crunchify Donate link : https : //www.paypal.com/cgi-bin/webscr?cmd=_s-xclick&hosted_button_id=8ZF6WATLYFELQ Tags : Hello World Plugin , Crunchify Plugins , Beginner WordPress , WordPress Plugin Requires at least : 4.5 Tested up to : 4.7.4 Stable tag : 3.0 License : GPLv2 or later License URI : http : //www.gnu.org/licenses/gpl-2.0.html Create your fist plugin . Crunchify Hello World Plugin is the simplest WordPress plugin for beginner . Take this as a base plugin and modify as per your need . == Description == Crunchify Hello World Plugin is the simplest WordPress plugin for beginner if you want to start creating fresh new plugin . Take this as a base plugin and modify as per your need . == Installation == 1. Unpack the ` download - package ` . 2. Upload the file to the ` / wp - content / plugins / ` directory . 3. Activate the plugin through the ` Plugins ` menu in WordPress . 4. Done and Ready . == Frequently Asked Questions == = How to add FAQ question = * just add your FAQ questions here == Screenshots == 1. This is a text label for your first screenshot 2. Add more screenshot labels as new line == Changelog == = 3.0 = * Initial release |
Sekarang apa?
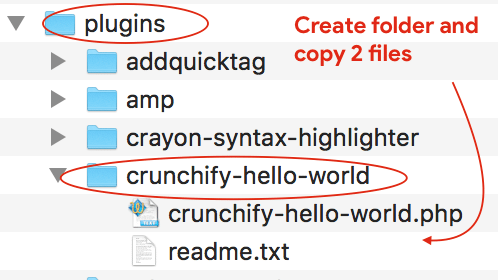
- Cukup buat folder
crunchify-hello-worlddi bawah/plugins folderdan tambahkan salin kedua file di sana.
- Buka Konsol Admin -> Plugin
- Aktifkan plugin
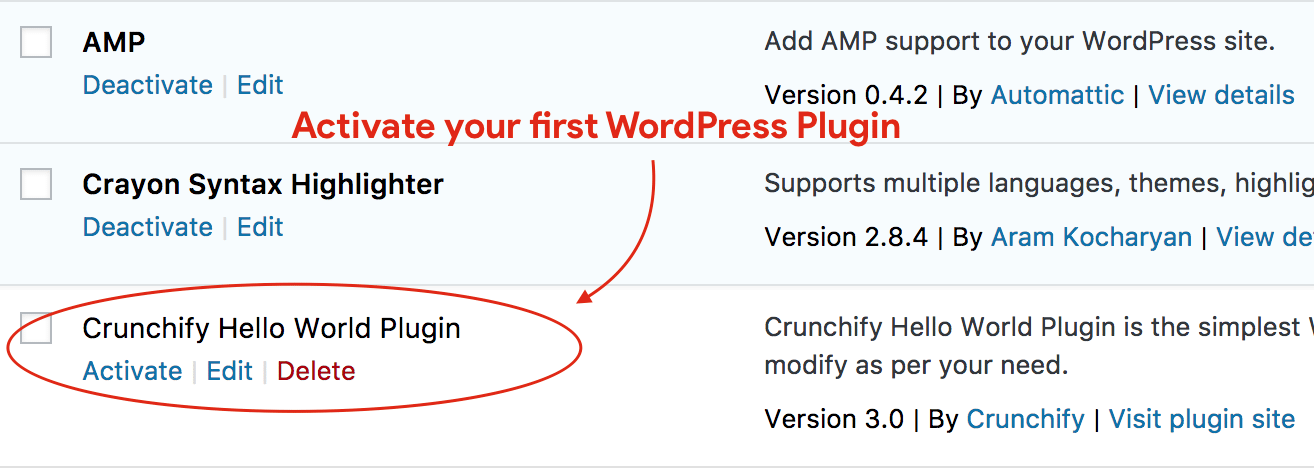
Itu dia.
Mulailah Menulis plugin WordPress Pertama Anda
Ambil kode ini as a sample basis Plugin WordPress pertama Anda dan modifikasi sesuai kebutuhan Anda. Dalam tutorial berikutnya kita akan membahas beberapa bidang array yang lebih kompleks untuk beberapa fungsionalitas lainnya.
Tetap disini dan Selamat ngeblog.