
Servlet-Tutorial: Erste Schritte mit JSP – Servlet-Beispiel
Veröffentlicht: 2013-07-16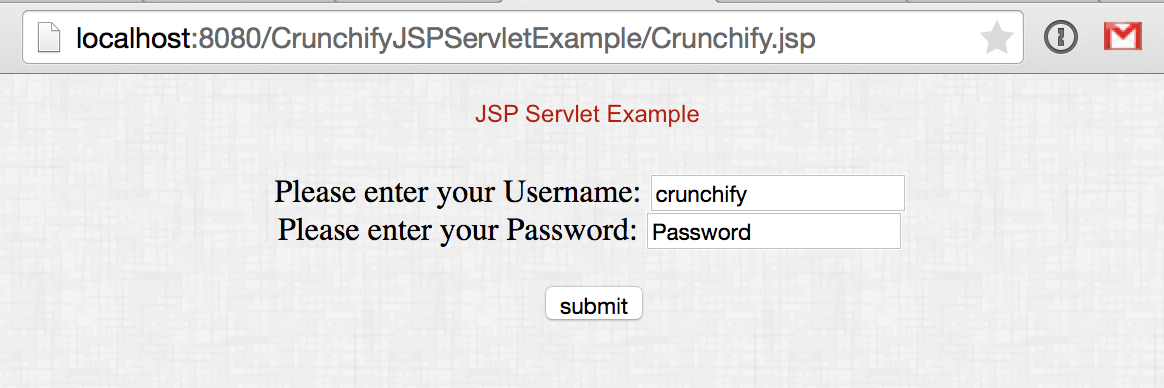
Hier ist ein einfaches JSP – Servlet-Beispiel mit Schritt-für-Schritt-Anleitung. Ich werde demonstrieren, wie Anforderungsparameter im JSP-Servlet-Beispiel abgerufen werden.
Hier sind die Schritte, die wir ausführen werden:
- Öffnen Sie die Eclipse-IDE.
- Neues dynamisches Webprojekt CrunchifyJSPServletExample erstellen.
- Erstellen Sie eine HelloCrunchify.java -Datei, die HttpServlet erweitert (Liste aller 200 Java-Beispiele).
- Erstellen Sie die Crunchify.jsp -Datei.
- web.xml -Datei (Bereitstellungsdeskriptordatei).
- Wenn Sie die Datei web.xml nicht sehen, finden Sie hier eine Lösung.
- Projekt auf Tomcat-Webserver hinzufügen und ausführen.
Hier ist eine vollständige Projektstruktur:

Schritt 1
Erstellen Sie die HelloCrunchify.java -Datei
|
1 2 3 4 5 6 7 8 9 10 11 12 13 14 15 16 17 18 19 20 21 22 23 24 25 26 27 28 29 30 31 32 33 34 35 36 37 |
package com . crunchify . jsp . servlet ; import java . io . IOException ; import javax . servlet . ServletException ; import javax . servlet . http . HttpServlet ; import javax . servlet . http . HttpServletRequest ; import javax . servlet . http . HttpServletResponse ; import java . io . PrintWriter ; /** * @author Crunchify.com */ public class HelloCrunchify extends HttpServlet { protected void doGet ( HttpServletRequest request , HttpServletResponse response ) throws ServletException , IOException { // reading the user input String username = request . getParameter ( "username" ) ; String password = request . getParameter ( "password" ) ; PrintWriter out = response . getWriter ( ) ; out . println ( "<!DOCTYPE html PUBLIC \"-//W3C//DTD HTML 4.01 Transitional//EN\" +" + "http://www.w3.org/TR/html4/loose.dtd\">\n" + "<html> \n" + "<head> \n" + "<meta http-equiv=\"Content-Type\" content=\"text/html; " + "charset=ISO-8859-1\"> \n" + "<title> Crunchify.com JSP Servlet Example </title> \n" + "</head> \n" + "<body> <div align='center'> \n" + "<style= \"font-size=\"12px\" color='black'\"" + "\">" + "Username: " + username + " <br> " + "Password: " + password + "</font></body> \n" + "</html>" ) ; } } |
Ein weiteres muss gelesen werden:
- So führen Sie das Java-Programm automatisch beim Tomcat-Start aus
- Verwendung von AJAX, jQuery in Spring Web MVC (.jsp) – Beispiel
Schritt 2
Crunchify.jsp -Datei erstellen:
|
1 2 3 4 5 6 7 8 9 10 11 12 13 14 15 16 17 18 19 20 21 22 23 24 25 26 27 28 29 30 |
<% @ page language = "java" contentType = "text/html; charset=ISO-8859-1" pageEncoding = "ISO-8859-1" %> < ! DOCTYPE html PUBLIC "-//W3C//DTD HTML 4.01 Transitional//EN" "http://www.w3.org/TR/html4/loose.dtd" > < html > <style type ="text/css"> body { background-image : url ( 'https://cdn.crunchify.com/wp-content/uploads/2013/03/Crunchify.bg_.300.png' ) ; } </style> < head > < meta http - equiv = "Content-Type" content = "text/html; charset=ISO-8859-1" > < title > Crunchify JSP Servlet Example < / title > < / head > < body > < div align = "center" style = "margin-top: 50px;" > < form action = "CrunchifyServlet" > Please enter your Username : < input type = "text" name = "username" size = "20px" > < br > Please enter your Password : < input type = "text" name = "password" size = "20px" > < br > < br > < input type = "submit" value = "submit" > < / form > < / div > < / body > < / html > |

Schritt 3
Aktualisieren Sie die web.xml -Datei:
|
1 2 3 4 5 6 7 8 9 10 11 12 13 14 15 16 17 18 19 20 21 22 23 |
<? xml version = "1.0" encoding = "UTF-8" ?> < web - app xmlns : xsi = "http://www.w3.org/2001/XMLSchema-instance" xmlns = "http://java.sun.com/xml/ns/javaee" xmlns : web = "http://java.sun.com/xml/ns/javaee/web-app_2_5.xsd" xsi : schemaLocation = "http://java.sun.com/xml/ns/javaee http://java.sun.com/xml/ns/javaee/web-app_3_0.xsd" version = "3.0" > < display - name > CrunchifyJSPServletExample < / display - name > < welcome - file - list > < welcome - file > index . html < / welcome - file > < welcome - file > index . htm < / welcome - file > < welcome - file > index . jsp < / welcome - file > < welcome - file > default . html < / welcome - file > < welcome - file > default . htm < / welcome - file > < welcome - file > default . jsp < / welcome - file > < / welcome - file - list > < servlet > < servlet - name > Hello < / servlet - name > < servlet - class > com . crunchify . jsp . servlet . HelloCrunchify < / servlet - class > < / servlet > < servlet - mapping > < servlet - name > Hello < / servlet - name > < url - pattern > / CrunchifyServlet < / url - pattern > < / servlet - mapping > < / web - app > |
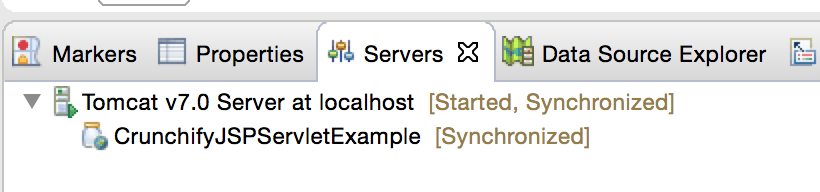
Schritt 4
CrunchifyJSPServletExample auf Tomcat bereitgestellt und ausgeführt.
Schritt-5
Richten Sie Ihre URL auf http://localhost:8080/CrunchifyJSPServletExample/Crunchify.jsp
Schritt-6
Checkout-Ergebnis. Ihre URL sollte folgendermaßen aussehen: http://localhost:8080/CrunchifyJSPServletExample/CrunchifyServlet?username=crunchify&password=Password

Beachten Sie, dass der Server keine Änderungen in „ web.xml “ erkennt, es sei denn, Sie haben den Server neu gestartet oder gestartet.