
WordPress CPT(Custom Post Type) 퍼머링크에 사용자 정의 분류를 추가하는 방법은 무엇입니까?
게시 됨: 2020-02-08
Crunchify에서 WordPress Custom Post Type에 대한 많은 기사를 게시했습니다. 가장 인기 있는 튜토리얼 중 하나는 WordPress CPT(Custom Post Type) 및 분류를 만드는 방법에 관한 것입니다.
이 자습서에서는 사용자 지정 게시물 유형 영구 링크에 사용자 지정 분류를 추가하는 방법에 대한 단계를 살펴보겠습니다.
1 단계. 우리는 무엇을 시도하고 있습니까?
tourist 라는 사용자 정의 분류와 attraction 라는 사용자 정의 게시물 유형이 있는 경우.
명소의 경우 다음과 같은 영구 링크 구조를 원하면 어떻게 합니까: crunchify.com/<tourist_name>/<attraction_name>
글쎄, 당신은 바로 이곳에 있습니다.
2 단계.
functions.php에서 아래 Custom Post Type 코드를 사용하세요.
|
1 2 3 4 5 6 7 8 9 10 11 12 13 14 15 16 17 18 19 20 21 22 23 24 25 26 27 28 29 30 31 32 33 34 35 36 37 38 39 40 41 42 43 |
// ================================= Create Attraction Custom Post Type ================================= function crunchify_create_the_attaction_posttype ( ) { $ labels = array ( 'name' = > _x ( 'Attraction' , 'Post Type General Name' , 'CRUNCHIFY_TEXT_DOMAIN' ) , 'singular_name' = > _x ( 'Attraction' , 'Post Type Singular Name' , 'CRUNCHIFY_TEXT_DOMAIN' ) , 'menu_name' = > esc_html__ ( 'Attraction' , 'CRUNCHIFY_TEXT_DOMAIN' ) , 'parent_item_colon' = > esc_html__ ( 'Parent Attraction' , 'CRUNCHIFY_TEXT_DOMAIN' ) , 'all_items' = > esc_html__ ( 'All Attraction' , 'CRUNCHIFY_TEXT_DOMAIN' ) , 'view_item' = > esc_html__ ( 'View Attraction' , 'CRUNCHIFY_TEXT_DOMAIN' ) , 'add_new_item' = > esc_html__ ( 'Add New Attraction' , 'CRUNCHIFY_TEXT_DOMAIN' ) , 'add_new' = > esc_html__ ( 'Add New' , 'CRUNCHIFY_TEXT_DOMAIN' ) , 'edit_item' = > esc_html__ ( 'Edit Attraction' , 'CRUNCHIFY_TEXT_DOMAIN' ) , 'update_item' = > esc_html__ ( 'Update Attraction' , 'CRUNCHIFY_TEXT_DOMAIN' ) , 'search_items' = > esc_html__ ( 'Search Attraction' , 'CRUNCHIFY_TEXT_DOMAIN' ) , 'not_found' = > esc_html__ ( 'Not Found' , 'CRUNCHIFY_TEXT_DOMAIN' ) , 'not_found_in_trash' = > esc_html__ ( 'Not found in Trash' , 'CRUNCHIFY_TEXT_DOMAIN' ) , ) ; $ args = array ( 'label' = > esc_html__ ( 'attraction' , 'CRUNCHIFY_TEXT_DOMAIN' ) , 'description' = > esc_html__ ( 'Attraction' , 'CRUNCHIFY_TEXT_DOMAIN' ) , 'labels' = > $ labels , 'supports' = > array ( 'title' , 'editor' , 'thumbnail' ) , 'taxonomies' = > array ( 'genres' ) , 'hierarchical' = > false , 'public' = > true , 'show_ui' = > true , 'show_in_menu' = > true , 'show_in_nav_menus' = > true , 'show_in_admin_bar' = > true , 'menu_position' = > 100 , 'can_export' = > true , 'has_archive' = > __ ( 'attraction' ) , 'exclude_from_search' = > false , 'publicly_queryable' = > true , 'query_var' = > true , 'show_admin_column' = > true , 'capability_type' = > 'post' , 'rewrite' = > array ( 'slug' = > 'attraction/%tourist%' ) , ) ; register_post_type ( 'attraction' , $ args ) ; } add_action ( 'init' , 'crunchify_create_the_attaction_posttype' , 0 ) ; |

3단계.
functions.php의 아래 Custom Taxonomy 코드를 사용하세요.
|
1 2 3 4 5 6 7 8 9 10 11 12 13 14 15 |
// ================================= Custom Post Type Taxonomies ================================= function crunchify_create_the_attaction_taxonomy ( ) { register_taxonomy ( 'tourist' , // This is a name of the taxonomy. Make sure it's not a capital letter and no space in between 'attraction' , //post type name array ( 'hierarchical' = > true , 'label' = > 'Attractions' , //Display name 'query_var' = > true , 'has_archive' = > true , 'rewrite' = > array ( 'slug' = > 'attraction' ) ) ) ; } add_action ( 'init' , 'crunchify_create_the_attaction_taxonomy' ) ; |
4단계.
Attraction Post Type Single Link의 경우 카테고리 슬러그를 추가합니다.
|
1 2 3 4 5 6 7 8 9 10 11 |
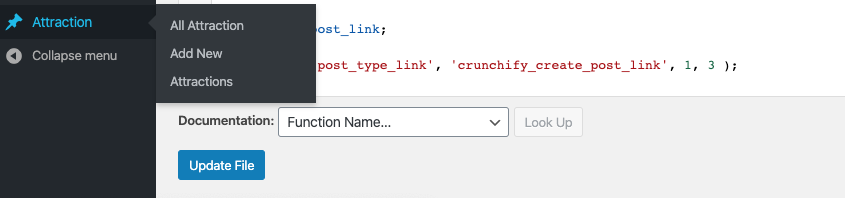
function crunchify_create_post_link ( $ post_link , $ id = 0 ) { $ post = get_post ( $ id ) ; if ( is_object ( $ post ) ) { $ terms = wp_get_object_terms ( $ post - > ID , 'tourist' ) ; if ( $ terms ) { return str_replace ( '%tourist%' , $ terms [ 0 ] - > slug , $ post_link ) ; } } return $ post_link ; } add_filter ( 'post_type_link' , 'crunchify_create_post_link' , 1 , 3 ) ; |
그 후에 다른 WordPress 왼쪽 패널 메뉴가 표시되기 시작합니다.
이 코드에 문제가 있으면 알려주십시오. 행복한 블로깅.
Custom Post Type에 대한 다른 자세한 기사를 확인하십시오.
WordPress 사용자 정의 게시물 유형(CPT) 및 분류를 만드는 방법 – Hello World 자습서, 팁 및 요령