
Java, MySQL และ JDBC Hello World Tutorial – สร้างการเชื่อมต่อ แทรกข้อมูล และดึงข้อมูลจาก MySQL
เผยแพร่แล้ว: 2020-07-27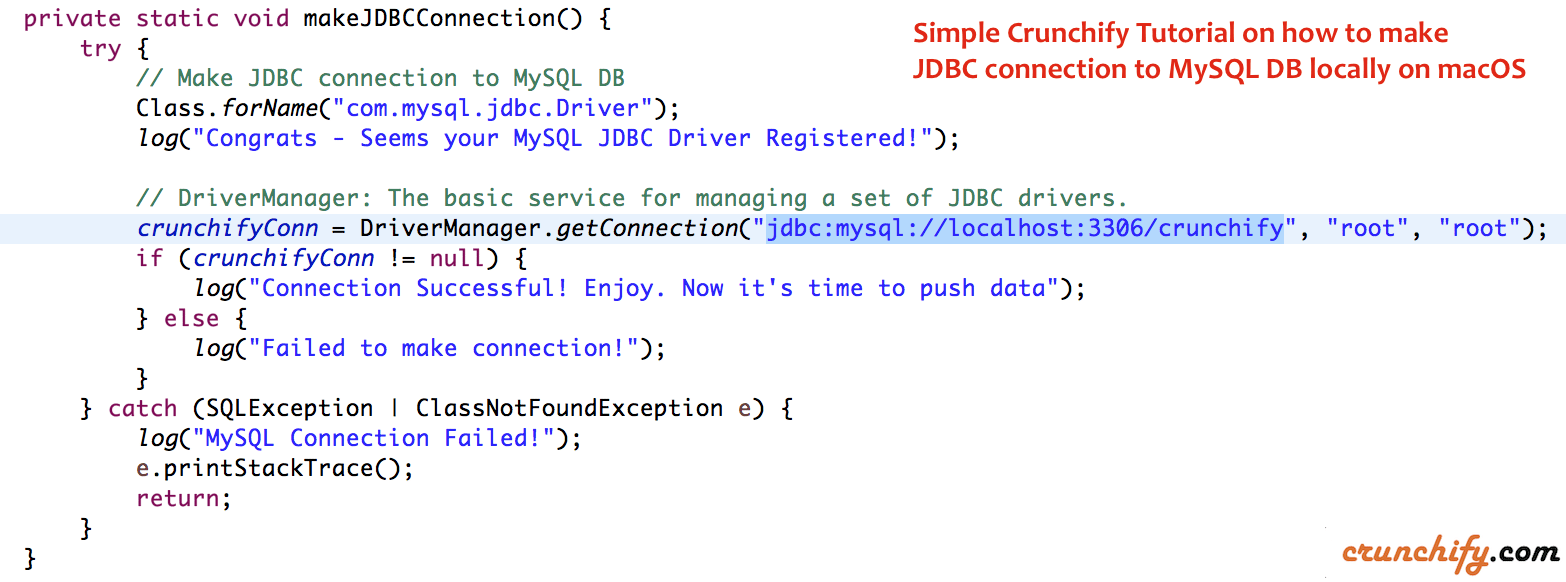
ในโลกของเทคโนโลยีที่เป็นนวัตกรรมในปัจจุบันนี้ คุณไม่จำเป็นต้องมี Database connectivity เพื่อดำเนินการเชื่อมต่อและกิจกรรมในแบบของคุณ
หากคุณกำลังใช้ Facebook, Twitter หรือโซเชียลมีเดียอื่น ๆ ทุกการกระทำที่คุณทำบนไซต์อาจถูกจัดเก็บไว้ในฐานข้อมูลและจะถูก retrieved during your next visit เพื่อมุมมองที่ปรับแต่งเฉพาะบุคคลที่เกี่ยวข้อง
มีเทคนิคอื่นๆ ค่อนข้างน้อย เช่น การแคชเบราว์เซอร์ แต่การตั้งค่าการจัดเก็บไปยัง DataBase เป็นหนึ่งในนั้น
มีฐานข้อมูลมากมายในป่า นี่คือบางส่วนของพวกเขา: CouchBase, MySQL, Oracle, Cassandra, MongoDB เป็นต้น ในบทช่วยสอนนี้ เราจะพูดถึงฐานข้อมูล MySQL
หากคุณมีคำถามใด ๆ ด้านล่างแสดงว่าคุณมาถูกที่แล้ว:
- บทช่วยสอน JDBC – JDBC HelloWorld MySQL
- เชื่อมต่อกับฐานข้อมูลโดยใช้ JDBC
- การเชื่อมต่อ JDBC และ MySQL
- ใน Java วิธีเชื่อมต่อกับ MySQL ด้วยไดรเวอร์ JDBC
- การใช้ JDBC เพื่อเชื่อมต่อกับ MySQL จาก Java Program
- โค้ดตัวอย่างสำหรับการเชื่อมต่อ JDBC ใน java ด้วย mysql
- วิธีเชื่อมต่อฐานข้อมูล mysql ใน java โดยใช้ eclipse
สิ่งที่คุณต้องการ?
คุณต้องมี MySQL ติดตั้งไว้บนเดสก์ท็อปหรือแล็ปท็อปของคุณ ฉันได้ติดตั้ง MAMP บน macOS ซึ่งโดยค่าเริ่มต้นจะมาพร้อมกับ MySQL DB
มาเริ่มกันเลย:
- สร้างคลาส
CrunchifyMySQLDBTutorial.java - สร้างการ
Connectionต่อ DB มาตรฐาน ,PreparedStatementและResultSetObjects - ดำเนินการ
executeUpdate()เพื่อแทรกข้อมูลลงใน Table - ดำเนินการ
executeQuery()เพื่อดึงข้อมูลจาก MySQL Table - ในกรณีของเรา:
- ชื่อฐานข้อมูล: crunchify
- ชื่อผู้ใช้: root
- รหัสผ่าน: root
- ชื่อโต๊ะ: พนักงาน
-
Step - 1: สร้างการเชื่อมต่อกับฐานข้อมูล ในกรณีที่ JDBC ล้มเหลว เราจะโยนข้อความแสดงข้อผิดพลาด -
Step - 2: เราจะเพิ่ม 3 ระเบียนลงในฐานข้อมูล -
Step - 3: เราจะอ่านบันทึกทั้งหมดทีละรายการและพิมพ์บน Eclipse Console
Maven Dependency สำหรับ JDBC MySQL
โปรดเพิ่มการพึ่งพา maven ด้านล่างให้กับไฟล์ pom.xml ของโปรเจ็กต์ของคุณ
|
1 2 3 4 5 |
< dependency > < groupId > mysql < / groupId > < artifactId > mysql - connector - java < / artifactId > < version > 5.1.6 < / version > < / dependency > |
นี่คือโครงสร้างฐานข้อมูลของเรา

กรอกรหัส Java สำหรับการเชื่อมต่อ MySQL JDBC และเพิ่ม เรียกการทำงาน
|
1 2 3 4 5 6 7 8 9 10 11 12 13 14 15 16 17 18 19 20 21 22 23 24 25 26 27 28 29 30 31 32 33 34 35 36 37 38 39 40 41 42 43 44 45 46 47 48 49 50 51 52 53 54 55 56 57 58 59 60 61 62 63 64 65 66 67 68 69 70 71 72 73 74 75 76 77 78 79 80 81 82 83 84 85 86 87 88 89 90 91 92 93 94 95 96 97 98 99 100 101 102 103 104 105 106 107 108 109 110 111 112 113 114 115 116 117 118 119 120 121 122 123 124 125 126 |
package crunchify . com . tutorial ; import java . sql . Connection ; import java . sql . DriverManager ; import java . sql . PreparedStatement ; import java . sql . ResultSet ; import java . sql . SQLException ; /** * @author Crunchify.com * Simple Hello World MySQL Tutorial on how to make JDBC connection, Add and Retrieve Data by App Shah * */ public class CrunchifyMySQLDBTutorial { static Connection crunchifyConn = null ; static PreparedStatement crunchifyPrepareStat = null ; public static void main ( String [ ] argv ) { try { log ( "-------- Simple Crunchify Tutorial on how to make JDBC connection to MySQL DB locally on macOS ------------" ) ; makeJDBCConnection ( ) ; log ( "\n---------- Adding company 'Crunchify LLC' to DB ----------" ) ; addDataToDB ( "Crunchify, LLC." , "NYC, US" , 5 , "https://crunchify.com" ) ; addDataToDB ( "Google Inc." , "Mountain View, CA, US" , 50000 , "https://google.com" ) ; addDataToDB ( "Apple Inc." , "Cupertino, CA, US" , 30000 , "http://apple.com" ) ; log ( "\n---------- Let's get Data from DB ----------" ) ; getDataFromDB ( ) ; crunchifyPrepareStat . close ( ) ; crunchifyConn . close ( ) ; // connection close } catch ( SQLException e ) { e . printStackTrace ( ) ; } } private static void makeJDBCConnection ( ) { try { Class . forName ( "com.mysql.jdbc.Driver" ) ; log ( "Congrats - Seems your MySQL JDBC Driver Registered!" ) ; } catch ( ClassNotFoundException e ) { log ( "Sorry, couldn't found JDBC driver. Make sure you have added JDBC Maven Dependency Correctly" ) ; e . printStackTrace ( ) ; return ; } try { // DriverManager: The basic service for managing a set of JDBC drivers. crunchifyConn = DriverManager . getConnection ( "jdbc:mysql://localhost:3306/crunchify" , "root" , "root" ) ; if ( crunchifyConn ! = null ) { log ( "Connection Successful! Enjoy. Now it's time to push data" ) ; } else { log ( "Failed to make connection!" ) ; } } catch ( SQLException e ) { log ( "MySQL Connection Failed!" ) ; e . printStackTrace ( ) ; return ; } } private static void addDataToDB ( String companyName , String address , int totalEmployee , String webSite ) { try { String insertQueryStatement = "INSERT INTO Employee VALUES (?,?,?,?)" ; crunchifyPrepareStat = crunchifyConn . prepareStatement ( insertQueryStatement ) ; crunchifyPrepareStat . setString ( 1 , companyName ) ; crunchifyPrepareStat . setString ( 2 , address ) ; crunchifyPrepareStat . setInt ( 3 , totalEmployee ) ; crunchifyPrepareStat . setString ( 4 , webSite ) ; // execute insert SQL statement crunchifyPrepareStat . executeUpdate ( ) ; log ( companyName + " added successfully" ) ; } catch ( SQLException e ) { e . printStackTrace ( ) ; } } private static void getDataFromDB ( ) { try { // MySQL Select Query Tutorial String getQueryStatement = "SELECT * FROM employee" ; crunchifyPrepareStat = crunchifyConn . prepareStatement ( getQueryStatement ) ; // Execute the Query, and get a java ResultSet ResultSet rs = crunchifyPrepareStat . executeQuery ( ) ; // Let's iterate through the java ResultSet while ( rs . next ( ) ) { String name = rs . getString ( "Name" ) ; String address = rs . getString ( "Address" ) ; int employeeCount = rs . getInt ( "EmployeeCount" ) ; String website = rs . getString ( "Website" ) ; // Simply Print the results System . out . format ( "%s, %s, %s, %s\n" , name , address , employeeCount , website ) ; } } catch ( SQLException e ) { e . printStackTrace ( ) ; } } // Simple log utility private static void log ( String string ) { System . out . println ( string ) ; } } |
เอาท์พุท:

|
1 2 3 4 5 6 7 8 9 10 11 12 13 14 |
-------- Simple Crunchify Tutorial on how to make JDBC connection to MySQL DB locally on macOS ------------ Congrats - Seems your MySQL JDBC Driver Registered! Connection Successful! Enjoy. Now it's time to push data ---------- Adding company 'Crunchify LLC' to DB ---------- Crunchify, LLC. added successfully Google Inc. added successfully Apple Inc. added successfully ---------- Let's get Data from DB ---------- Crunchify, LLC., NYC, US, 5, https://crunchify.com Google Inc., Mountain View, CA, US, 50000, https://google.com Apple Inc., Cupertino, CA, US, 30000, http://apple.com |