
공모: iOS에서 MultipeerConnectivity를 사용한 주변 장치 네트워킹
게시 됨: 2022-03-11전통적으로 P2P 통신을 위한 연결 장치는 다소 무거운 작업이었습니다. 애플리케이션은 주변에 있는 것을 발견하고 양쪽에서 연결을 연 다음 네트워크 인프라, 연결, 거리 등이 모두 변경됨에 따라 이를 유지해야 합니다. 이러한 활동에 내재된 어려움을 깨닫고 iOS 7 및 macOS 10.10에서 Apple은 앱이 비교적 적은 노력으로 이러한 작업을 수행할 수 있도록 설계된 MultipeerConnectivity 프레임워크(이하 MPC)를 도입했습니다.
MPC는 여기에서 필요한 기본 인프라의 대부분을 처리합니다.
- 다중 네트워크 인터페이스 지원(Bluetooth, WiFi 및 이더넷)
- 장치 감지
- 암호화를 통한 보안
- 작은 메시지 전달
- 파일 전송
이 기사에서는 주로 iOS 구현을 다루지만 전부는 아닐지라도 대부분은 macOS 및 tvOS에 적용할 수 있습니다.
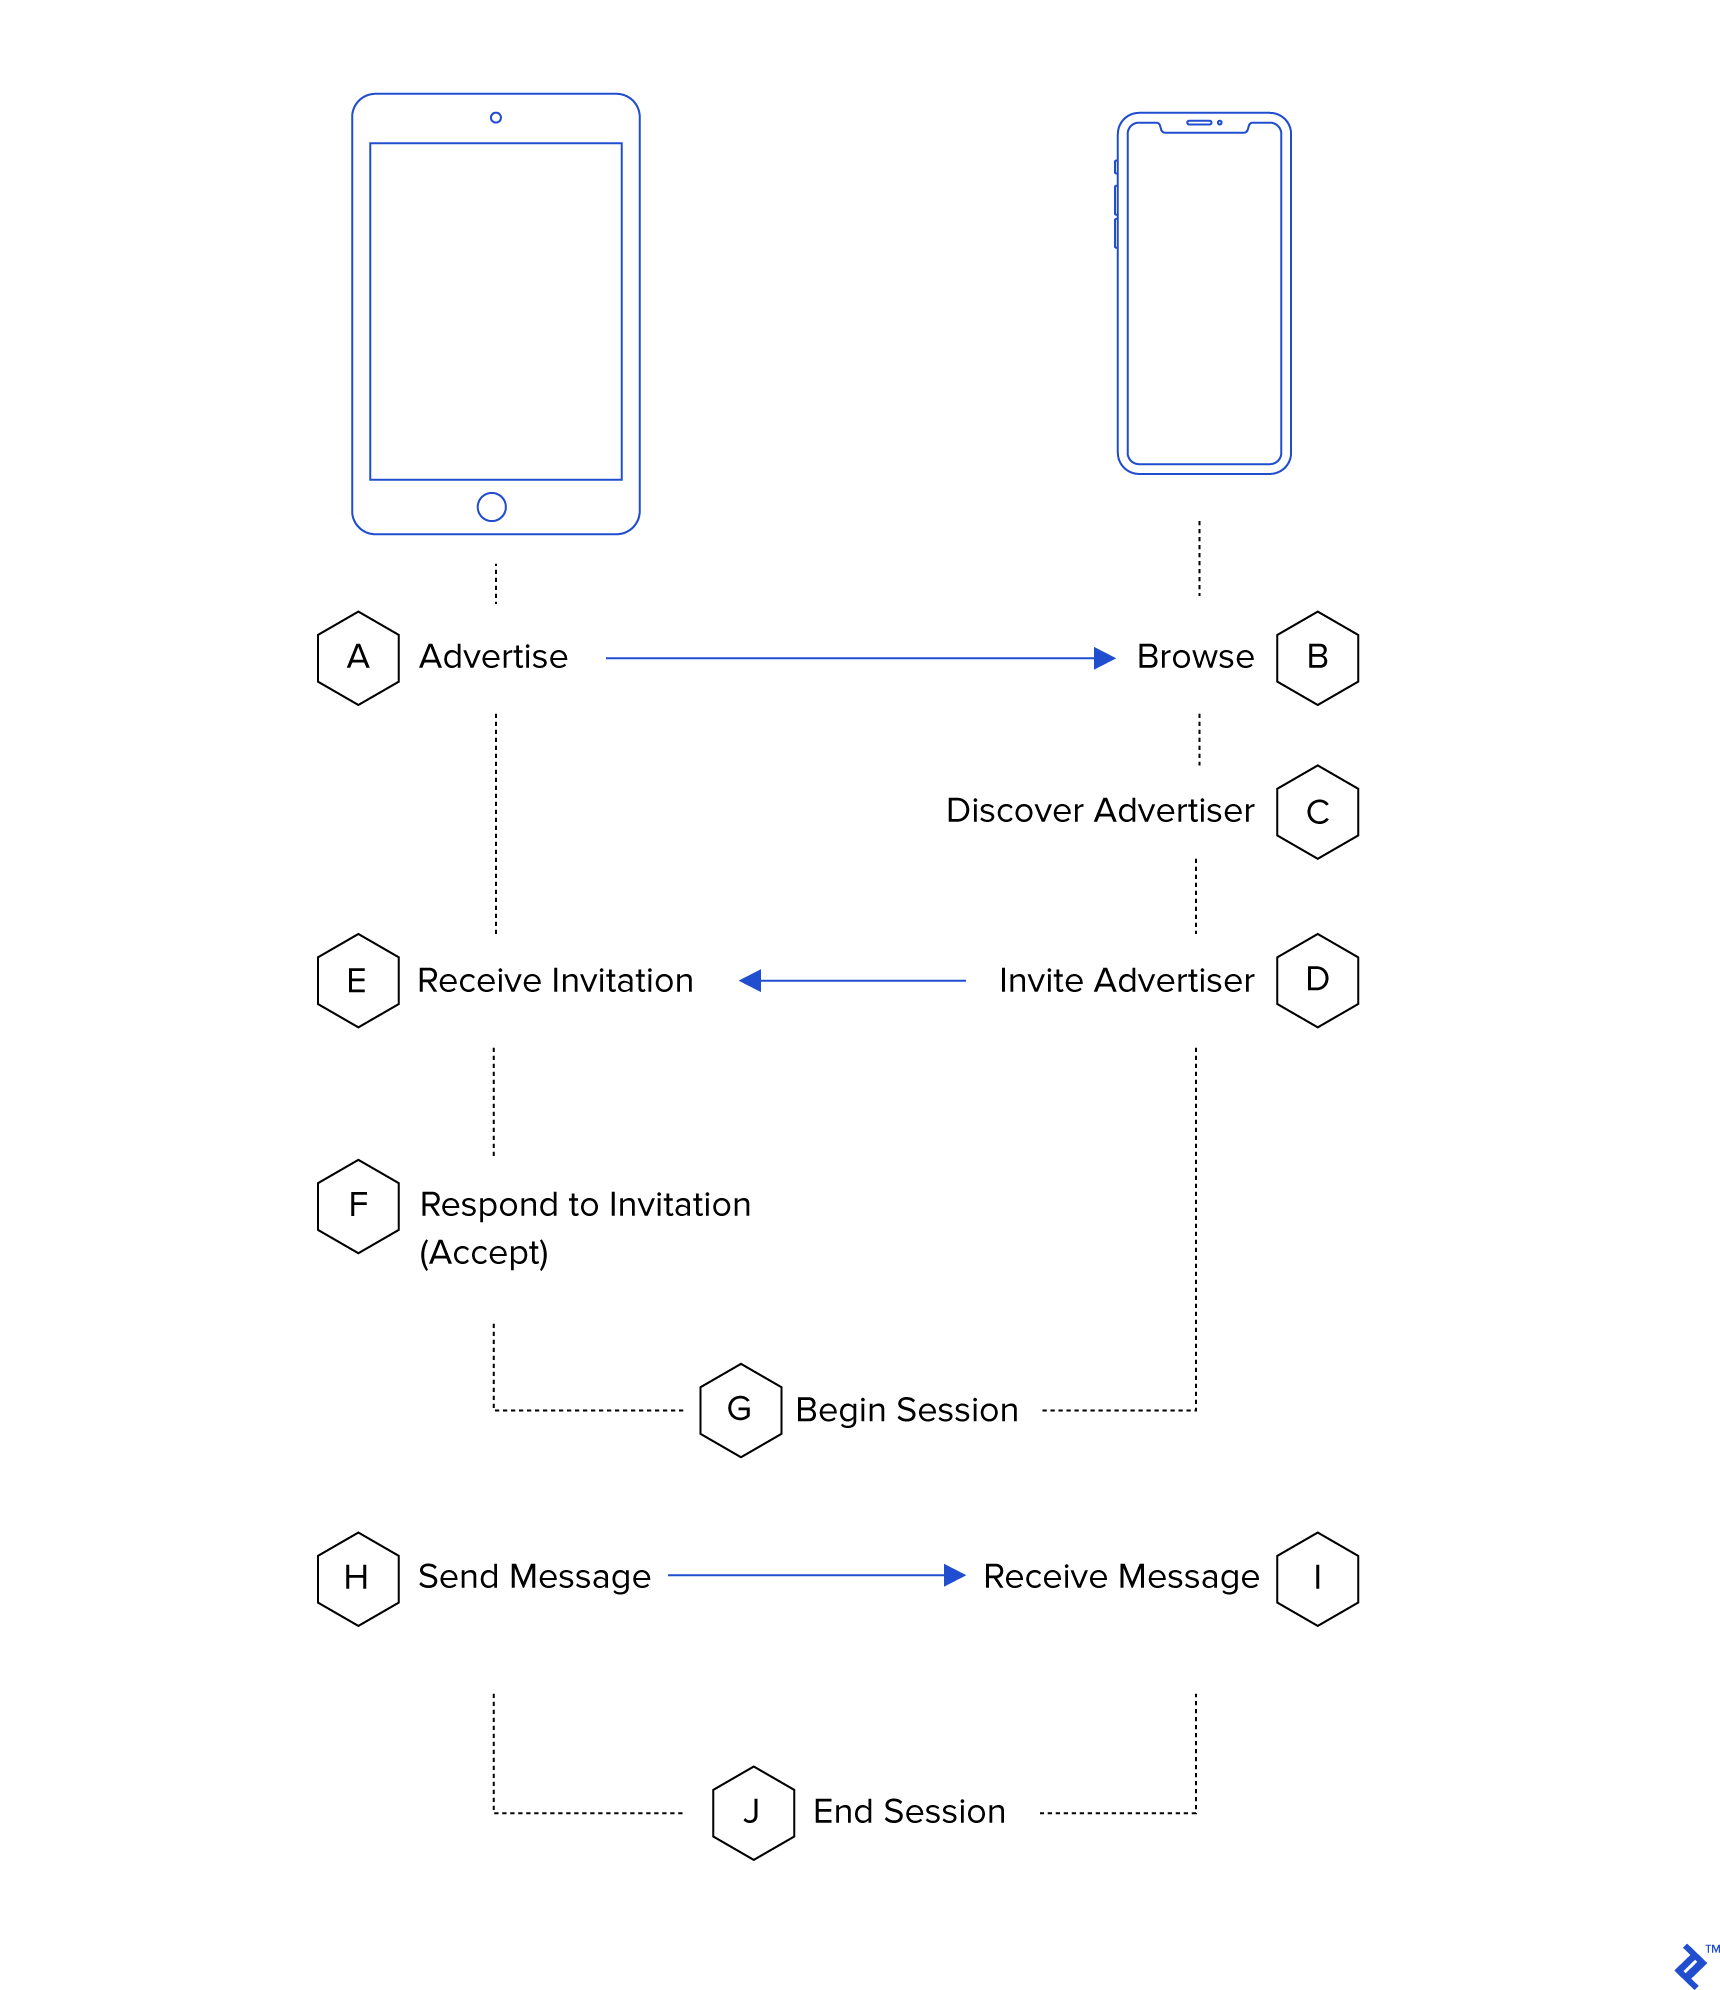
멀티피어 세션 수명 주기:
-
MCNearbyServiceAdvertiser.startAdvertisingForPeers() -
MCNearbyServiceBrowser.startBrowsingForPeers() -
MCNearbyServiceBrowserDelegate.browser(:foundPeer:withDiscoveryInfo:) -
MCNearbyServiceBrowser.invitePeer(...) -
MCNearbyServiceAdvertiserDelegate.didReceiveInvitationFromPeer(...) -
invitationHandler에서didReceiveInvitation를 호출합니다. -
Create the MCSession -
MCSession.send(...) -
MCSessionDelegate.session(_:didReceive:data:peerID) -
MCSession.disconnect()
때때로 이 이미지를 다시 참조하십시오.
MPC 기반 애플리케이션의 구현을 통해 iOS 개발자를 안내한다고 주장하는 수많은 MultipeerConnectivity 튜토리얼과 예제가 있습니다. 그러나 내 경험에 따르면 일반적으로 불완전하며 MPC에서 잠재적인 몇 가지 중요한 걸림돌을 간과하는 경향이 있습니다. 이 기사에서 나는 독자들에게 그러한 앱의 기본적인 구현을 안내하고 내가 막히기 쉬운 영역을 설명하기를 바랍니다.
개념 및 수업
MPC는 소수의 클래스를 기반으로 합니다. 일반적인 것들의 목록을 살펴보고 프레임워크에 대한 이해를 높여봅시다.
-
MCSession– 세션은 연결된 피어 간의 모든 통신을 관리합니다. 세션을 통해 메시지, 파일 및 스트림을 보낼 수 있으며 연결된 피어에서 이들 중 하나가 수신되면 해당 대리인에게 알림이 전송됩니다. -
MCPeerID– 피어 ID를 사용하면 세션 내에서 개별 피어 장치를 식별할 수 있습니다. 연결된 이름이 있지만 주의하십시오. 이름이 같은 피어 ID는 동일한 것으로 간주되지 않습니다(아래 기본 규칙 참조). -
MCNearbyServiceAdvertiser– 광고주를 통해 주변 장치에 서비스 이름을 브로드캐스트할 수 있습니다. 이것은 그들이 당신에게 연결할 수 있습니다. -
MCNearbyServiceBrowser– 브라우저에서MCNearbyServiceAdvertiser를 사용하여 기기를 검색할 수 있습니다. 이 두 클래스를 함께 사용하면 주변 장치를 검색하고 P2P 연결을 만들 수 있습니다. -
MCBrowserViewController– 이것은 (MCNearbyServiceAdvertiser를 통해 판매되는) 주변 장치 서비스를 탐색하기 위한 매우 기본적인 UI를 제공합니다. 일부 사용 사례에는 적합하지만 내 경험에 따르면 MCP의 가장 좋은 측면 중 하나는 매끄럽기 때문에 사용하지 않습니다.
기본 규칙
MPC 네트워크를 구성할 때 염두에 두어야 할 몇 가지 사항이 있습니다.
- 장치는 MCPeerID 개체로 식별됩니다. 이것들은 표면적으로는 래핑된 문자열이며 실제로 간단한 이름으로 초기화할 수 있습니다. 동일한 문자열로 두 개의 MCPeerID를 생성할 수 있지만 동일하지는 않습니다. 따라서 MCPeerID는 복사하거나 다시 생성해서는 안 됩니다. 애플리케이션 내에서 전달되어야 합니다. 필요한 경우 NSArchiver를 사용하여 저장할 수 있습니다.
- 이에 대한 문서가 부족하지만 MCSession을 사용하여 두 개 이상의 장치 간에 통신할 수 있습니다. 그러나 내 경험상 이러한 개체를 활용하는 가장 안정적인 방법은 장치가 상호 작용하는 각 피어에 대해 하나를 만드는 것입니다.
- MPC는 응용 프로그램이 백그라운드에 있는 동안 작동하지 않습니다. 앱이 백그라운드로 설정되어 있을 때 모든 MCSession의 연결을 끊고 해제해야 합니다. 백그라운드 작업에서 최소한의 작업 이상을 시도하거나 수행하지 마십시오.
MultipeerConnectivity 시작하기
네트워크를 구축하기 전에 약간의 정리 작업을 수행한 다음 광고주 및 브라우저 클래스를 설정하여 통신할 수 있는 다른 장치를 검색해야 합니다. 몇 가지 상태 변수(로컬 MCPeerID 및 연결된 장치)를 유지하는 데 사용할 싱글톤을 만든 다음 MCNearbyServiceAdvertiser 및 MCNearbyServiceBrowser 를 만듭니다. 이 마지막 두 객체에는 서비스 유형이 필요하며, 이는 애플리케이션을 식별하는 문자열일 뿐입니다. 16자 미만이어야 하며 최대한 고유해야 합니다(예: "Multipeer"가 아닌 "MyApp-MyCo"). 우리는 브라우저가 읽을 수 있는 것보다 (작은) 사전을 광고주에게 지정하여 주변 장치(예: 게임 유형 또는 장치 역할)를 볼 때 조금 더 많은 정보를 제공할 수 있습니다.
MPC는 시스템 제공 API에 의존하고 실제 객체(다른 장치 및 이들 간의 공유 "네트워크")와 상관 관계가 있으므로 싱글톤 패턴에 적합합니다. 자주 남용되지만 싱글톤은 이와 같은 공유 리소스에 적합합니다.
다음은 싱글톤의 정의입니다.
class MPCManager: NSObject { var advertiser: MCNearbyServiceAdvertiser! var browser: MCNearbyServiceBrowser! static let instance = MPCManager() let localPeerID: MCPeerID let serviceType = "MPC-Testing" var devices: [Device] = [] override init() { if let data = UserDefaults.standard.data(forKey: "peerID"), let id = NSKeyedUnarchiver.unarchiveObject(with: data) as? MCPeerID { self.localPeerID = id } else { let peerID = MCPeerID(displayName: UIDevice.current.name) let data = try? NSKeyedArchiver.archivedData(withRootObject: peerID) UserDefaults.standard.set(data, forKey: "peerID") self.localPeerID = peerID } super.init() self.advertiser = MCNearbyServiceAdvertiser(peer: localPeerID, discoveryInfo: nil, serviceType: self.serviceType) self.advertiser.delegate = self self.browser = MCNearbyServiceBrowser(peer: localPeerID, serviceType: self.serviceType) self.browser.delegate = self } } MCPeerID 를 사용자 기본값에 저장하고( NSKeyedArchiver 를 통해) 재사용한다는 점에 유의하십시오. 위에서 언급했듯이 이것은 중요하며 어떤 식으로든 캐시에 실패하면 모호한 버그가 더 많이 발생할 수 있습니다.
다음은 발견된 장치와 상태를 추적하는 데 사용할 Device 클래스입니다.
class Device: NSObject { let peerID: MCPeerID var session: MCSession? var name: String var state = MCSessionState.notConnected init(peerID: MCPeerID) { self.name = peerID.displayName self.peerID = peerID super.init() } func invite() { browser.invitePeer(self.peerID, to: self.session!, withContext: nil, timeout: 10) } }이제 초기 클래스를 구축했으므로 뒤로 물러나 브라우저와 광고주 간의 상호 작용에 대해 생각할 때입니다. MPC에서 장치는 제공하는 서비스를 알릴 수 있고 다른 장치에서 관심 있는 서비스를 검색할 수 있습니다. 우리는 앱만 사용하는 기기 간 통신에 중점을 두고 있기 때문에 동일한 서비스를 광고하고 검색할 것입니다.
기존의 클라이언트/서버 구성에서 하나의 장치(서버)는 서비스를 알리고 클라이언트는 서비스를 찾습니다. 우리는 평등주의자이기 때문에 장치에 대한 역할을 지정하고 싶지 않습니다. 우리는 모든 장치가 광고하고 탐색하도록 할 것입니다.
MPCManager 에 메서드를 추가하여 장치가 검색될 때 장치를 만들고 장치 배열에서 추적해야 합니다. 우리의 방법은 MCPeerID 를 취하고 해당 ID를 가진 기존 장치를 찾고 발견하면 반환합니다. 기존 장치가 없으면 새 장치를 만들고 장치 배열에 추가합니다.
func device(for id: MCPeerID) -> Device { for device in self.devices { if device.peerID == id { return device } } let device = Device(peerID: id) self.devices.append(device) return device } 장치가 광고를 시작한 후 다른 검색 장치가 연결을 시도할 수 있습니다. 이 경우 광고주로부터 들어오는 대리자 호출을 처리하기 위해 MPCSession 클래스에 대리자 메서드를 추가해야 합니다.
extension MPCManager: MCNearbyServiceAdvertiserDelegate { func advertiser(_ advertiser: MCNearbyServiceAdvertiser, didReceiveInvitationFromPeer peerID: MCPeerID, withContext context: Data?, invitationHandler: @escaping (Bool, MCSession?) -> Void) { let device = MPCManager.instance.device(for: peerID) device.connect() invitationHandler(true, device.session) } }… MCSession을 생성하는 장치의 방법:

func connect() { if self.session != nil { return } self.session = MCSession(peer: MPCManager.instance.localPeerID, securityIdentity: nil, encryptionPreference: .required) self.session?.delegate = self }… 그리고 마지막으로 브라우저가 광고주를 발견할 때 초대를 트리거하는 방법:
extension MPCManager: MCNearbyServiceBrowserDelegate { func browser(_ browser: MCNearbyServiceBrowser, foundPeer peerID: MCPeerID, withDiscoveryInfo info: [String : String]?) { let device = MPCManager.instance.device(for: peerID) device.invite(with: self.browser) } 지금은 withDiscoveryInfo 인수를 무시하고 있습니다. 우리는 이것을 사용하여 그들이 사용 가능하게 만든 것을 기반으로 특정 장치를 걸러낼 수 있습니다(위의 MCNearbyServiceAdvertiser 에 대한 discoveryInfo 인수에서 제공한 것과 동일한 사전입니다).
장치 연결
이제 모든 집안일을 처리했으므로 장치를 연결하는 실제 비즈니스를 시작할 수 있습니다.
MPCSession의 init 메소드에서 광고주와 대리자를 모두 설정합니다. 연결을 시작할 준비가 되면 둘 다 시작해야 합니다. 이는 App 대리자의 didFinishLaunching 메소드에서 또는 적절한 경우 언제든지 수행할 수 있습니다. 다음은 클래스에 추가할 start() 메서드입니다.
func start() { self.advertiser.startAdvertisingPeer() self.browser.startBrowsingForPeers() }이러한 호출은 앱이 WiFi를 통해 자신의 존재를 방송하기 시작한다는 것을 의미합니다. 이것이 작동하기 위해 WiFi 네트워크에 연결할 필요는 없습니다(그러나 켜져 있어야 함).
장치가 초대에 응답하고 MCSession을 시작하면 세션에서 대리인 콜백을 받기 시작합니다. 우리는 그것들에 대한 핸들러를 우리의 장치 객체에 추가할 것입니다. 그들 중 대부분은 당분간 무시할 것입니다.
extension Device: MCSessionDelegate { public func session(_ session: MCSession, peer peerID: MCPeerID, didChange state: MCSessionState) { self.state = state NotificationCenter.default.post(name: Multipeer.Notifications.deviceDidChangeState, object: self) } public func session(_ session: MCSession, didReceive data: Data, fromPeer peerID: MCPeerID) { } public func session(_ session: MCSession, didReceive stream: InputStream, withName streamName: String, fromPeer peerID: MCPeerID) { } public func session(_ session: MCSession, didStartReceivingResourceWithName resourceName: String, fromPeer peerID: MCPeerID, with progress: Progress) { } public func session(_ session: MCSession, didFinishReceivingResourceWithName resourceName: String, fromPeer peerID: MCPeerID, at localURL: URL?, withError error: Error?) { } } 당분간은 주로 session(_:peer:didChangeState:) 콜백에 관심이 있습니다. 이것은 장치가 새로운 상태( notConnected , connecting 및 connected )로 전환될 때마다 호출됩니다. 연결된 모든 장치의 목록을 작성할 수 있도록 이를 추적하고 싶습니다.
extension MPCManager { var connectedDevices: [Device] { return self.devices.filter { $0.state == .connected } } }메시지 보내기
이제 모든 장치가 연결되었으므로 실제로 메시지를 주고받을 차례입니다. MPC는 이와 관련하여 세 가지 옵션을 제공합니다.
- 바이트 블록(데이터 개체)을 보낼 수 있습니다.
- 우리는 파일을 보낼 수 있습니다
- 다른 장치에 대한 스트림을 열 수 있습니다.
단순화를 위해 이러한 옵션 중 첫 번째 옵션만 살펴보겠습니다. 우리는 간단한 메시지를 앞뒤로 보낼 것이고 메시지 유형, 형식 등의 복잡성에 대해 너무 걱정하지 않을 것입니다. 우리는 다음과 같은 메시지를 캡슐화하기 위해 Codable 구조를 사용할 것입니다:
struct Message: Codable { let body: String }또한 다음 중 하나를 보내도록 장치에 확장 프로그램을 추가합니다.
extension Device { func send(text: String) throws { let message = Message(body: text) let payload = try JSONEncoder().encode(message) try self.session?.send(payload, toPeers: [self.peerID], with: .reliable) } } ~~~swift Finally, we'll need to modify our `Device.session(_:didReceive:fromPeer)` code to receive the message, parse it, and notify any interested objects about it:static let messageReceivedNotification = Notification.Name("DeviceDidReceiveMessage") public func session(_ session: MCSession, didReceive data: Data, fromPeer peerID: MCPeerID) { if let message = try? JSONDecoder().decode(Message.self, from: data) { NotificationCenter.default.post(name: Device.messageReceivedNotification, object: message, userInfo: ["from": self]) } }
## Disconnections Now that we've got a connection created between multiple devices, we have to be able to both disconnect on demand and also handle system interruptions. One of the undocumented weaknesses of MPC is that it doesn't function in the background. We need to observe the `UIApplication.didEnterBackgroundNotification` notification, and make sure that we shut down all our sessions. Failure to do this will lead to undefined states in the sessions and devices and can cause lots of confusing, hard-to-track-down errors. There is a temptation to use a background task to keep your sessions around, in case the user jumps back into your app. However, this is a bad idea, as MPC will usually fail within the first second of being backgrounded. When your app returns to the foreground, you can rely on MPC's delegate methods to rebuild your connections. In our MPCSession's `start()` method, we'll want to observe this notification and add code to handle it and shut down all our sessions. ~~~swift func start() { self.advertiser.startAdvertisingPeer() self.browser.startBrowsingForPeers() NotificationCenter.default.addObserver(self, selector: #selector(enteredBackground), name: Notification.Name.UIApplicationDidEnterBackground, object: nil) } @objc func enteredBackground() { for device in self.devices { device.disconnect() } } func disconnect() { self.session?.disconnect() self.session = nil }결론
이 기사에서는 MultipeerConnectivity 기반 애플리케이션의 네트워킹 구성 요소를 구축하는 데 필요한 아키텍처를 다룹니다. 전체 소스 코드(Github에서 사용 가능)는 연결된 장치를 보고 장치 간에 메시지를 보낼 수 있는 최소 사용자 인터페이스 래퍼를 제공합니다.
MPC는 WiFi 네트워크, Bluetooth 또는 복잡한 클라이언트/서버 체조에 대해 걱정할 필요 없이 주변 장치 간에 거의 원활한 연결을 제공합니다. 짧은 게임 세션을 위해 몇 대의 전화기를 빠르게 페어링하거나 공유를 위해 두 대의 장치를 연결하는 것은 일반적인 Apple 방식으로 수행됩니다.
이 프로젝트의 소스 코드는 https://github.com/bengottlieb/MultipeerExample의 Github에서 사용할 수 있습니다.
AFNetworking을 사용하는 iOS를 설계하시겠습니까? MVC(Model-View-Controller) 디자인 패턴은 유지보수 코드베이스에 적합하지만 DRY 코드, 중앙 집중식 네트워킹 로깅, 특히 속도 제한과 같은 문제로 인해 네트워킹을 처리하기 위해 단일 클래스가 필요할 때도 있습니다. iOS Centralized and Decoupled Networking: AFNetworking Tutorial 에서 Singleton 클래스로 이를 처리하는 방법에 대해 모두 읽어보세요.