
Vue.jsでの認証
公開: 2022-03-10認証は、ユーザーデータを保存するアプリケーションにとって非常に必要な機能です。 これは、ユーザーのIDを確認し、許可されていないユーザーが他のユーザーに属する個人データにアクセスできないようにするプロセスです。 これにより、認証されたユーザーのみがアクセスできるルートが制限されます。 これらの認証されたユーザーは、ログインの詳細(つまり、ユーザー名/電子メールとパスワード)を使用し、アプリケーションの保護されたリソースにアクセスするために使用されるトークンをユーザーに割り当てることによって検証されます。
この記事では、次のことについて学習します。
- Axiosを使用したVuex構成
- ルートの定義
- ユーザーの処理
- 期限切れのトークンの処理
依存関係
認証に役立つ次の依存関係を処理します。
- アクシオス
APIからデータを送信および取得するため - Vuex
APIから取得したデータを保存するため - Vue-ルーター
ルートのナビゲーションと保護用
これらのツールを使用して、これらのツールがどのように連携してアプリに堅牢な認証機能を提供できるかを確認します。
バックエンドAPI
このAPIを利用した簡単なブログサイトを構築します。 ドキュメントをチェックして、エンドポイントとリクエストの送信方法を確認できます。
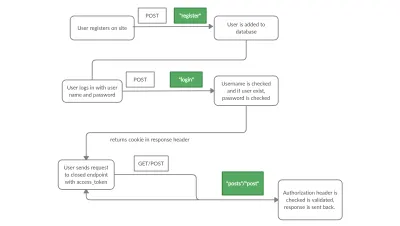
ドキュメントから、いくつかのエンドポイントがロックで接続されていることがわかります。 これは、許可されたユーザーのみがこれらのエンドポイントにリクエストを送信できることを示す方法です。 制限のないエンドポイントは、 /registerエンドポイントと/loginエンドポイントです。 認証されていないユーザーが制限されたエンドポイントにアクセスしようとすると、ステータスコード401のエラーが返されます。
ユーザーのログインに成功すると、一部のデータと一緒にアクセストークンがVueアプリで受信されます。これは、Cookieの設定に使用され、今後のリクエストで使用されるリクエストヘッダーに添付されます。 バックエンドは、制限されたエンドポイントに対してリクエストが行われるたびに、リクエストヘッダーをチェックします。 アクセストークンをローカルストレージに保存しようとしないでください。
足場プロジェクト
Vue CLIを使用して、以下のコマンドを実行してアプリケーションを生成します。
vue create auth-project新しいフォルダに移動します。
cd auth-projectvue-routerを追加し、さらに依存関係をインストールします— vuexとaxios:
vue add router npm install vuex axiosプロジェクトを実行すると、ブラウザに以下の内容が表示されます。
npm run serve1.Axiosを使用したVuex構成
Axiosは、ブラウザからAPIにリクエストを送信するために使用されるJavaScriptライブラリです。 Vuexのドキュメントによると;
「Vuexは、Vue.jsアプリケーション用の状態管理パターン+ライブラリです。 これは、アプリケーション内のすべてのコンポーネントの集中ストアとして機能し、状態を予測可能な方法でのみ変更できるようにするルールを備えています。」
どういう意味ですか? Vuexは、Vueアプリケーションで使用されるストアであり、すべてのコンポーネントで利用できるデータを保存し、そのようなデータを変更する方法を提供します。 VuexのAxiosを使用してリクエストを送信し、状態(データ)を変更します。 AxiosはVuex actionsでGETとPOSTを送信するために使用され、取得された応答はミューmutationsに情報を送信する際に使用され、ストアデータを更新します。
更新後のVuexのリセットに対処するために、ページの再読み込みの間にVuexデータを保存するライブラリであるvuex-persistedstateを使用します。
npm install --save vuex-persistedstate 次に、Vuexストアを構成するために、 srcに新しいフォルダーstoreを作成しましょう。 storeフォルダーに、新しいフォルダーを作成します。 modulesとファイルindex.js 。 これを行う必要があるのは、フォルダが自動的に作成されない場合のみであることに注意してください。
import Vuex from 'vuex'; import Vue from 'vue'; import createPersistedState from "vuex-persistedstate"; import auth from './modules/auth'; // Load Vuex Vue.use(Vuex); // Create store export default new Vuex.Store({ modules: { auth }, plugins: [createPersistedState()] }); ここでは、 Vuexを利用して、 modulesフォルダーからストアに認証moduleをインポートしています。
モジュール
モジュールは、次のような同様のタスクを一緒に処理するストアのさまざまなセグメントです。
- 州
- 行動
- 突然変異
- ゲッター
先に進む前に、 main.jsファイルを編集しましょう。
import Vue from 'vue' import App from './App.vue' import router from './router'; import store from './store'; import axios from 'axios'; axios.defaults.withCredentials = true axios.defaults.baseURL = 'https://gabbyblog.herokuapp.com/'; Vue.config.productionTip = false new Vue({ store, router, render: h => h(App) }).$mount('#app') ./storeフォルダーとAxiosパッケージからstoreオブジェクトをインポートしました。
前述のように、APIから取得したアクセストークンCookieおよびその他の必要なデータは、将来のリクエストのリクエストヘッダーに設定する必要があります。 リクエストを行うときにAxiosを利用するため、これを利用するようにAxiosを構成する必要があります。 上記のスニペットでは、 axios.defaults.withCredentials = trueを使用してこれを行います。これは、デフォルトではCookieがAxiosによって渡されないために必要です。
aaxios.defaults.withCredentials = trueは、次のような資格情報を使用してすべてのリクエストを送信するようにAxiosに指示します。 承認ヘッダー、TLSクライアント証明書、またはCookie(この場合のように)。
APIへのAxiosリクエストのaxios.defaults.baseURLを設定します。このようにして、Axios経由で送信する場合は常に、このベースURLを使用します。 これにより、毎回完全なURLを指定しなくても、 /registerや/loginなどのエンドポイントだけをアクションに追加できます。
storeのmodulesフォルダー内に、 auth.jsというファイルを作成します。
//store/modules/auth.js import axios from 'axios'; const state = { }; const getters = { }; const actions = { }; const mutations = { }; export default { state, getters, actions, mutations }; state
state辞書では、データとそのデフォルト値を定義します。
const state = { user: null, posts: null, }; stateのデフォルト値を設定しています。これは、初期値がnullのuserとpostsを含むオブジェクトです。
行動
アクションは、状態を変更するためにミューテーションをcommitするために使用される関数、またはdispatchするために使用できる、つまり別のアクションを呼び出すために使用される関数です。 さまざまなコンポーネントまたはビューで呼び出すことができ、その後、状態の変更をコミットします。
アクションの登録
Registerアクションはフォームデータを受け取り、データを/registerエンドポイントに送信し、応答を変数responseに割り当てます。 次に、フォームのusernameとpasswordをloginアクションにディスパッチします。 このように、ユーザーがサインアップした後にログインするため、ユーザーは/postsページにリダイレクトされます。
async Register({dispatch}, form) { await axios.post('register', form) let UserForm = new FormData() UserForm.append('username', form.username) UserForm.append('password', form.password) await dispatch('LogIn', UserForm) },ログインアクション
ここで主な認証が行われます。 ユーザーがユーザー名とパスワードを入力すると、FormDataオブジェクトであるUserに渡され、 LogIn関数はUserオブジェクトを受け取り、 /loginエンドポイントにPOSTリクエストを送信してユーザーにログインします。
Login関数は、最終的にusernameをsetUserミューテーションにコミットします。
async LogIn({commit}, User) { await axios.post('login', User) await commit('setUser', User.get('username')) },投稿アクションの作成
CreatePostアクションは、 postを受け取り、それを/postエンドポイントに送信してから、 GetPostsアクションをディスパッチする関数です。 これにより、ユーザーは作成後に自分の投稿を表示できます。
async CreatePost({dispatch}, post) { await axios.post('post', post) await dispatch('GetPosts') },投稿アクションを取得
GetPostsアクションはGETリクエストを/postsエンドポイントに送信して、APIで投稿をフェッチし、 setPostsミューテーションをコミットします。
async GetPosts({ commit }){ let response = await axios.get('posts') commit('setPosts', response.data) },ログアウトアクション
async LogOut({commit}){ let user = null commit('logout', user) } LogOutアクションは、 userをブラウザーのキャッシュから削除します。 これは、 logoutをコミットすることによって行われます。
突然変異
const mutations = { setUser(state, username){ state.user = username }, setPosts(state, posts){ state.posts = posts }, LogOut(state){ state.user = null state.posts = null }, }; 各ミューテーションは、 Logoutを除いて、それをコミットするアクションからstateと値を受け取ります。 取得した値は、 LogOutの特定の部分またはすべてを変更するために使用され、すべての変数をnullに戻します。
ゲッター
ゲッターは、状態を取得するための機能です。 複数のコンポーネントで使用して、現在の状態を取得できます。 isAuthenticatated関数は、 state.userが定義されているかnullであるかをチェックし、それぞれtrueまたはfalseを返します。 StatePostsとStateUserは、それぞれstate.postsとstate.user値を返します。
const getters = { isAuthenticated: state => !!state.user, StatePosts: state => state.posts, StateUser: state => state.user, }; これで、 auth.jsファイル全体がGitHubの私のコードに似ているはずです。
コンポーネントの設定
NavBar.vueおよびApp.vueコンポーネント
src/componentsフォルダーで、 HelloWorld.vueとNavBar.vueという名前の新しいファイルを削除します。
これはナビゲーションバーのコンポーネントであり、ここにルーティングされたコンポーネントのさまざまなページにリンクしています。 各ルーターリンクは、アプリのルート/ページを指しています。
v-if="isLoggedIn"は、ユーザーがログインしている場合にLogoutリンクを表示し、 RegisterルートとLoginルートを非表示にする条件です。 サインインしたユーザーのみがアクセスできるlogoutメソッドがあります。これは、[ Logoutリンクをクリックすると呼び出されます。 LogOutアクションをディスパッチしてから、ユーザーをログインページに誘導します。
<template> <div> <router-link to="/">Home</router-link> | <router-link to="/posts">Posts</router-link> | <span v-if="isLoggedIn"> <a @click="logout">Logout</a> </span> <span v-else> <router-link to="/register">Register</router-link> | <router-link to="/login">Login</router-link> </span> </div> </template> <script> export default { name: 'NavBar', computed : { isLoggedIn : function(){ return this.$store.getters.isAuthenticated} }, methods: { async logout (){ await this.$store.dispatch('LogOut') this.$router.push('/login') } }, } </script> <style> #nav { padding: 30px; } #nav a { font-weight: bold; color: #2c3e50; } a:hover { cursor: pointer; } #nav a.router-link-exact-active { color: #42b983; } </style> 次に、 App.vueコンポーネントを次のように編集します。
<template> <div> <NavBar /> <router-view/> </div> </template> <script> // @ is an alias to /src import NavBar from '@/components/NavBar.vue' export default { components: { NavBar } } </script> <style> #app { font-family: Avenir, Helvetica, Arial, sans-serif; -webkit-font-smoothing: antialiased; -moz-osx-font-smoothing: grayscale; text-align: center; color: #2c3e50; } </style> ここでは、上記で作成したNavBarコンポーネントをインポートし、 <router-view />前のテンプレートセクションに配置しました。
2.ビューコンポーネント
ビューコンポーネントは、ルートの下で定義され、ナビゲーションバーからアクセスできるアプリのさまざまなページです。 開始するにはviewsフォルダーに移動し、 About.vueコンポーネントを削除して、次のコンポーネントを追加します。
-
Home.vue -
Register.vue -
Login.vue -
Posts.vue
Home.vue
Home.vueを次のように書き直します。
<template> <div class="home"> <p>Heyyyyyy welcome to our blog, check out our posts</p> </div> </template> <script> export default { name: 'Home', components: { } } </script>これにより、ユーザーがホームページにアクセスしたときにウェルカムテキストが表示されます。
Register.vue
これは、ユーザーがアプリケーションにサインアップできるようにするページです。 ユーザーがフォームに入力すると、ユーザーの情報がAPIに送信され、データベースに追加されてからログインします。
APIを見ると、 /registerエンドポイントには、ユーザーのusername 、 full_name 、およびpasswordが必要です。 次に、これらの情報を取得するためのページとフォームを作成しましょう。

<template> <div class="register"> <div> <form @submit.prevent="submit"> <div> <label for="username">Username:</label> <input type="text" name="username" v-model="form.username"> </div> <div> <label for="full_name">Full Name:</label> <input type="text" name="full_name" v-model="form.full_name"> </div> <div> <label for="password">Password:</label> <input type="password" name="password" v-model="form.password"> </div> <button type="submit"> Submit</button> </form> </div> <p v-if="showError">Username already exists</p> </div> </template> Registerコンポーネントでは、フォームデータを受信するRegisterアクションを呼び出す必要があります。
<script> import { mapActions } from "vuex"; export default { name: "Register", components: {}, data() { return { form: { username: "", full_name: "", password: "", }, showError: false }; }, methods: { ...mapActions(["Register"]), async submit() { try { await this.Register(this.form); this.$router.push("/posts"); this.showError = false } catch (error) { this.showError = true } }, }, }; </script> まず、 mapActionsからmapActionsをインポートします。これは、ストアからコンポーネントにアクションをインポートすることです。 これにより、コンポーネントからアクションを呼び出すことができます。
data()には、このコンポーネントで使用されるローカル状態値が含まれています。 username 、 full_name 、およびpasswordを含むformオブジェクトがあり、初期値は空の文字列に設定されています。 エラーを表示するかどうかを指定するために使用されるブール値であるshowErrorもあります。
methodsでは、Mapactionsを使用してRegisterアクションをコンポーネントにインポートするため、 Mapactionsを使用してRegisterアクションをthis.Registerことができます。
this.Registerを使用してアクセスできるRegisterアクションを呼び出すsubmitメソッドがあり、 this.Registerを送信しthis.form 。 errorが発生しなかった場合は、 this.$routerを使用してユーザーをログインページに送信します。 それ以外の場合は、 showErrorをtrueに設定します。
それが済んだら、いくつかのスタイリングを含めることができます。
<style scoped> * { box-sizing: border-box; } label { padding: 12px 12px 12px 0; display: inline-block; } button[type=submit] { background-color: #4CAF50; color: white; padding: 12px 20px; cursor: pointer; border-radius:30px; } button[type=submit]:hover { background-color: #45a049; } input { margin: 5px; box-shadow:0 0 15px 4px rgba(0,0,0,0.06); padding:10px; border-radius:30px; } #error { color: red; } </style> Login.vue
ログインページは、登録ユーザーがAPIによって認証され、サイトにログインするためのusernameとpasswordを入力する場所です。
<template> <div class="login"> <div> <form @submit.prevent="submit"> <div> <label for="username">Username:</label> <input type="text" name="username" v-model="form.username" /> </div> <div> <label for="password">Password:</label> <input type="password" name="password" v-model="form.password" /> </div> <button type="submit">Submit</button> </form> <p v-if="showError">Username or Password is incorrect</p> </div> </div> </template> 次に、フォームデータをリクエストを送信するアクションに渡してから、安全なページのPostsにプッシュする必要があります。
<script> import { mapActions } from "vuex"; export default { name: "Login", components: {}, data() { return { form: { username: "", password: "", }, showError: false }; }, methods: { ...mapActions(["LogIn"]), async submit() { const User = new FormData(); User.append("username", this.form.username); User.append("password", this.form.password); try { await this.LogIn(User); this.$router.push("/posts"); this.showError = false } catch (error) { this.showError = true } }, }, }; </script> Mapactionsをインポートし、それを使用してLogInアクションをコンポーネントにインポートします。これはsubmit関数で使用されます。
Loginアクションの後、ユーザーは/postsページにリダイレクトされます。 エラーの場合、エラーがキャッチされ、 ShowErrorがtrueに設定されます。
さて、いくつかのスタイリング:
<style scoped> * { box-sizing: border-box; } label { padding: 12px 12px 12px 0; display: inline-block; } button[type=submit] { background-color: #4CAF50; color: white; padding: 12px 20px; cursor: pointer; border-radius:30px; } button[type=submit]:hover { background-color: #45a049; } input { margin: 5px; box-shadow:0 0 15px 4px rgba(0,0,0,0.06); padding:10px; border-radius:30px; } #error { color: red; } </style> Posts.vue
投稿ページは、認証されたユーザーのみが利用できる保護されたページです。 このページでは、APIのデータベース内の投稿にアクセスできます。 これにより、ユーザーは投稿にアクセスできるようになり、APIへの投稿を作成することもできます。
<template> <div class="posts"> <div v-if="User"> <p>Hi {{User}}</p> </div> <div> <form @submit.prevent="submit"> <div> <label for="title">Title:</label> <input type="text" name="title" v-model="form.title"> </div> <div> <textarea name="write_up" v-model="form.write_up" placeholder="Write up..."></textarea> </div> <button type="submit"> Submit</button> </form> </div> <div class="posts" v-if="Posts"> <ul> <li v-for="post in Posts" :key="post.id"> <div> <p>{{post.title}}</p> <p>{{post.write_up}}</p> <p>Written By: {{post.author.username}}</p> </div> </li> </ul> </div> <div v-else> Oh no!!! We have no posts </div> </div> </template>上記のコードには、ユーザーが新しい投稿を作成できるようにするためのフォームがあります。 フォームを送信すると、投稿がAPIに送信されます。これを行うメソッドをすぐに追加します。 APIから取得した投稿を表示するセクションもあります(ユーザーが持っている場合)。 ユーザーに投稿がない場合は、投稿がないというメッセージを表示するだけです。
StateUserゲッターとStatePostsゲッターはマッピングされます。つまり、 Posts.vueを使用してmapGettersにインポートされ、テンプレートで呼び出すことができます。
<script> import { mapGetters, mapActions } from "vuex"; export default { name: 'Posts', components: { }, data() { return { form: { title: '', write_up: '', } }; }, created: function () { // a function to call getposts action this.GetPosts() }, computed: { ...mapGetters({Posts: "StatePosts", User: "StateUser"}), }, methods: { ...mapActions(["CreatePost", "GetPosts"]), async submit() { try { await this.CreatePost(this.form); } catch (error) { throw "Sorry you can't make a post now!" } }, } }; </script> formの初期状態があります。これは、 titleとwrite_upをキーとして持ち、値が空の文字列に設定されているオブジェクトです。 これらの値は、ユーザーがコンポーネントのテンプレートセクションのフォームに入力したものに変更されます。
ユーザーが投稿を送信すると、フォームオブジェクトを受け取るthis.CreatePostが呼び出されます。
createdライフサイクルでわかるように、コンポーネントの作成時に投稿をフェッチするためのthis.GetPostsがあります。
いくつかのスタイリング、
<style scoped> * { box-sizing: border-box; } label { padding: 12px 12px 12px 0; display: inline-block; } button[type=submit] { background-color: #4CAF50; color: white; padding: 12px 20px; cursor: pointer; border-radius:30px; margin: 10px; } button[type=submit]:hover { background-color: #45a049; } input { width:60%; margin: 15px; border: 0; box-shadow:0 0 15px 4px rgba(0,0,0,0.06); padding:10px; border-radius:30px; } textarea { width:75%; resize: vertical; padding:15px; border-radius:15px; border:0; box-shadow:0 0 15px 4px rgba(0,0,0,0.06); height:150px; margin: 15px; } ul { list-style: none; } #post-div { border: 3px solid #000; width: 500px; margin: auto; margin-bottom: 5px;; } </style>2.ルートの定義
router/index.jsファイルで、ビューをインポートし、各ビューのルートを定義します
import Vue from 'vue' import VueRouter from 'vue-router' import store from '../store'; import Home from '../views/Home.vue' import Register from '../views/Register' import Login from '../views/Login' import Posts from '../views/Posts' Vue.use(VueRouter) const routes = [ { path: '/', name: 'Home', component: Home }, { path: '/register', name: "Register", component: Register, meta: { guest: true }, }, { path: '/login', name: "Login", component: Login, meta: { guest: true }, }, { path: '/posts', name: Posts, component: Posts, meta: {requiresAuth: true}, } ] const router = new VueRouter({ mode: 'history', base: process.env.BASE_URL, routes }) export default router3.ユーザーの処理
- 許可されていないユーザー
投稿ルートの定義で気付いた場合は、ユーザーを認証する必要があることを示すmetaを追加しました。ここで、router.BeforeEachが必要です。ルートにmeta: {requiresAuth: true}キー。 ルートにmetaがある場合、ストアでトークンをチェックします。 存在する場合は、loginルートにリダイレクトします。
const router = new VueRouter({ mode: 'history', base: process.env.BASE_URL, routes }) router.beforeEach((to, from, next) => { if(to.matched.some(record => record.meta.requiresAuth)) { if (store.getters.isAuthenticated) { next() return } next('/login') } else { next() } }) export default router- 許可されたユーザー
/registerルートと/loginルートにもmetaがあります。meta: {guest: true}guest、ログインしているユーザーがゲストメタを使用してルートにアクセスするのを防ぎます。
router.beforeEach((to, from, next) => { if (to.matched.some((record) => record.meta.guest)) { if (store.getters.isAuthenticated) { next("/posts"); return; } next(); } else { next(); } });最終的に、ファイルは次のようになります。
import Vue from "vue"; import VueRouter from "vue-router"; import store from "../store"; import Home from "../views/Home.vue"; import Register from "../views/Register"; import Login from "../views/Login"; import Posts from "../views/Posts"; Vue.use(VueRouter); const routes = [ { path: "/", name: "Home", component: Home, }, { path: "/register", name: "Register", component: Register, meta: { guest: true }, }, { path: "/login", name: "Login", component: Login, meta: { guest: true }, }, { path: "/posts", name: "Posts", component: Posts, meta: { requiresAuth: true }, }, ]; const router = new VueRouter({ mode: "history", base: process.env.BASE_URL, routes, }); router.beforeEach((to, from, next) => { if (to.matched.some((record) => record.meta.requiresAuth)) { if (store.getters.isAuthenticated) { next(); return; } next("/login"); } else { next(); } }); router.beforeEach((to, from, next) => { if (to.matched.some((record) => record.meta.guest)) { if (store.getters.isAuthenticated) { next("/posts"); return; } next(); } else { next(); } }); export default router;4.期限切れのトークンの処理(禁止されたリクエスト)
APIは30分後にトークンを期限切れにするように設定されています。30分後にpostsページにアクセスしようとすると、 401エラーが発生します。これは、再度ログインする必要があることを意味するため、 401エラーが発生すると、 loginページにリダイレクトされます。
main.jsファイルのAxiosデフォルトURL宣言の後に、以下のスニペットを追加します。
axios.interceptors.response.use(undefined, function (error) { if (error) { const originalRequest = error.config; if (error.response.status === 401 && !originalRequest._retry) { originalRequest._retry = true; store.dispatch('LogOut') return router.push('/login') } } })これにより、コードがGitHubの例と同じ状態になります。
結論
最後までフォローできれば、完全に機能する安全なフロントエンドアプリケーションを構築できるはずです。 これで、Vuexと、VuexをAxiosと統合する方法、およびリロード後にデータを保存する方法について詳しく学びました。
コードはGitHubで入手できます→
ホストされているサイト:
https://nifty-hopper-1e9895.netlify.app/://nifty-hopper-1e9895.netlify.app/API:
https://gabbyblog.herokuapp.com://gabbyblog.herokuapp.comAPIドキュメント:
https://gabbyblog.herokuapp.com/docs://gabbyblog.herokuapp.com/docs
資力
- 「Axiosを使用したCookieの処理」、Aditya Srivastava、Medium
- 「Vueでの認証ナビゲーションガードの作成」、Laurie Barth、Ten Mile Square Blog
- 「Vuex入門」公式ガイド
- 「VuexとVueルーターを使用したVue.jsJWT認証」、BezKoder