
Wie erstelle ich mit wenigen einfachen Schritten die erste Spring Boot HelloWorld-Anwendung in IntelliJ IDEA?
Veröffentlicht: 2020-08-18
Hallo Leser – In diesem Tutorial gehen wir eine Liste mit Schritten durch, wie Sie Ihre erste sehr einfache Hello World Spring Boot-Anwendung mit nur wenigen Klicks erstellen können.
Vor einiger Zeit habe ich einen Artikel darüber geschrieben, wie Sie Ihre erste Spring Boot-Anwendung in Eclipse erstellen. Bitte werfen Sie einen Blick darauf, wenn Sie es in Eclipse IDE erstellen möchten.
Die Nutzung von Spring-Boot-Anwendungen hat in den letzten Jahren stark zugenommen, da es sehr einfach ist, Ihre Anwendung ohne Apache Tomcat und andere Anwendungsserver auszuführen.
Im nächsten Tutorial erstellen wir eine einfache Spring Boot-Webanwendung, die auf Port 8081 lauscht.
Lass uns anfangen.
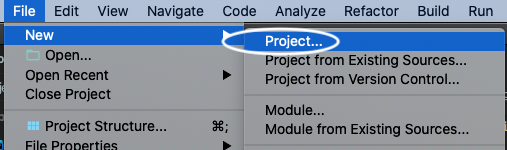
Schritt 1.
- Öffnen Sie IntelliJ IDEA
- Klicken Sie auf Datei
- Klicken Sie auf Neu
- Klicken Sie auf Projekt
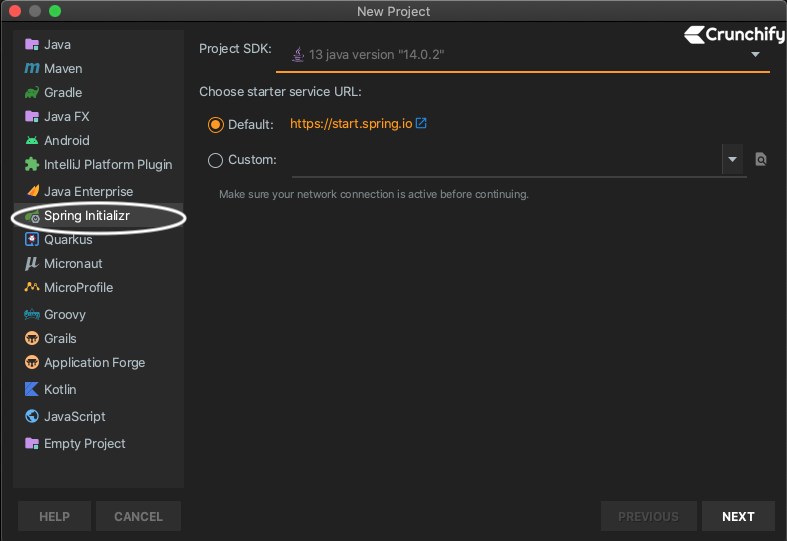
Schritt 2.
- IntelliJ IDEA – Erstellen Sie eine Spring Boot-Anwendung mit
Spring Initializr - Weiter klicken
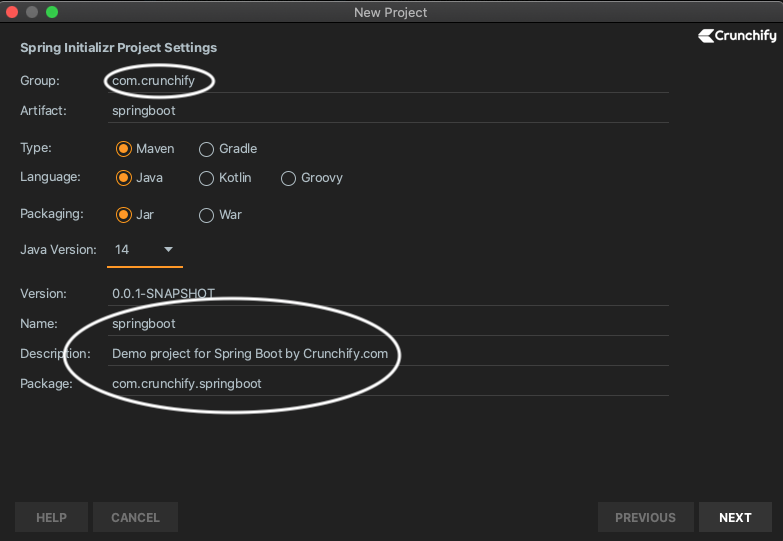
Schritt 3.
- Geben Sie die Projektdetails wie unten angegeben an
- Gruppe:
com.crunchify - Artefakt: Springboot
- Paket:
com.crunchify.springboot - Java-Version: 13 oder 14 (Ihre installierte JDK-Binärdatei)
- Weiter klicken
Schritt 4.
- Wählen Sie alle Abhängigkeiten für Ihre Spring Boot-Anwendung aus
- Ich habe keine Abhängigkeiten für dieses Projekt ausgewählt
- Weiter klicken

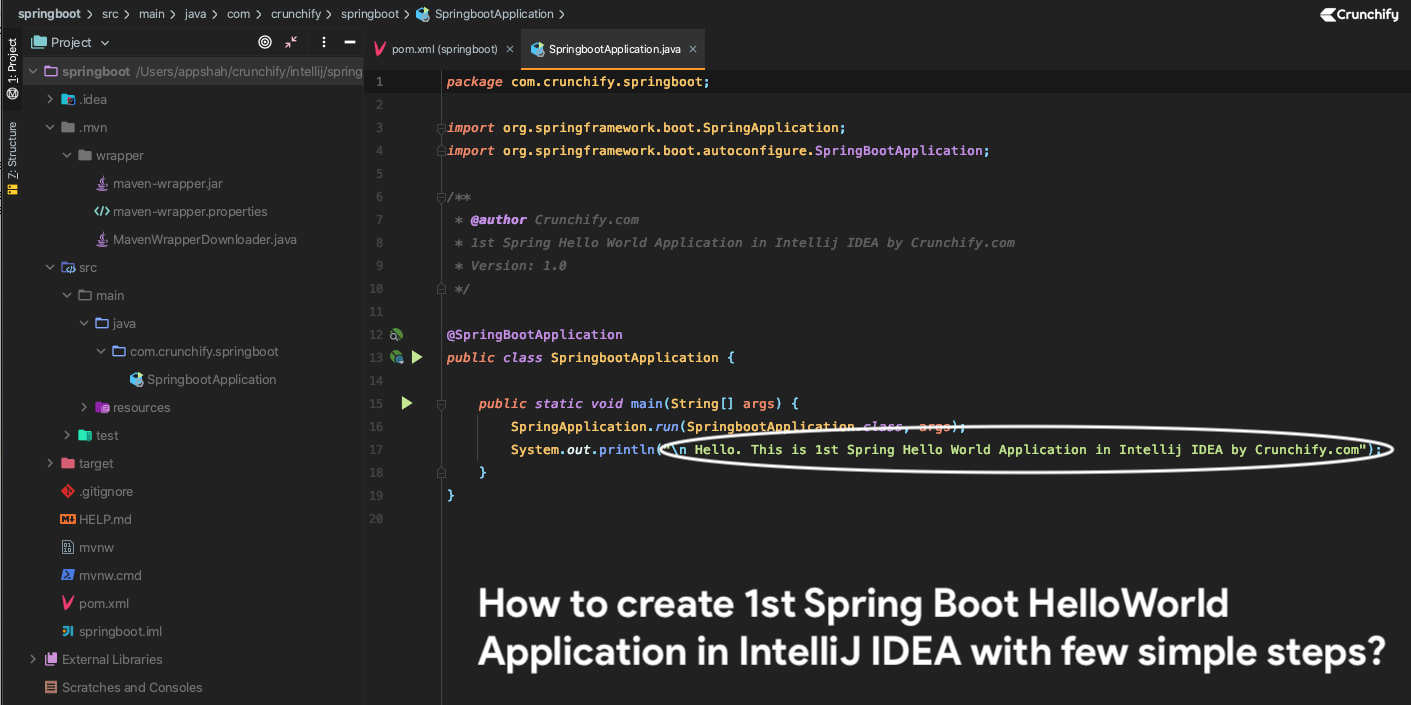
Schritt-5.
- Dadurch wird eine neue Spring Boot-Anwendung in Ihrer IntelliJ IDEA erstellt.
- Datei öffnen: SrpingBootApplication.java
- Ändern Sie es, um einige Infomeldungen zu drucken
Kopieren Sie den folgenden Inhalt und fügen Sie ihn ein.
|
1 2 3 4 5 6 7 8 9 10 11 12 13 14 15 16 17 18 19 |
package com . crunchify . springboot ; import org . springframework . boot . SpringApplication ; import org . springframework . boot . autoconfigure . SpringBootApplication ; /** * @author Crunchify.com * 1st Spring Hello World Application in Intellij IDEA by Crunchify.com * Version: 1.0 */ @ SpringBootApplication public class SpringbootApplication { public static void main ( String [ ] args ) { SpringApplication . run ( SpringbootApplication . class , args ) ; System . out . println ( "\n Hello. This is 1st Spring Hello World Application in Intellij IDEA by Crunchify.com" ) ; } } |
Schritt-6. Erstellen Sie ein Projekt
- Klicken Sie im linken Bereich mit der rechten Maustaste auf das Projekt springboot
- Klicken Sie auf das Build-Modul „Springboot“.
Sie sollten eine erfolgreiche Build-Meldung wie unten sehen.
|
1 2 3 4 5 6 7 8 9 10 11 12 13 14 15 16 17 18 19 20 21 22 23 24 25 26 |
Clearing build system data . . . Executing pre - compile tasks . . . Loading Ant Configuration . . . Running Ant Tasks . . . Cleaning output directories . . . Running 'before' tasks Checking sources Copying resources . . . [ springboot ] Parsing java . . . [ springboot ] Writing classes . . . [ springboot ] Updating dependency information . . . [ springboot ] Adding @ NotNull assertions . . . [ springboot ] Adding pattern assertions . . . [ springboot ] Parsing java . . . [ tests of springboot ] Writing classes . . . [ tests of springboot ] Updating dependency information . . . [ tests of springboot ] Adding @ NotNull assertions . . . [ tests of springboot ] Adding pattern assertions . . . [ tests of springboot ] Running 'after' tasks javac 14.0.2 was used to compile java sources Finished , saving caches . . . Executing post - compile tasks . . . Loading Ant Configuration . . . Running Ant Tasks . . . Synchronizing output directories . . . 8 / 17 / 20 , 12 : 11 PM - Build completed successfully in 2 s 236 ms |
Schritt-7. Führen Sie ein Java-Programm aus
- Klicken Sie mit der rechten Maustaste auf die Java-Datei SpringbootApplication und führen Sie sie aus
- Sie sollten ein erfolgreiches Ergebnis sehen
|
1 2 3 4 5 6 7 8 9 10 11 12 13 14 15 16 17 18 19 20 21 22 23 24 25 26 |
/ Library / Java / JavaVirtualMachines / jdk - 14.0.2.jdk / Contents / Home / bin / java - XX : TieredStopAtLevel = 1 - noverify - Dspring . output . ansi . enabled = always - Dcom . sun . management . jmxremote - Dspring . jmx . enabled = true - Dspring . liveBeansView . mbeanDomain - Dspring . application . admin . enabled = true - javaagent : / Applications / IntelliJ IDEA . app / Contents / lib / idea_rt . jar = 53480 : / Applications / IntelliJ IDEA . app / Contents / bin - Dfile . encoding = UTF - 8 - classpath / Users / appshah / crunchify / intellij / springboot / target / classes : / Users / appshah / . m2 / repository / org / springframework / boot / spring - boot - starter / 2.3.3.RELEASE / spring - boot - starter - 2.3.3.RELEASE.jar : / Users / appshah / . m2 / repository / org / springframework / boot / spring - boot / 2.3.3.RELEASE / spring - boot - 2.3.3.RELEASE.jar : / Users / appshah / . m2 / repository / org / springframework / spring - context / 5.2.8.RELEASE / spring - context - 5.2.8.RELEASE.jar : / Users / appshah / . m2 / repository / org / springframework / spring - aop / 5.2.8.RELEASE / spring - aop - 5.2.8.RELEASE.jar : / Users / appshah / . m2 / repository / org / springframework / spring - beans / 5.2.8.RELEASE / spring - beans - 5.2.8.RELEASE.jar : / Users / appshah / . m2 / repository / org / springframework / spring - expression / 5.2.8.RELEASE / spring - expression - 5.2.8.RELEASE.jar : / Users / appshah / . m2 / repository / org / springframework / boot / spring - boot - autoconfigure / 2.3.3.RELEASE / spring - boot - autoconfigure - 2.3.3.RELEASE.jar : / Users / appshah / . m2 / repository / org / springframework / boot / spring - boot - starter - logging / 2.3.3.RELEASE / spring - boot - starter - logging - 2.3.3.RELEASE.jar : / Users / appshah / . m2 / repository / ch / qos / logback / logback - classic / 1.2.3 / logback - classic - 1.2.3.jar : / Users / appshah / . m2 / repository / ch / qos / logback / logback - core / 1.2.3 / logback - core - 1.2.3.jar : / Users / appshah / . m2 / repository / org / apache / logging / log4j / log4j - to - slf4j / 2.13.3 / log4j - to - slf4j - 2.13.3.jar : / Users / appshah / . m2 / repository / org / apache / logging / log4j / log4j - api / 2.13.3 / log4j - api - 2.13.3.jar : / Users / appshah / . m2 / repository / org / slf4j / jul - to - slf4j / 1.7.30 / jul - to - slf4j - 1.7.30.jar : / Users / appshah / . m2 / repository / jakarta / annotation / jakarta . annotation - api / 1.3.5 / jakarta . annotation - api - 1.3.5.jar : / Users / appshah / . m2 / repository / org / springframework / spring - core / 5.2.8.RELEASE / spring - core - 5.2.8.RELEASE.jar : / Users / appshah / . m2 / repository / org / springframework / spring - jcl / 5.2.8.RELEASE / spring - jcl - 5.2.8.RELEASE.jar : / Users / appshah / . m2 / repository / org / yaml / snakeyaml / 1.26 / snakeyaml - 1.26.jar : / Users / appshah / . m2 / repository / org / slf4j / slf4j - api / 1.7.30 / slf4j - api - 1.7.30.jar com . crunchify . springboot . SpringbootApplication Java HotSpot ( TM ) 64 - Bit Server VM warning : Options - Xverify : none and - noverify were deprecated in JDK 13 and will likely be removed in a future release . . ____ _ __ _ _ / \ \ / ___ '_ __ _ _(_)_ __ __ _ \ \ \ \ ( ( )\___ | ' _ | '_| | ' _ \ / _ ` | \ \ \ \ \ \ / ___ ) | | _ ) | | | | | | | ( _ | | ) ) ) ) ' | ____ | . __ | _ | | _ | _ | | _ \ __ , | / / / / ========= | _ | ============== | ___ /=/ _ / _ / _ / : : Spring Boot : : ( v2 . 3.3.RELEASE ) 2020 - 08 - 17 12 : 12 : 29.554 INFO 70969 --- [ main ] c . c . springboot . SpringbootApplication : Starting SpringbootApplication on LM - AUN - 11022307 with PID 70969 ( / Users / appshah / crunchify / intellij / springboot / target / classes started by appshah in / Users / appshah / crunchify / intellij / springboot ) 2020 - 08 - 17 12 : 12 : 29.556 INFO 70969 --- [ main ] c . c . springboot . SpringbootApplication : No active profile set , falling back to default profiles : default 2020 - 08 - 17 12 : 12 : 29.772 INFO 70969 --- [ main ] c . c . springboot . SpringbootApplication : Started SpringbootApplication in 0.385 seconds ( JVM running for 0.728 ) Hello . This is 1st Spring Hello World Application in Intellij IDEA by Crunchify . com Process finished with exit code 0 |
Glückwunsch. Sie haben die Spring Boot-Anwendung erfolgreich erstellt.

Was als nächstes?
- Erstellen Sie den einfachsten Web Rest Service, der auf Port 8081 lauscht.
- Erstellen Sie Spring Boot in der Eclipse-IDE.